
Metal roofing installation transforms your home's protection and value. With proper materials and techniques, a metal roof can last 40 to 70 years while providing superior weather resistance and energy efficiency. Whether you're considering a DIY project or hiring professionals, understanding the metal roofing installation process helps you make informed decisions and ensure quality results.
This guide covers everything from planning and permits to step-by-step installation techniques, costs, and common mistakes to avoid.
What You Need to Know Before Installing Metal Roofing
Is Metal Roofing Installation a DIY Project?
Metal roofing installation is possible for experienced DIYers, but it requires specific skills and conditions. Simple gable roofs with minimal penetrations are the best candidates for DIY installation. Complex roofs with multiple valleys, dormers, or steep pitches should be handled by professional roofers.
Key skill requirements for DIY metal roofing installation include:
Comfort working at heights with proper safety equipment
Ability to use power tools and metal-cutting equipment
Understanding of square and plumb measurements
Physical capability to lift and position large panels (some weigh 50+ pounds)
Knowledge of local building codes and roofing principles
Most homeowners hire professional installers to ensure proper technique, maintain manufacturer warranties, and avoid costly mistakes.
Required Permits and Building Codes
Metal roofing installation typically requires a building permit in most jurisdictions. Permit costs range from $50 to $200 depending on your location. The permit process involves submitting plans, passing inspections, and ensuring compliance with the International Residential Code (IRC).
Key code requirements for metal roofing include:
Minimum roof pitch of 3:12 for most metal roofing types
Proper underlayment installation per manufacturer specifications
Adequate roof ventilation to prevent moisture accumulation
Approved fasteners and fastening patterns
Wind uplift resistance ratings for your climate zone
Contact your local building department before starting installation. Schedule a professional roof inspection to assess structural readiness and identify any repairs needed before metal roofing installation. Some regions have additional requirements for snow load capacity, seismic considerations, or historic district restrictions.
Best Time of Year for Installation
The optimal time for metal roofing installation is late spring through early fall when temperatures are moderate and weather is predictable. Metal panels can be installed in temperatures from 40°F to 90°F, but extreme heat makes panels expand and extreme cold makes them contract.
Seasonal considerations:
Spring (April-May): Ideal conditions, high contractor availability
Summer (June-August): Peak season, but watch for afternoon thunderstorms
Fall (September-October): Excellent weather, prepare before winter
Winter (November-March): Possible but challenging due to cold, ice, and shorter days
Metal roofing installation should be avoided during rain, snow, or high winds. Wet underlayment can cause issues, and wind can make panel handling dangerous.
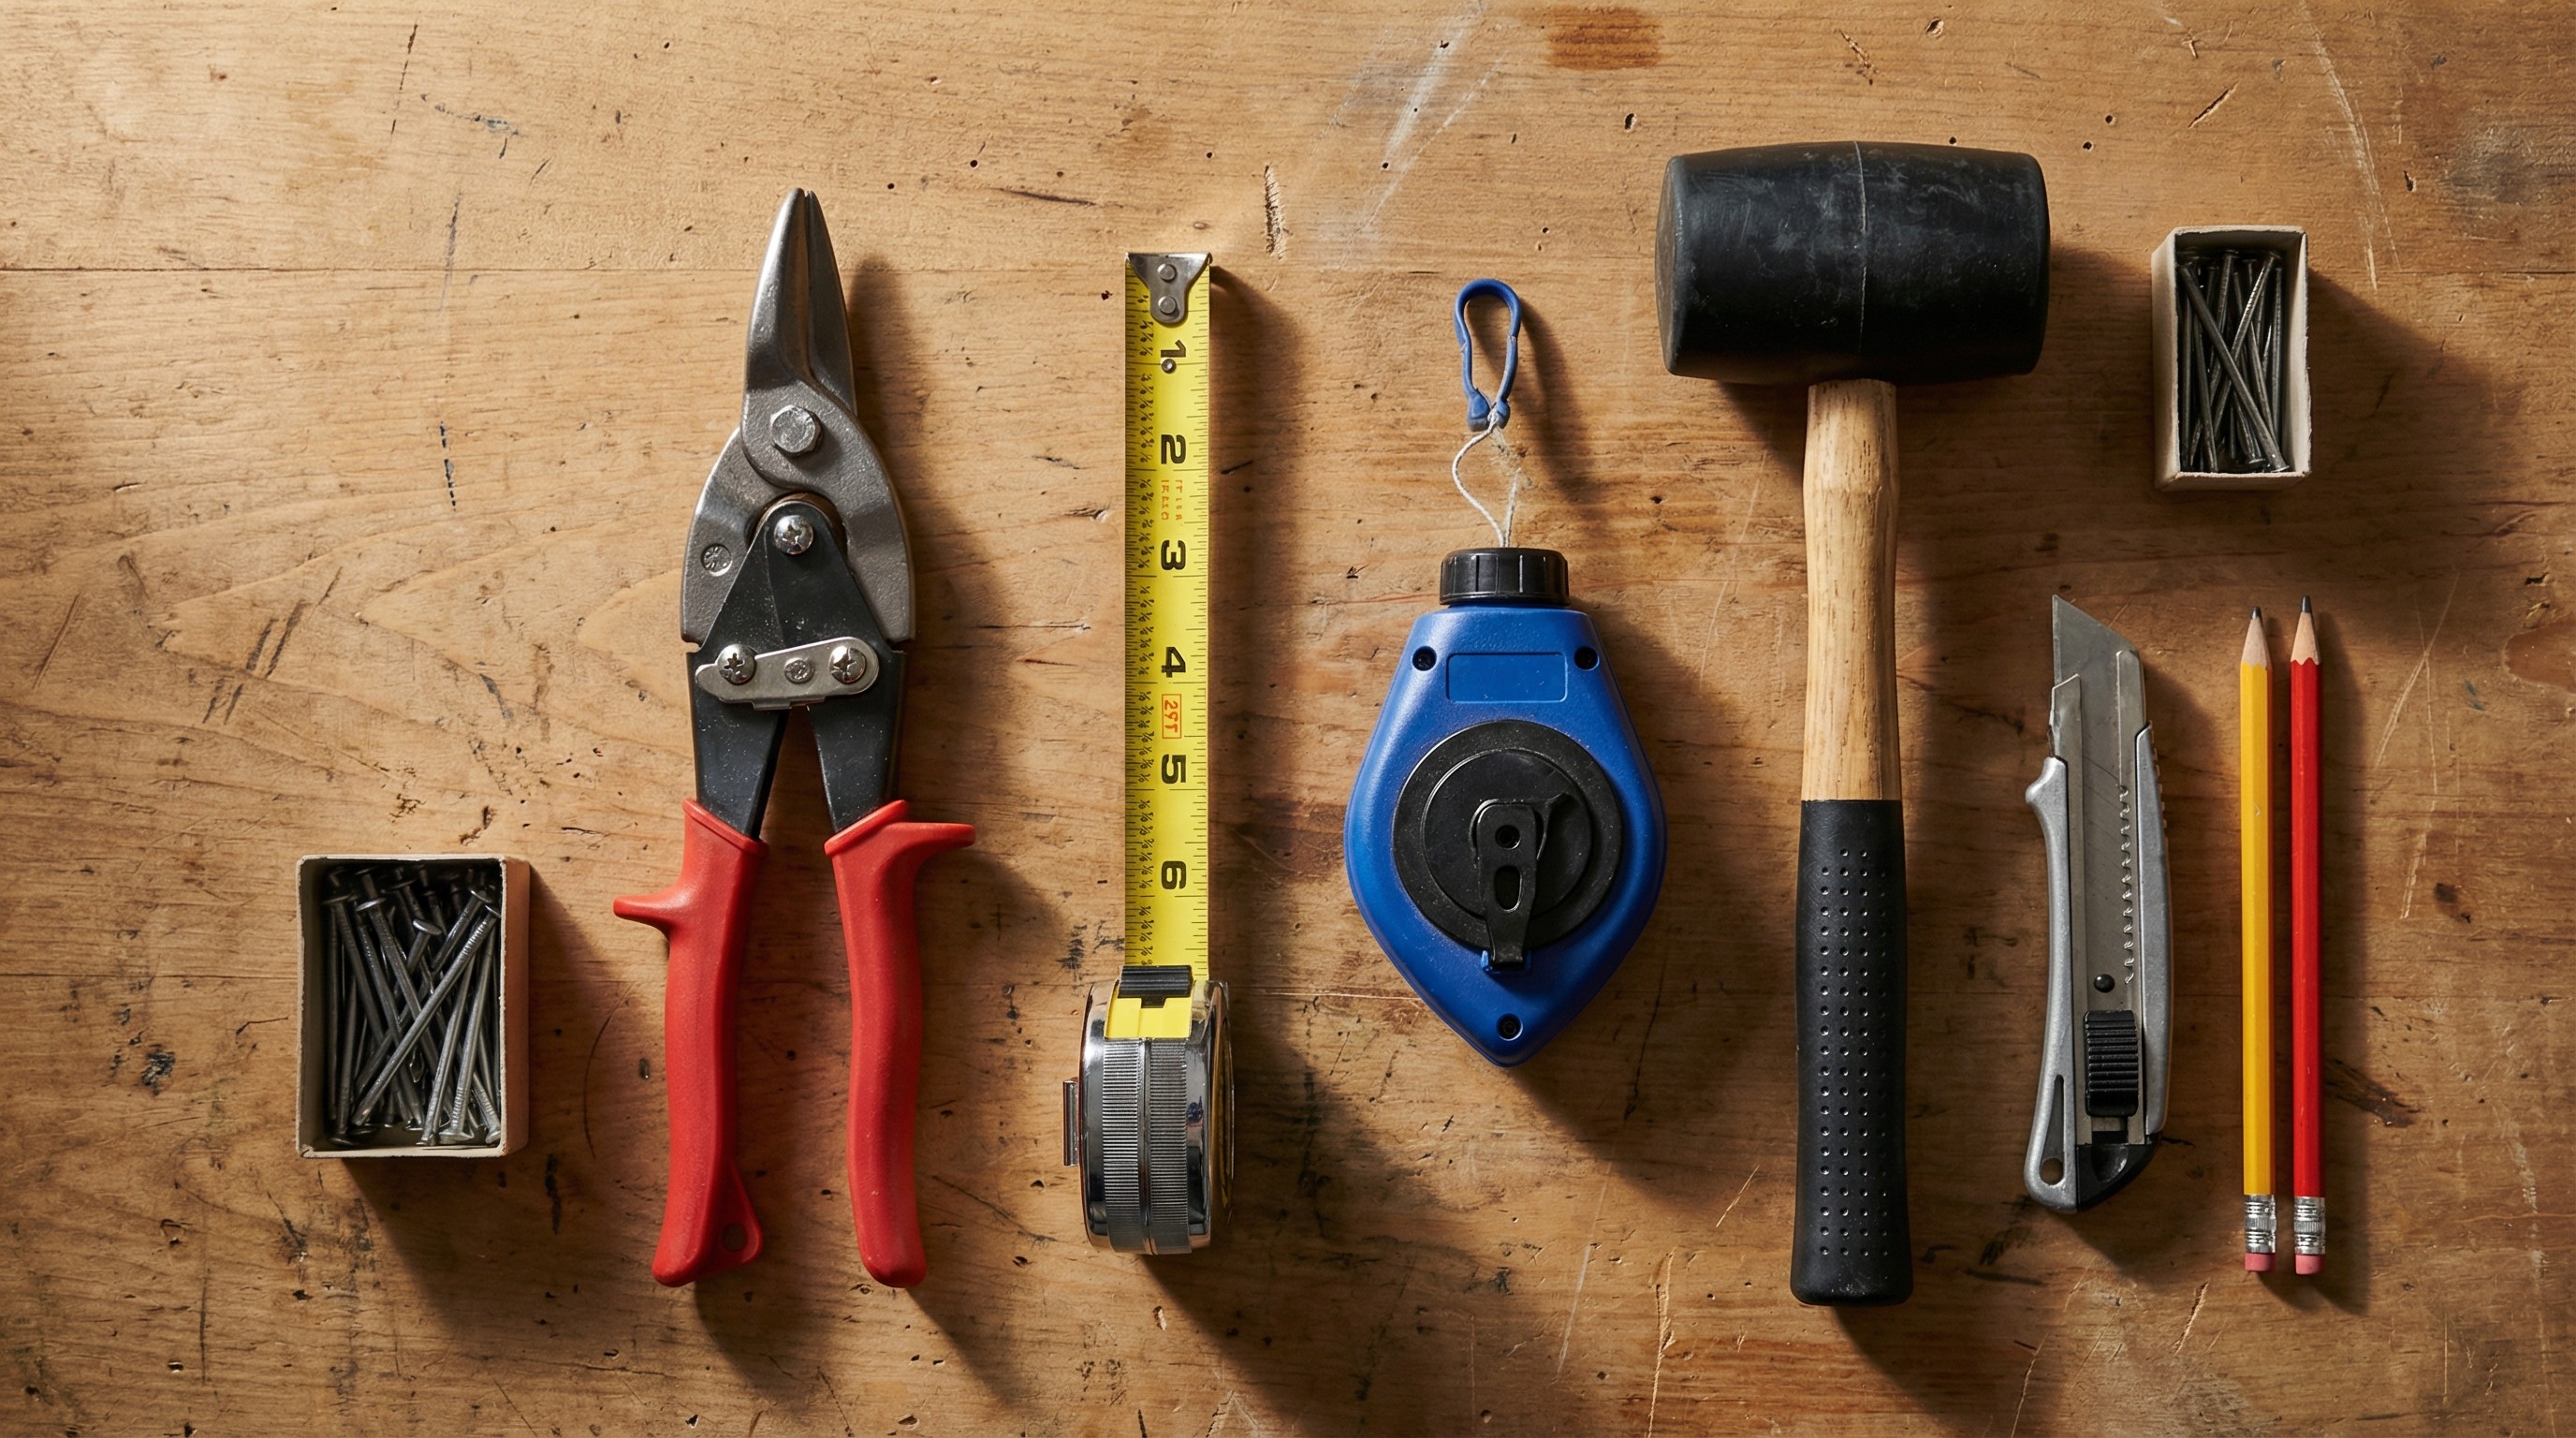
Metal Roofing Installation Tools and Materials
Essential Tools List
Proper tools make metal roofing installation safer and more precise. Here's what you need:
Cutting Tools:
Metal shears (aviation snips for trim cuts)
Circular saw with metal-cutting blade
Angle grinder for complex cuts
Nibbler for tight areas
Fastening Tools:
Cordless drill with adjustable torque
Screw gun with depth control
Hex-head driver bits for metal roofing screws
Measuring and Layout:
25-foot tape measure
Chalk line and chalk
Speed square and framing square
Level (4-foot minimum)
General Tools:
Utility knife for underlayment
Caulking gun for sealant
Extension ladder and roof jacks
Magnet or magnetic sweep for cleanup
Tool rental costs $200 to $500 for a weekend. Purchasing quality tools runs $800 to $1,200. Professional installers already own specialized equipment, which is one reason their labor costs reflect tool investment.
Safety Equipment Requirements
Metal roofing installation safety equipment is non-negotiable:
Fall protection harness and anchor points
Non-slip roofing boots with good ankle support
Safety glasses (metal debris protection)
Work gloves (cut-resistant for sharp edges)
Hard hat if working below other workers
OSHA requires fall protection for work above 6 feet. Most residential roofs exceed this height, making safety equipment legally mandatory for professional installers and strongly recommended for DIYers.
Materials Checklist by Roof Type
Materials vary based on metal roofing type:
Standing Seam Metal Roofing:
Standing seam panels (custom length)
Clips and cleats for hidden fastening
Ridge cap and trim pieces
Synthetic underlayment
Ice and water shield (eaves and valleys)
Closure strips (foam or metal)
Sealant tape and caulk
Corrugated Metal Roofing:
Corrugated metal panels (standard lengths)
Exposed fastening screws with rubber washers
Ridge cap and trim pieces
Underlayment (felt or synthetic)
Closure strips
Touch-up paint for screw heads
Material costs range from $4 to $30 per square foot depending on metal type. Steel and aluminum are most common for DIY projects due to manageable weight and cost.
Step-by-Step Metal Roofing Installation Process
Step 1: Roof Deck Preparation and Inspection
Begin metal roofing installation by inspecting the roof deck for damage. Walk the roof and check for soft spots, rot, or sagging. Replace any damaged sheathing before proceeding. Metal roofing requires a solid substrate. typically 1/2-inch plywood or OSB sheathing.
If installing over existing shingles, verify local codes allow this method. Some jurisdictions require complete tear-off. Installing over one layer of shingles is generally acceptable, but multiple layers must be removed to avoid excessive weight.
Clean the deck surface of debris, nails, and protruding fasteners. Sweep thoroughly. any debris left behind can puncture underlayment or prevent proper panel seating.
Step 2: Installing Underlayment (Ice and Water Shield)
Underlayment protects against water infiltration if wind drives moisture under metal panels. Start at the eave and roll synthetic underlayment horizontally across the roof. Overlap each row by 6 inches, with the upper layer covering the lower layer.
Apply ice and water shield (self-adhering waterproof membrane) at the eaves (extending 24 inches past the exterior wall) and in valleys. This provides extra protection in vulnerable leak zones.
Secure underlayment with staples or cap nails every 12 inches. Ensure it's smooth and wrinkle-free. any bumps will be visible under metal panels. In high-wind areas, use additional fasteners to prevent uplift during installation.
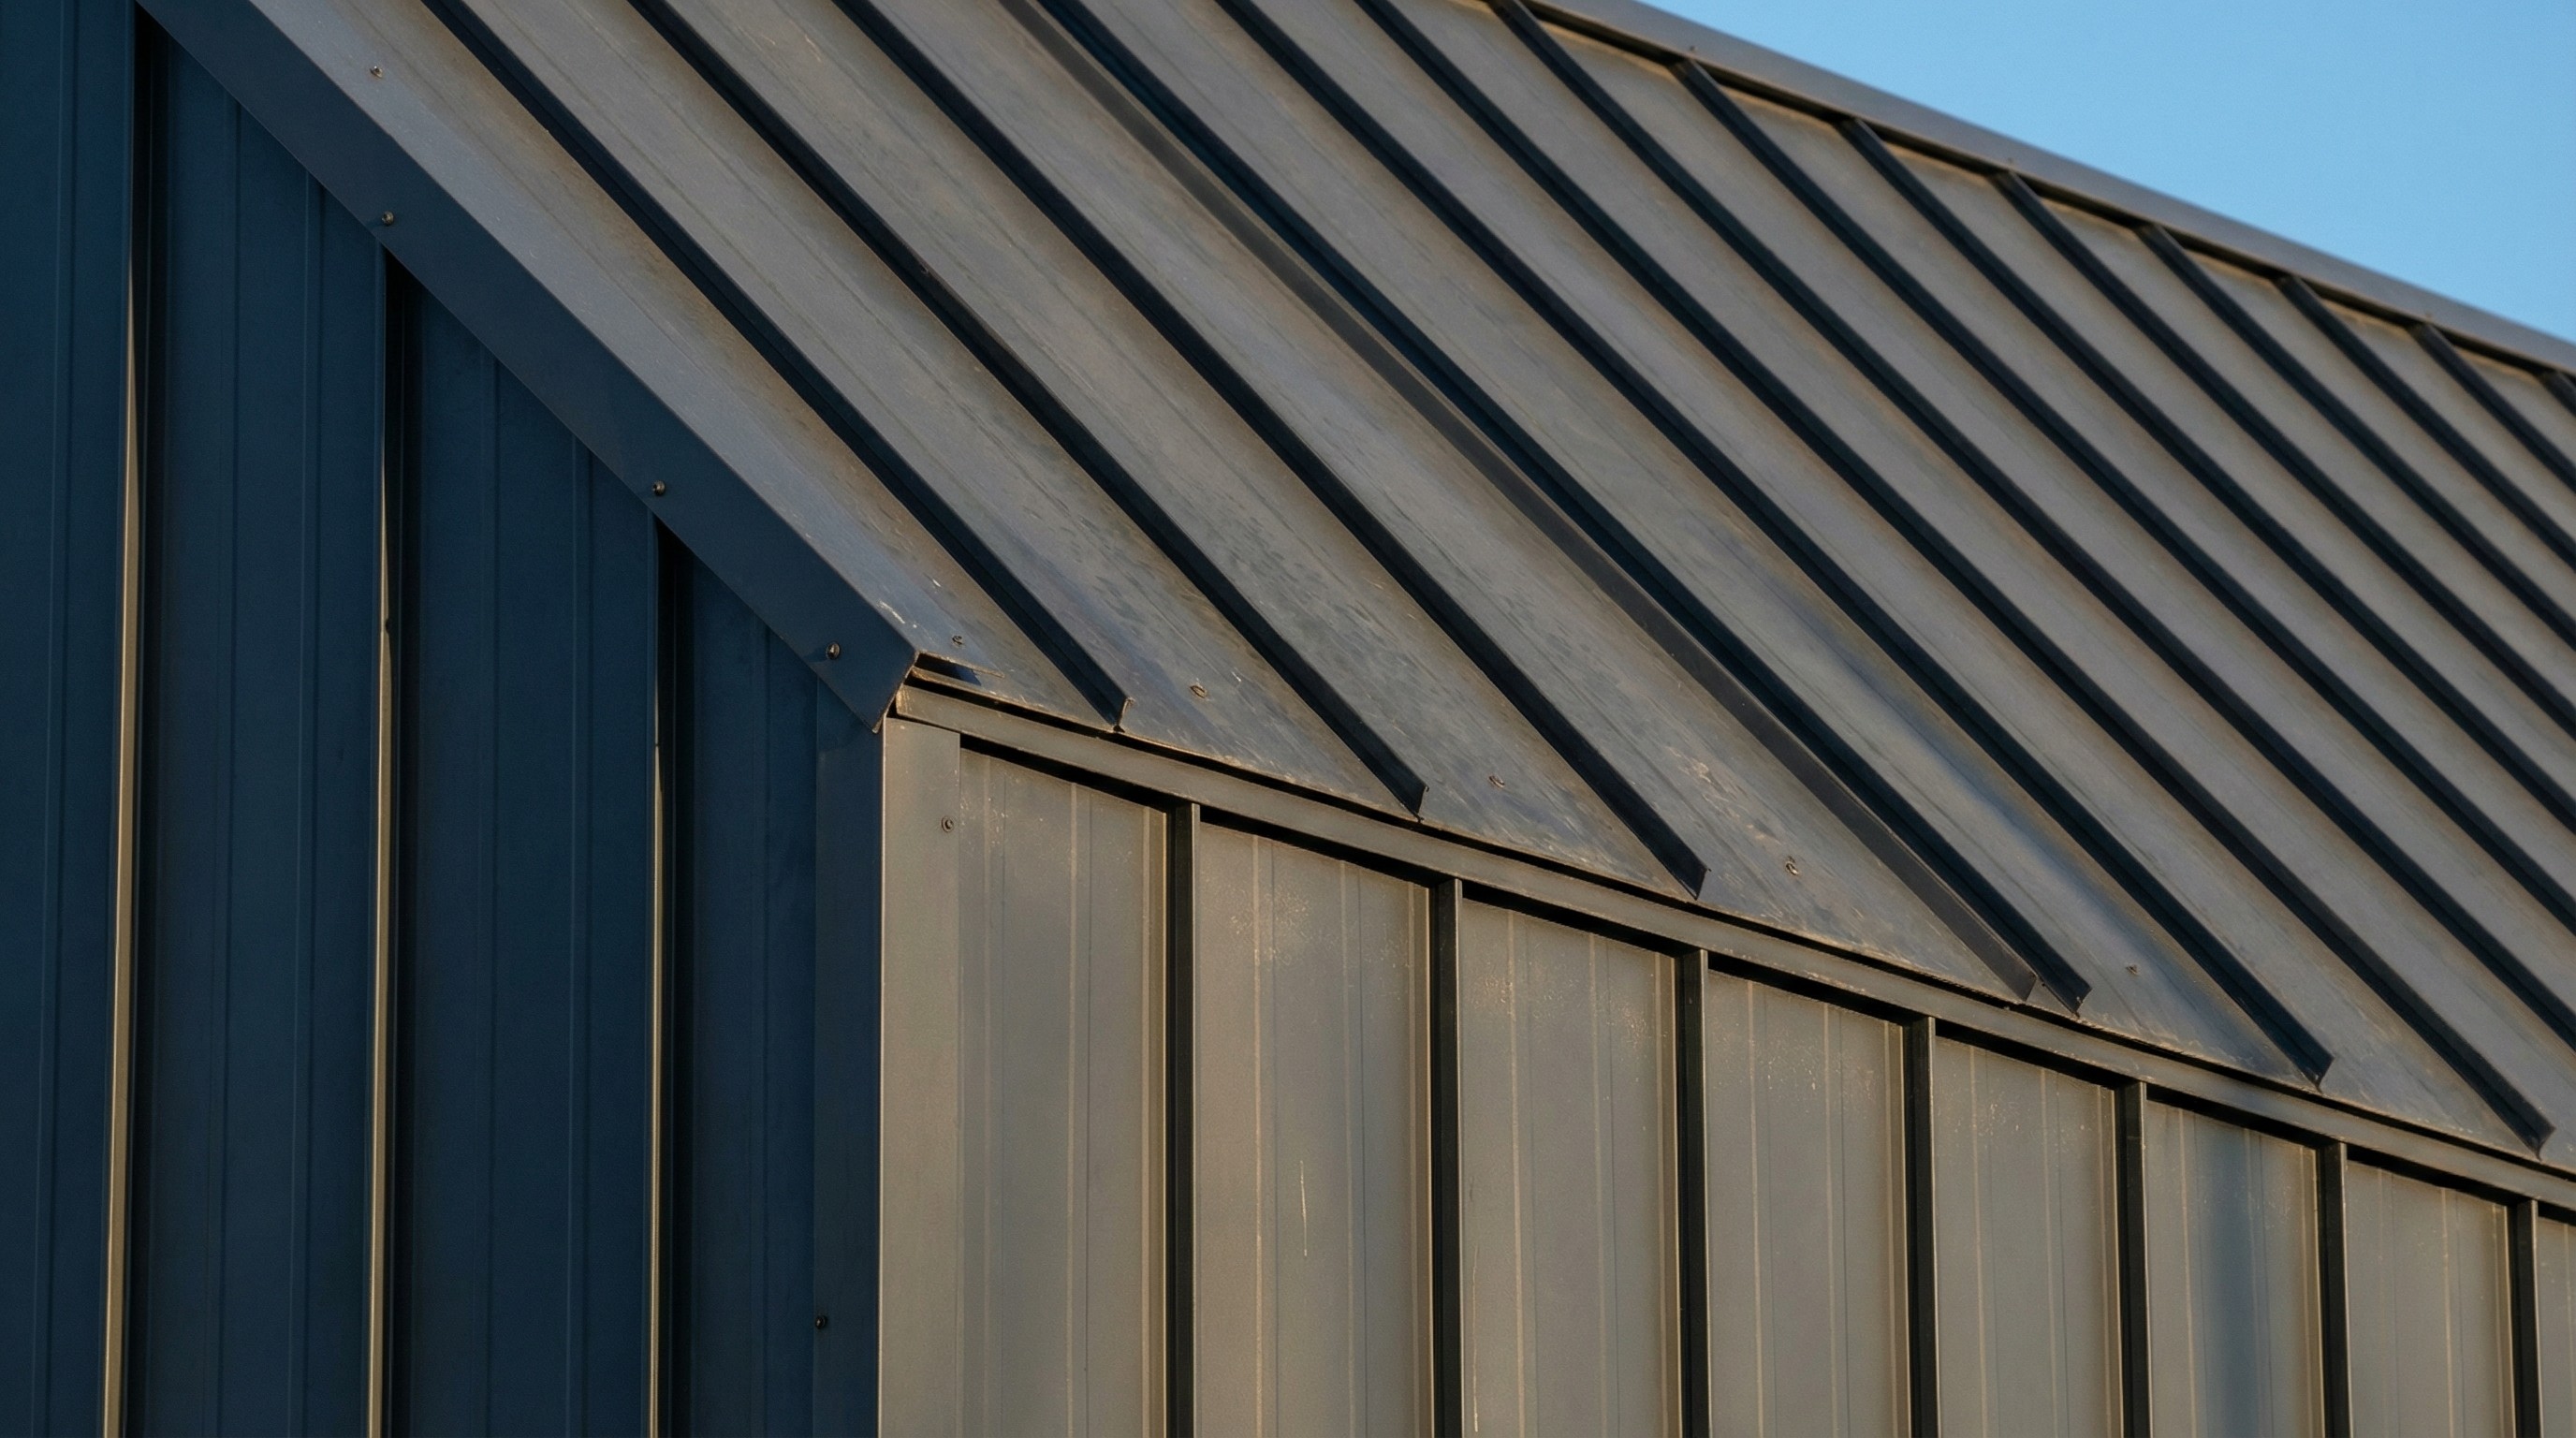
Step 3: Installing Eave and Rake Trim
Eave trim (drip edge) channels water away from fascia boards and directs it into gutters. Measure the eave length and cut trim pieces to fit, allowing 1/2-inch overlap where pieces meet.
Fasten trim with screws placed 12 to 16 inches on center. Use 1-inch pancake-head screws with rubber washers. Pre-drill holes if working with thick-gauge metal to prevent splitting.
Rake trim covers the gable edges and prevents wind-driven rain from entering under panels. Install rake trim using the same fastening pattern as eave trim. Where trim pieces meet, overlap by 2 inches and seal with caulk.
Step 4: Creating Square Reference Lines
Metal panels must be installed square to the ridge and eave, or they'll run off-line and create gaps. Use the 3-4-5 method to establish square:
Measure 3 feet along the eave from one gable
Measure 4 feet up the roof perpendicular to the eave
The diagonal between these points should be exactly 5 feet
Adjust until measurements are perfect
Snap a chalk line from eave to ridge following your square line. This becomes your reference for the first panel. Double-check before proceeding. errors compound as you move across the roof.
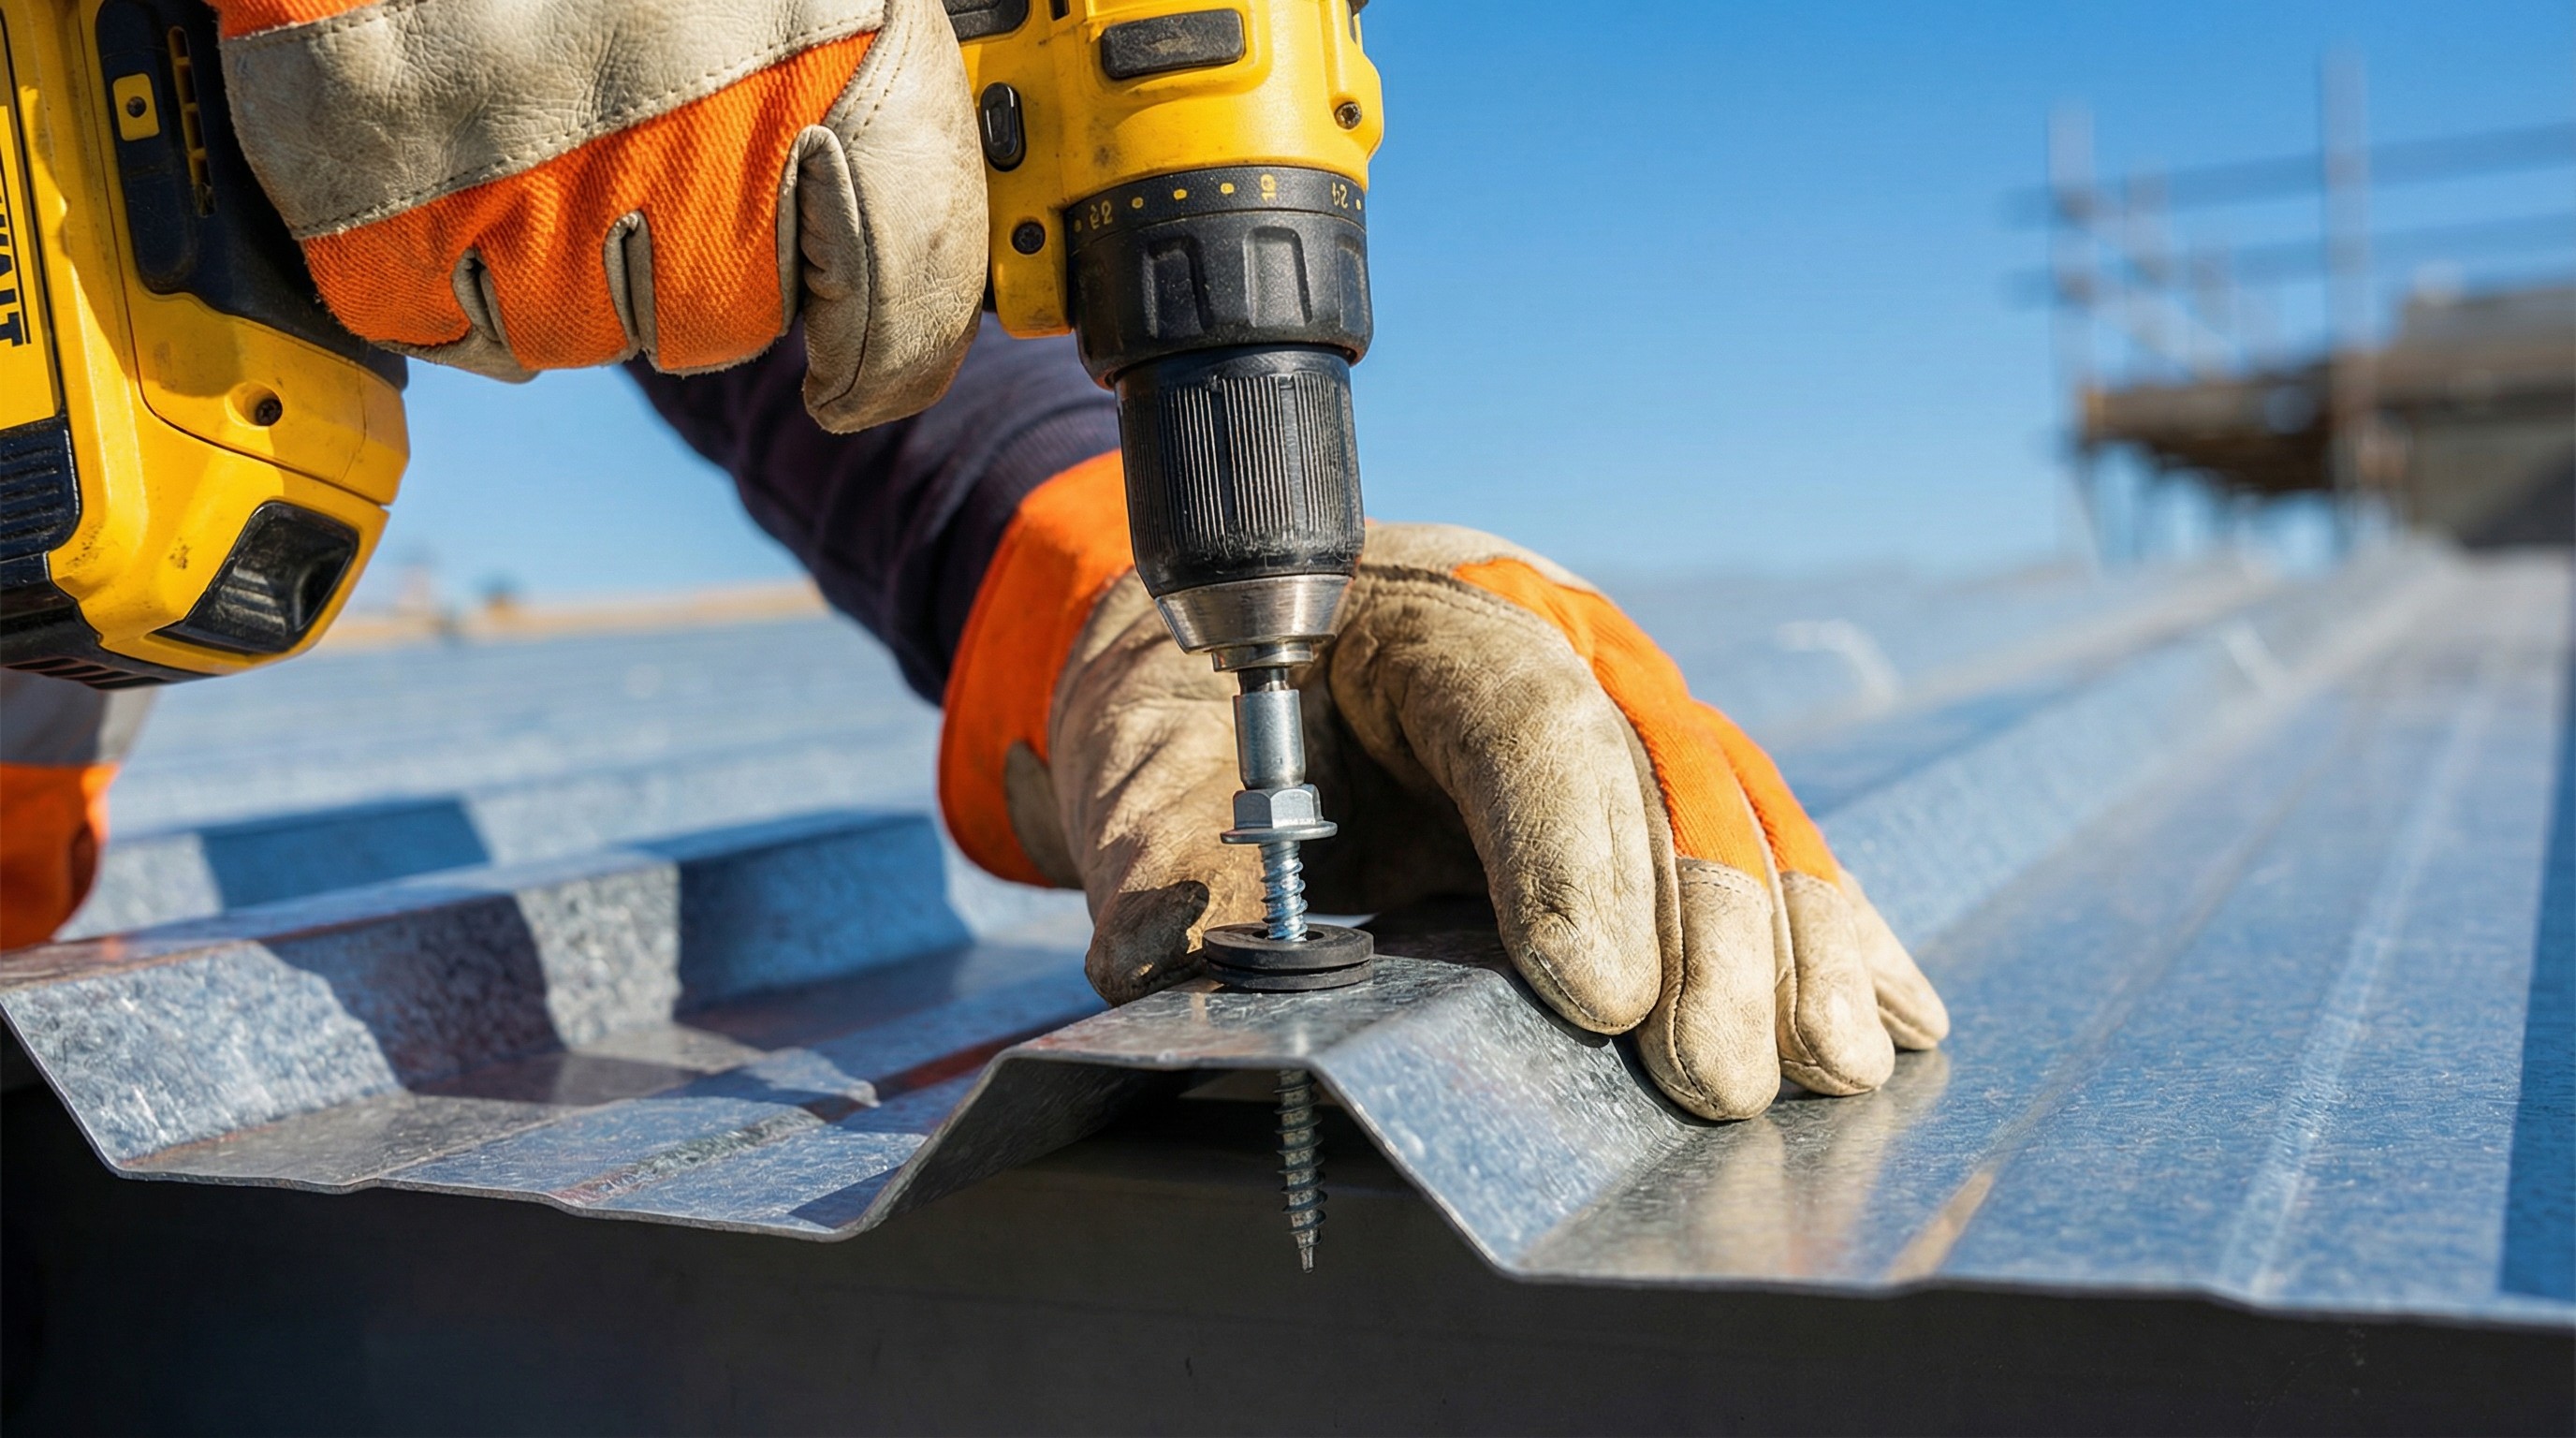
Step 5: Installing the First Metal Panel
The first panel sets the foundation for the entire installation. Align it with your chalk line and allow 1 to 2 inches of overhang past the eave trim (manufacturer specifications vary).
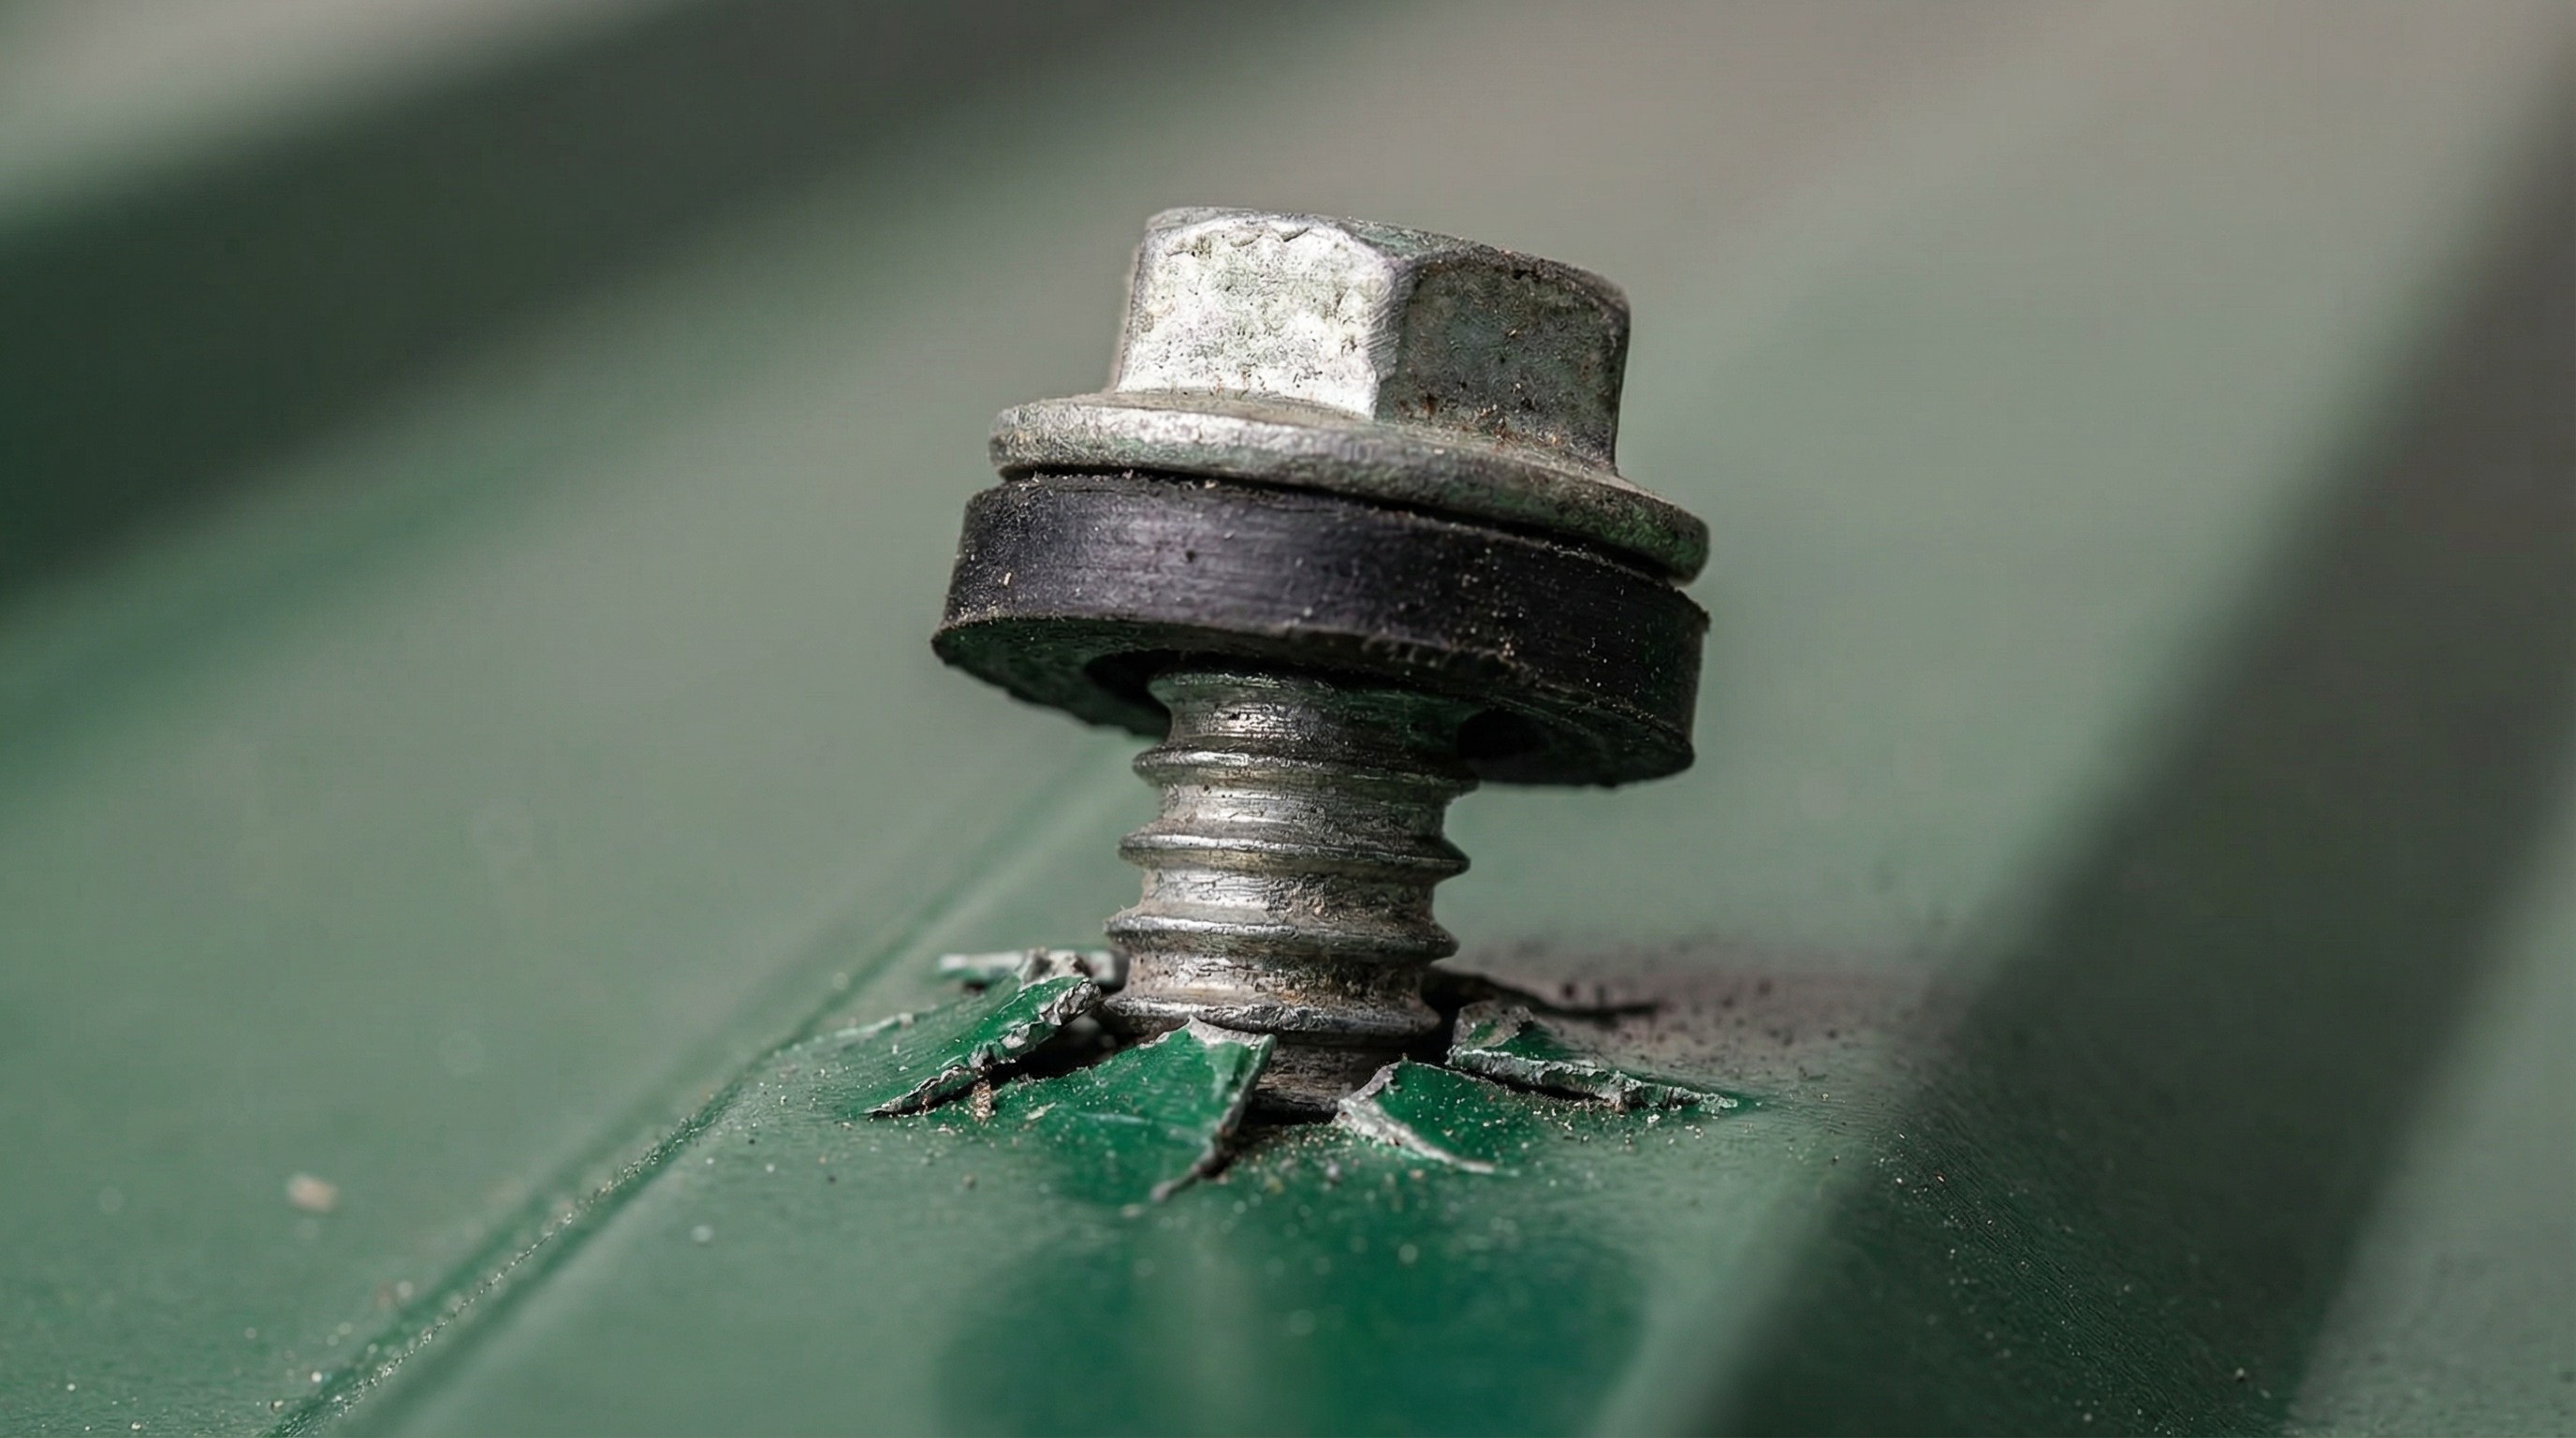
Position the panel carefully and secure it with screws placed in the flat areas between ribs. never in the ribs themselves, where water runs. For corrugated roofing, drive screws through panel peaks into solid sheathing.
Use screws with neoprene washers that seal around the fastener. Tighten until the washer compresses slightly but don't over-tighten. crushed washers cause leaks. Proper torque is "snug plus a quarter turn."
Step 6: Panel Overlap and Fastening Technique
Each subsequent panel overlaps the previous panel by one or two ribs (depending on panel style). Standing seam panels connect with hidden clips, while corrugated panels overlap visibly.
For corrugated metal roofing installation:
Overlap panels by 6 to 12 inches (follow manufacturer specs)
Fasten through overlapped sections for weathertight seal
Maintain consistent fastener spacing (12-16 inches on center)
Follow the manufacturer's fastening pattern diagram
For standing seam metal roof installation:
Snap panels into concealed clips
Do not penetrate the panel surface with fasteners
Use manufacturer-specific clip and seaming tools
Check for proper panel engagement before moving to next row
Work upward toward the ridge, maintaining your chalk line reference. Check square every 3-4 panels to catch drift before it becomes a major problem.
Step 7: Ridge Cap and Ventilation Installation
Ridge cap seals the peak of the roof while allowing ventilation. Install ridge vent material first (if using vented ridge cap system), then cover with metal ridge cap trim.
Fasten ridge cap through the panel ribs into solid sheathing. Overlap cap pieces by 2 to 4 inches, always working away from prevailing winds so wind doesn't drive water under laps.
Apply butyl sealant tape under ridge cap overlaps for additional weather protection. Some ridge caps use concealed fasteners with clips similar to panel systems.
Proper ridge ventilation prevents heat and moisture buildup in the attic, extending roof lifespan and improving energy efficiency.
Step 8: Flashing Around Penetrations
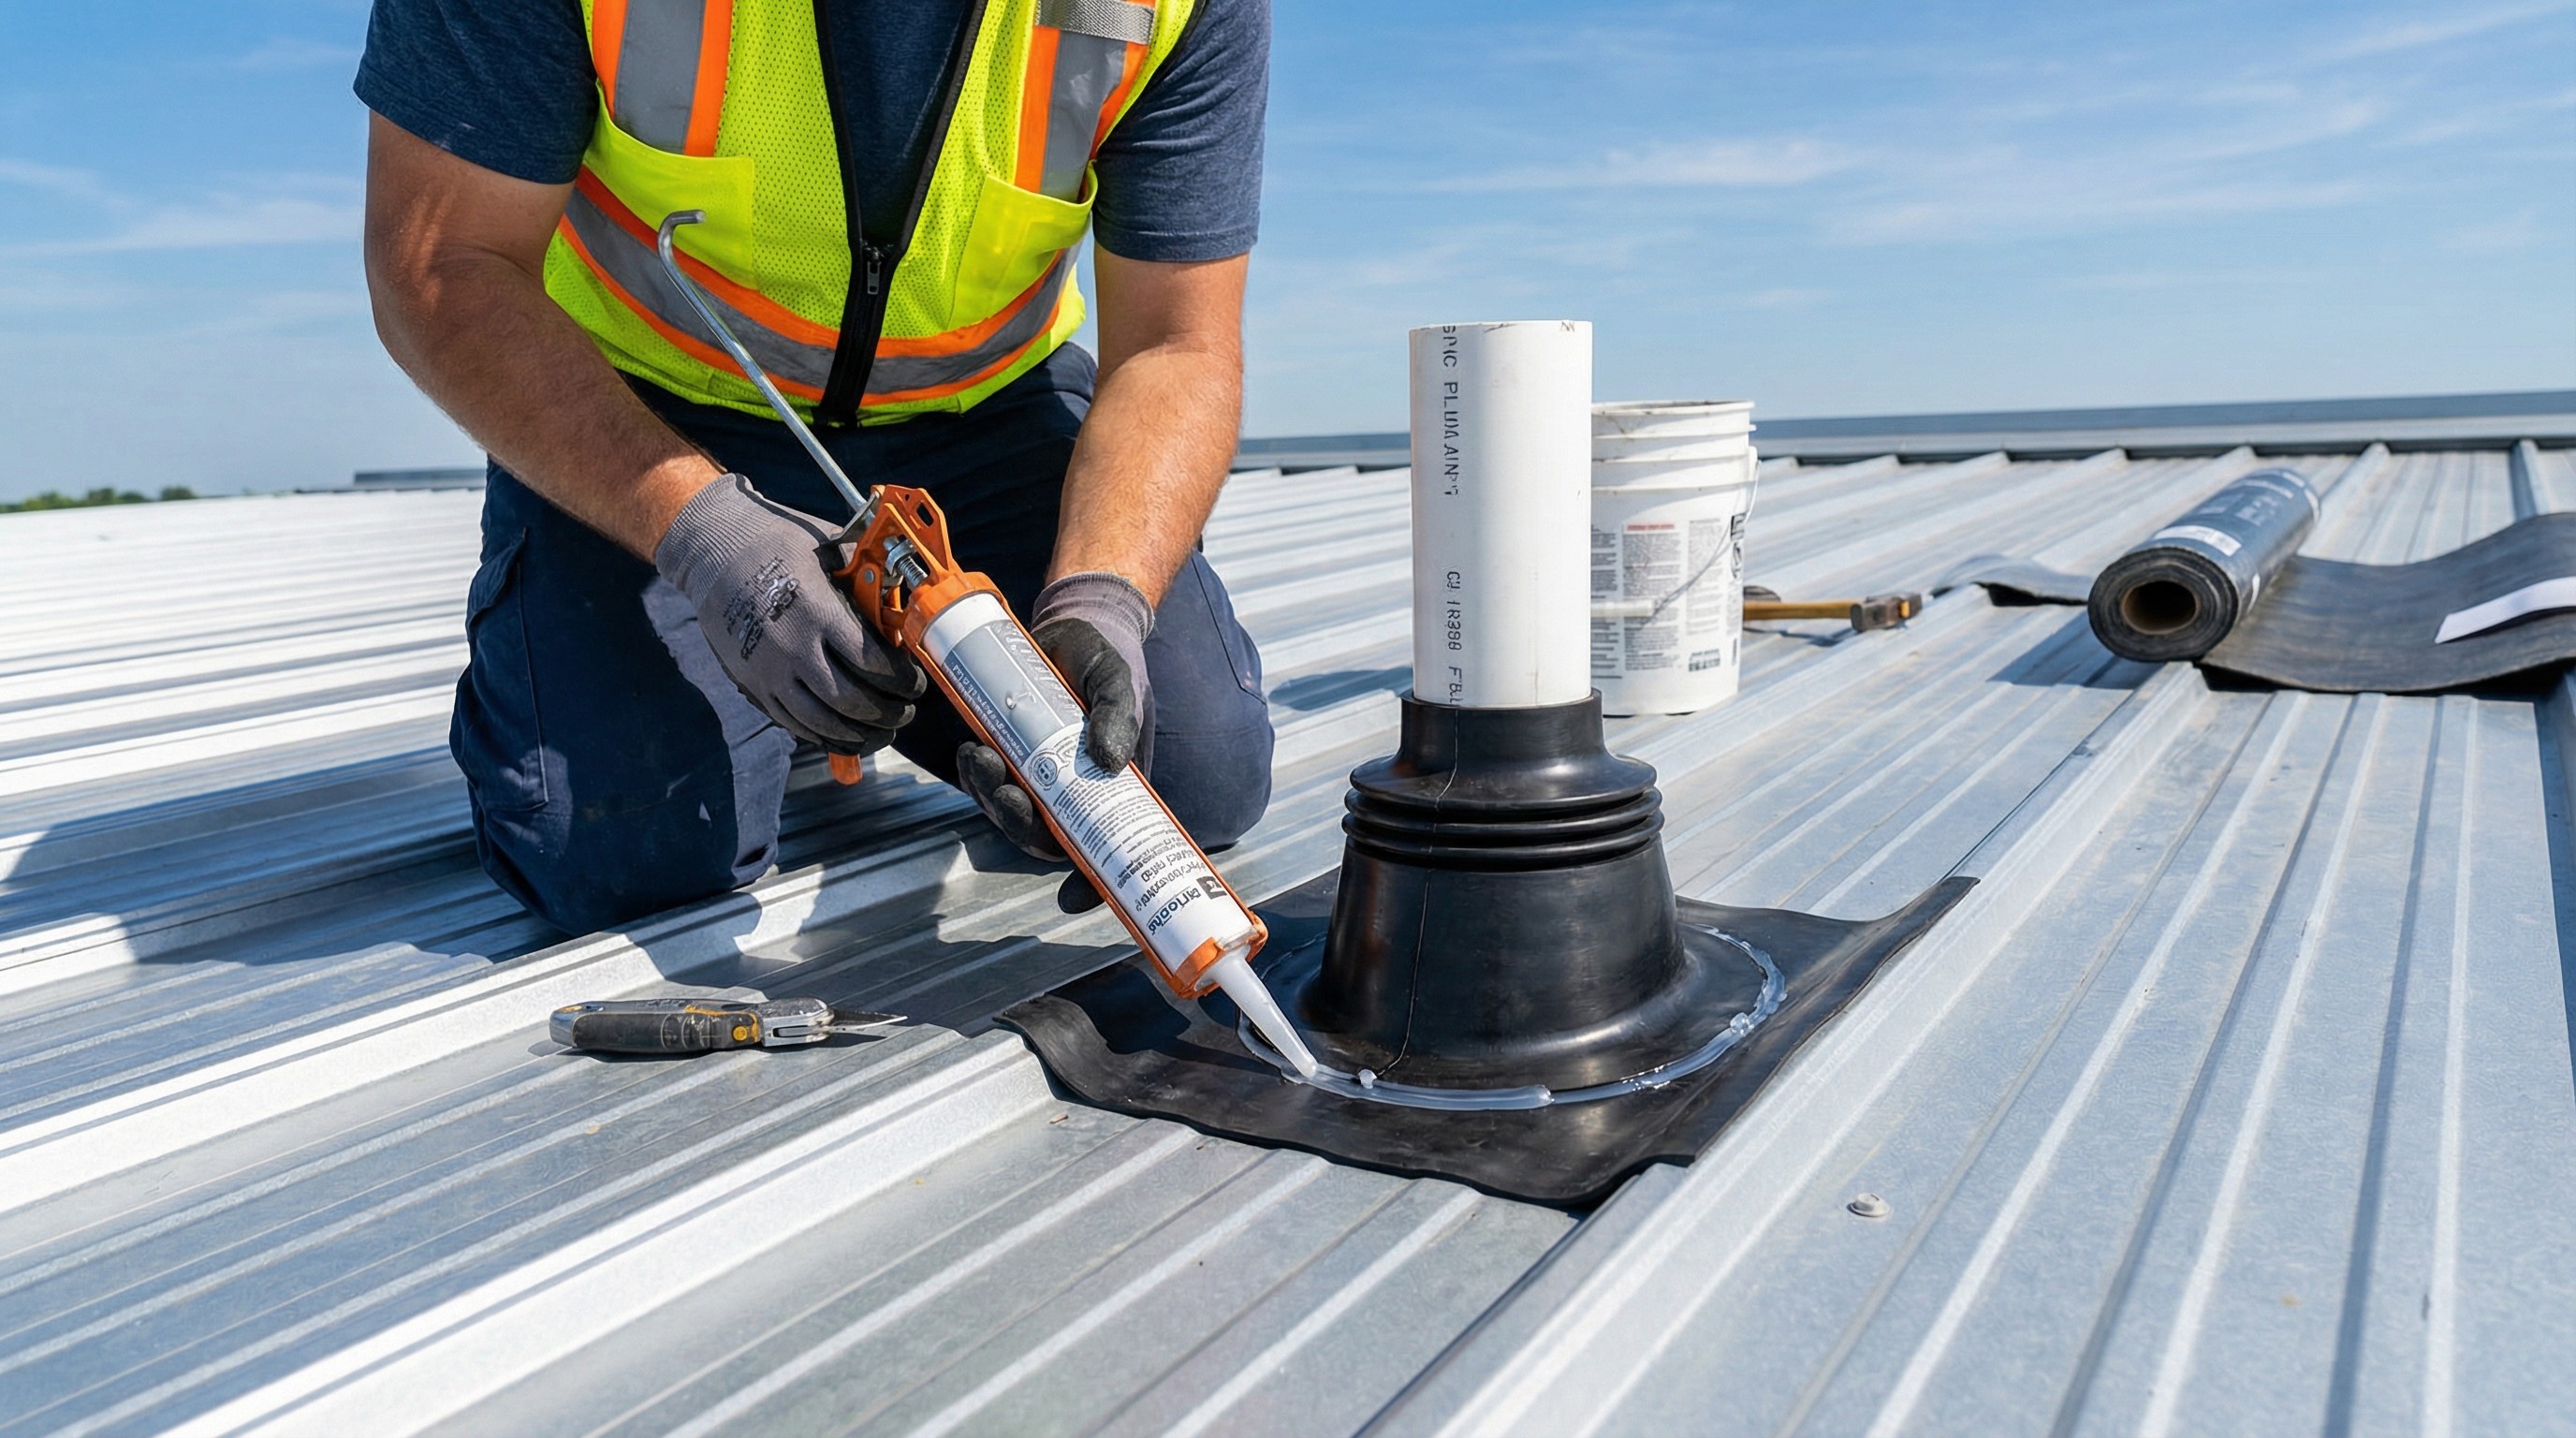
Flashing prevents water entry at chimneys, vent pipes, skylights, and other roof penetrations. Each penetration type requires specific flashing:
Vent Pipe Boots:
Use rubber or metal boots designed for metal roofing
Slide boot over pipe and seal base to panel surface
Secure with screws and sealant around perimeter
Chimney Flashing:
Install step flashing along chimney sides
Add counter flashing embedded in mortar joints
Seal all joints with high-temperature roofing sealant
Skylight Installation:
Follow skylight manufacturer's flashing kit instructions
Ensure upper flashing layers overlap lower layers (shingle principle)
Test for leaks before final panel installation
All flashing should be compatible with your metal type. Mixing incompatible metals (aluminum and steel, for example) causes galvanic corrosion and premature failure.
Metal Roofing Installation Costs
Material Costs by Metal Type
Metal roofing materials vary significantly in price:
Steel Roofing: $4 to $8 per square foot
Most common choice for residential installation
Galvanized or Galvalume coating prevents rust
Available in many colors and finishes
Weight: 1 to 2 pounds per square foot
Aluminum Roofing: $5 to $12 per square foot
Naturally corrosion-resistant (ideal for coastal areas)
Lighter weight than steel (easier to handle)
Softer metal (more susceptible to dents)
Weight: 0.5 to 1 pound per square foot
Copper Roofing: $15 to $30 per square foot
Premium material with distinctive appearance
Develops natural patina over time
Extremely long lifespan (100+ years)
Requires specialized installation skills
For a typical 1,500 square foot roof, materials alone cost $6,000 to $45,000 depending on metal type.
Labor Cost Breakdown
Professional metal roofing installation labor costs $3 to $7 per square foot. Labor typically represents 60% of total project cost. For a 1,500 square foot roof, expect to pay $4,500 to $10,500 for professional installation.
Labor cost factors include:
Roof complexity (valleys, hips, penetrations)
Roof pitch (steeper roofs require more safety equipment and time)
Access difficulty (height, nearby obstacles)
Tear-off requirements (removing old roofing)
Geographic location (higher costs in urban areas)
Installation timeframe affects labor costs. Professional crews complete most residential metal roofing installations in 2 to 5 days. Complex roofs with multiple penetrations may take up to a week.
DIY vs Professional Installation Comparison
Factor | DIY Installation | Professional Installation |
|---|---|---|
Material Cost | $6,000-$45,000 | $6,000-$45,000 |
Labor Cost | $0 (your time) | $4,500-$10,500 |
Tool Cost | $200-$1,200 | Included |
Timeframe | 1-3 weeks | 2-5 days |
Warranty | Limited (may void mfr warranty) | Full manufacturer warranty |
Expertise | Learning curve | Professional experience |
Risk | Falls, mistakes, improper technique | Bonded/insured contractors |
Total Cost | $6,200-$46,200 | $10,500-$55,500 |
DIY installation can save 40% to 60% on labor, but mistakes can be expensive to fix. Professional installation provides speed, expertise, warranty protection, and peace of mind.
Use our roofing calculator to estimate costs for your specific roof size and metal type.
Common Metal Roofing Installation Mistakes
Incorrect Fastener Placement
The most common metal roofing installation mistake is improper screw placement. For corrugated roofing, fasteners must go through the panel peaks (high points) into solid sheathing. Fastening in the valleys allows water to pool around screws and eventually cause leaks.
Over-tightening fasteners crushes the rubber washer and breaks the seal. Under-tightening leaves gaps for water infiltration. Proper torque is "snug plus a quarter turn". the washer should compress slightly without deforming.
Improper Panel Overlap
Insufficient panel overlap creates leak paths during wind-driven rain. Follow manufacturer specifications for overlap distance. typically one to two ribs for corrugated roofing and specific measurements for standing seam systems.
Panels must overlap in the direction away from prevailing winds. Installing backwards allows wind to drive water under the overlaps. Check local wind patterns before starting installation.
Inadequate Ventilation
Skipping proper ventilation causes condensation, moisture damage, and premature roof failure. Metal roofing needs both intake (soffit) and exhaust (ridge) ventilation to maintain airflow.
Without adequate ventilation:
Condensation forms on the underside of metal panels
Attic temperatures increase, raising cooling costs
Sheathing and rafters develop mold and rot
Metal panel warranties may be voided
Install ridge vents along the entire peak and ensure soffit vents provide equal intake area.
Skipping or Improperly Installing Underlayment
Some DIYers skip underlayment to save money, but this violates building codes and manufacturer warranties. Underlayment provides:
Secondary weather protection if panels leak
Slip resistance during installation
Sound dampening (reduces rain noise)
Thermal barrier (prevents condensation)
Use synthetic underlayment designed for metal roofing. felt paper deteriorates quickly under metal. Ensure proper overlap (6 inches minimum) and secure it to prevent movement during panel installation.
Wrong Trim Application
Trim pieces must be installed in the correct sequence and overlap direction. Eave trim goes on before panels. Ridge cap installs last. Each trim piece should overlap the previous piece by 2 to 4 inches, working away from prevailing winds.
Failing to seal trim overlaps with caulk or sealant tape allows water entry during wind-driven rain. Use butyl-based sealant designed for metal-to-metal applications. silicone doesn't bond well to metal roofing.
Metal Roofing Installation for Different Applications
Installing Metal Roofing Over Existing Shingles
Metal roofing installation over existing shingles is allowed by code in many jurisdictions, saving tear-off costs and labor time. However, this method requires proper preparation and has specific limitations.
Requirements for installing over shingles:
Maximum of one existing shingle layer (some codes allow two)
Shingles must be in good condition (no excessive curling or cupping)
Furring strips (1x4 boards) installed perpendicular to rafters
Proper ventilation airspace between shingles and metal panels
Manufacturer approval (some void warranties for over-shingle installation)
The furring strip method creates an air gap that prevents condensation and provides a consistent fastening surface. Strips are typically spaced 24 inches on center, aligned with rafters.
Installing over shingles adds height to the roof, affecting trim and flashing details. Plan for extended downspout extensions and modified step flashing at walls.
Standing Seam vs Corrugated Installation Differences
Standing seam and corrugated metal roofing require different installation approaches:
Standing Seam Installation:
Uses concealed clip fastening system
Panels snap together with raised seams
Requires specialized seaming tool (manual or mechanical)
More expensive ($8-12 per square foot installed)
Cleaner appearance with no exposed fasteners
Better for low-pitch roofs (down to 3:12 or less with proper underlayment)
Corrugated Metal Installation:
Uses exposed screw fastening through panel peaks
Simpler installation process (better for DIY)
Less expensive ($4-8 per square foot installed)
Traditional agricultural appearance
Faster installation time
Requires minimum 3:12 pitch
Standing seam metal roofing installation is more complex and typically requires professional installers. Corrugated installation is more forgiving for DIYers willing to learn proper techniques.
Installing Metal Roofing on Low-Pitch Roofs
Low-pitch roofs (3:12 to 4:12) require special considerations for metal roofing installation. Most metal roofing types have a minimum 3:12 pitch requirement, but some standing seam systems work on pitches as low as 1:12.
Special requirements for low-pitch metal roofing:
Premium underlayment (ice and water shield across entire deck)
Sealed panel seams (mechanical or snap-lock systems)
Increased panel overlap (follow manufacturer specifications)
Additional fasteners in high-stress areas
Check manufacturer specifications carefully. using the wrong system on a low-pitch roof voids warranties and creates leak risk. Some areas with heavy snow require higher minimum pitches to ensure proper drainage and snow shedding.


