
What is a drip edge? It's metal flashing installed along the edges of your roof that directs water away from the fascia and into the gutter. Without this simple component, rainwater rolls off your shingles and wicks backward underneath them, soaking into the wood and causing rot that often goes unnoticed until significant structural damage has occurred.
Your contractor might have mentioned it in your estimate, or you've noticed some deterioration around your roofline and started researching what protects that area. Either way, understanding this roofing component can save you thousands in water damage repairs down the road.
This guide covers the purpose of roof edge flashing, the different types and materials available, what it costs to install or replace, and how to spot problems before they turn into bigger repairs.
What Is Drip Edge on a Roof
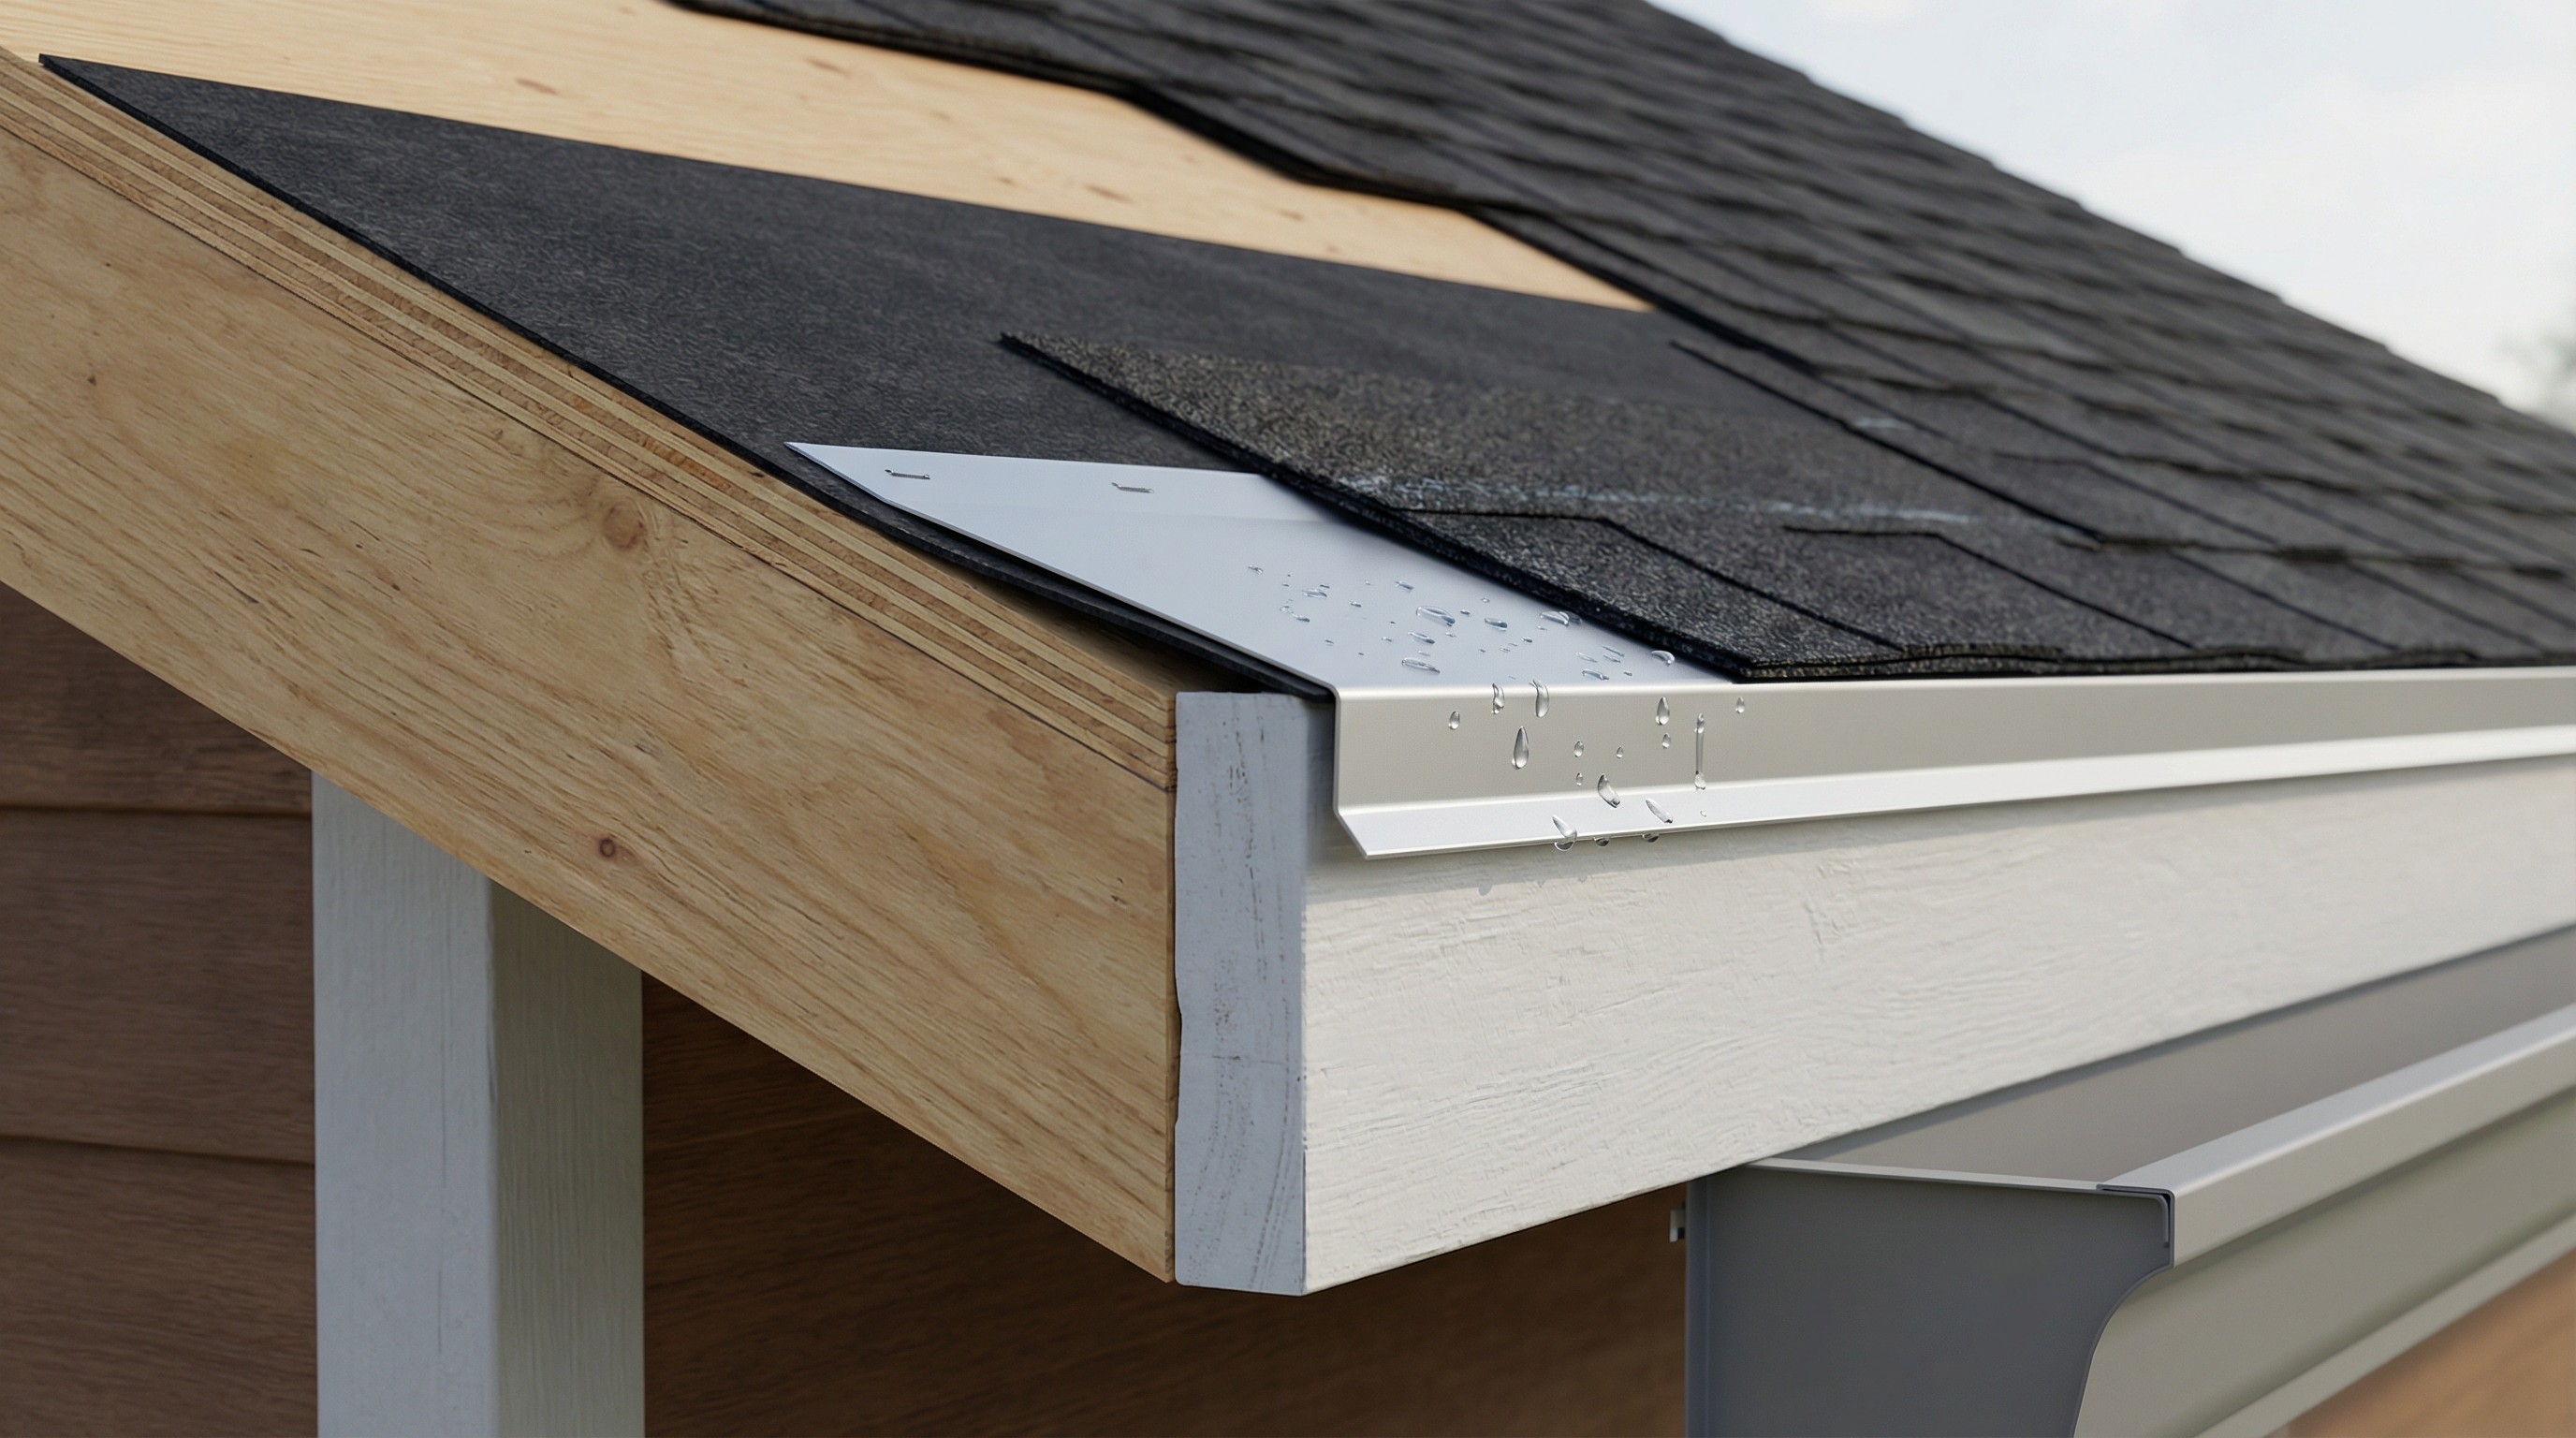
A drip edge is metal flashing that runs along the edges of your roof. It directs rainwater away from the fascia board and into the gutter, preventing water from seeping under your shingles or soaking into the wood beneath. Think of it as a small metal lip that gives water a clean path off your roof instead of letting it roll backward and cause damage.
Most designs have a simple L-shaped or angled profile. One side tucks under the shingles, and the other side extends slightly past the roof edge. The design is straightforward, but the protection it provides is significant.
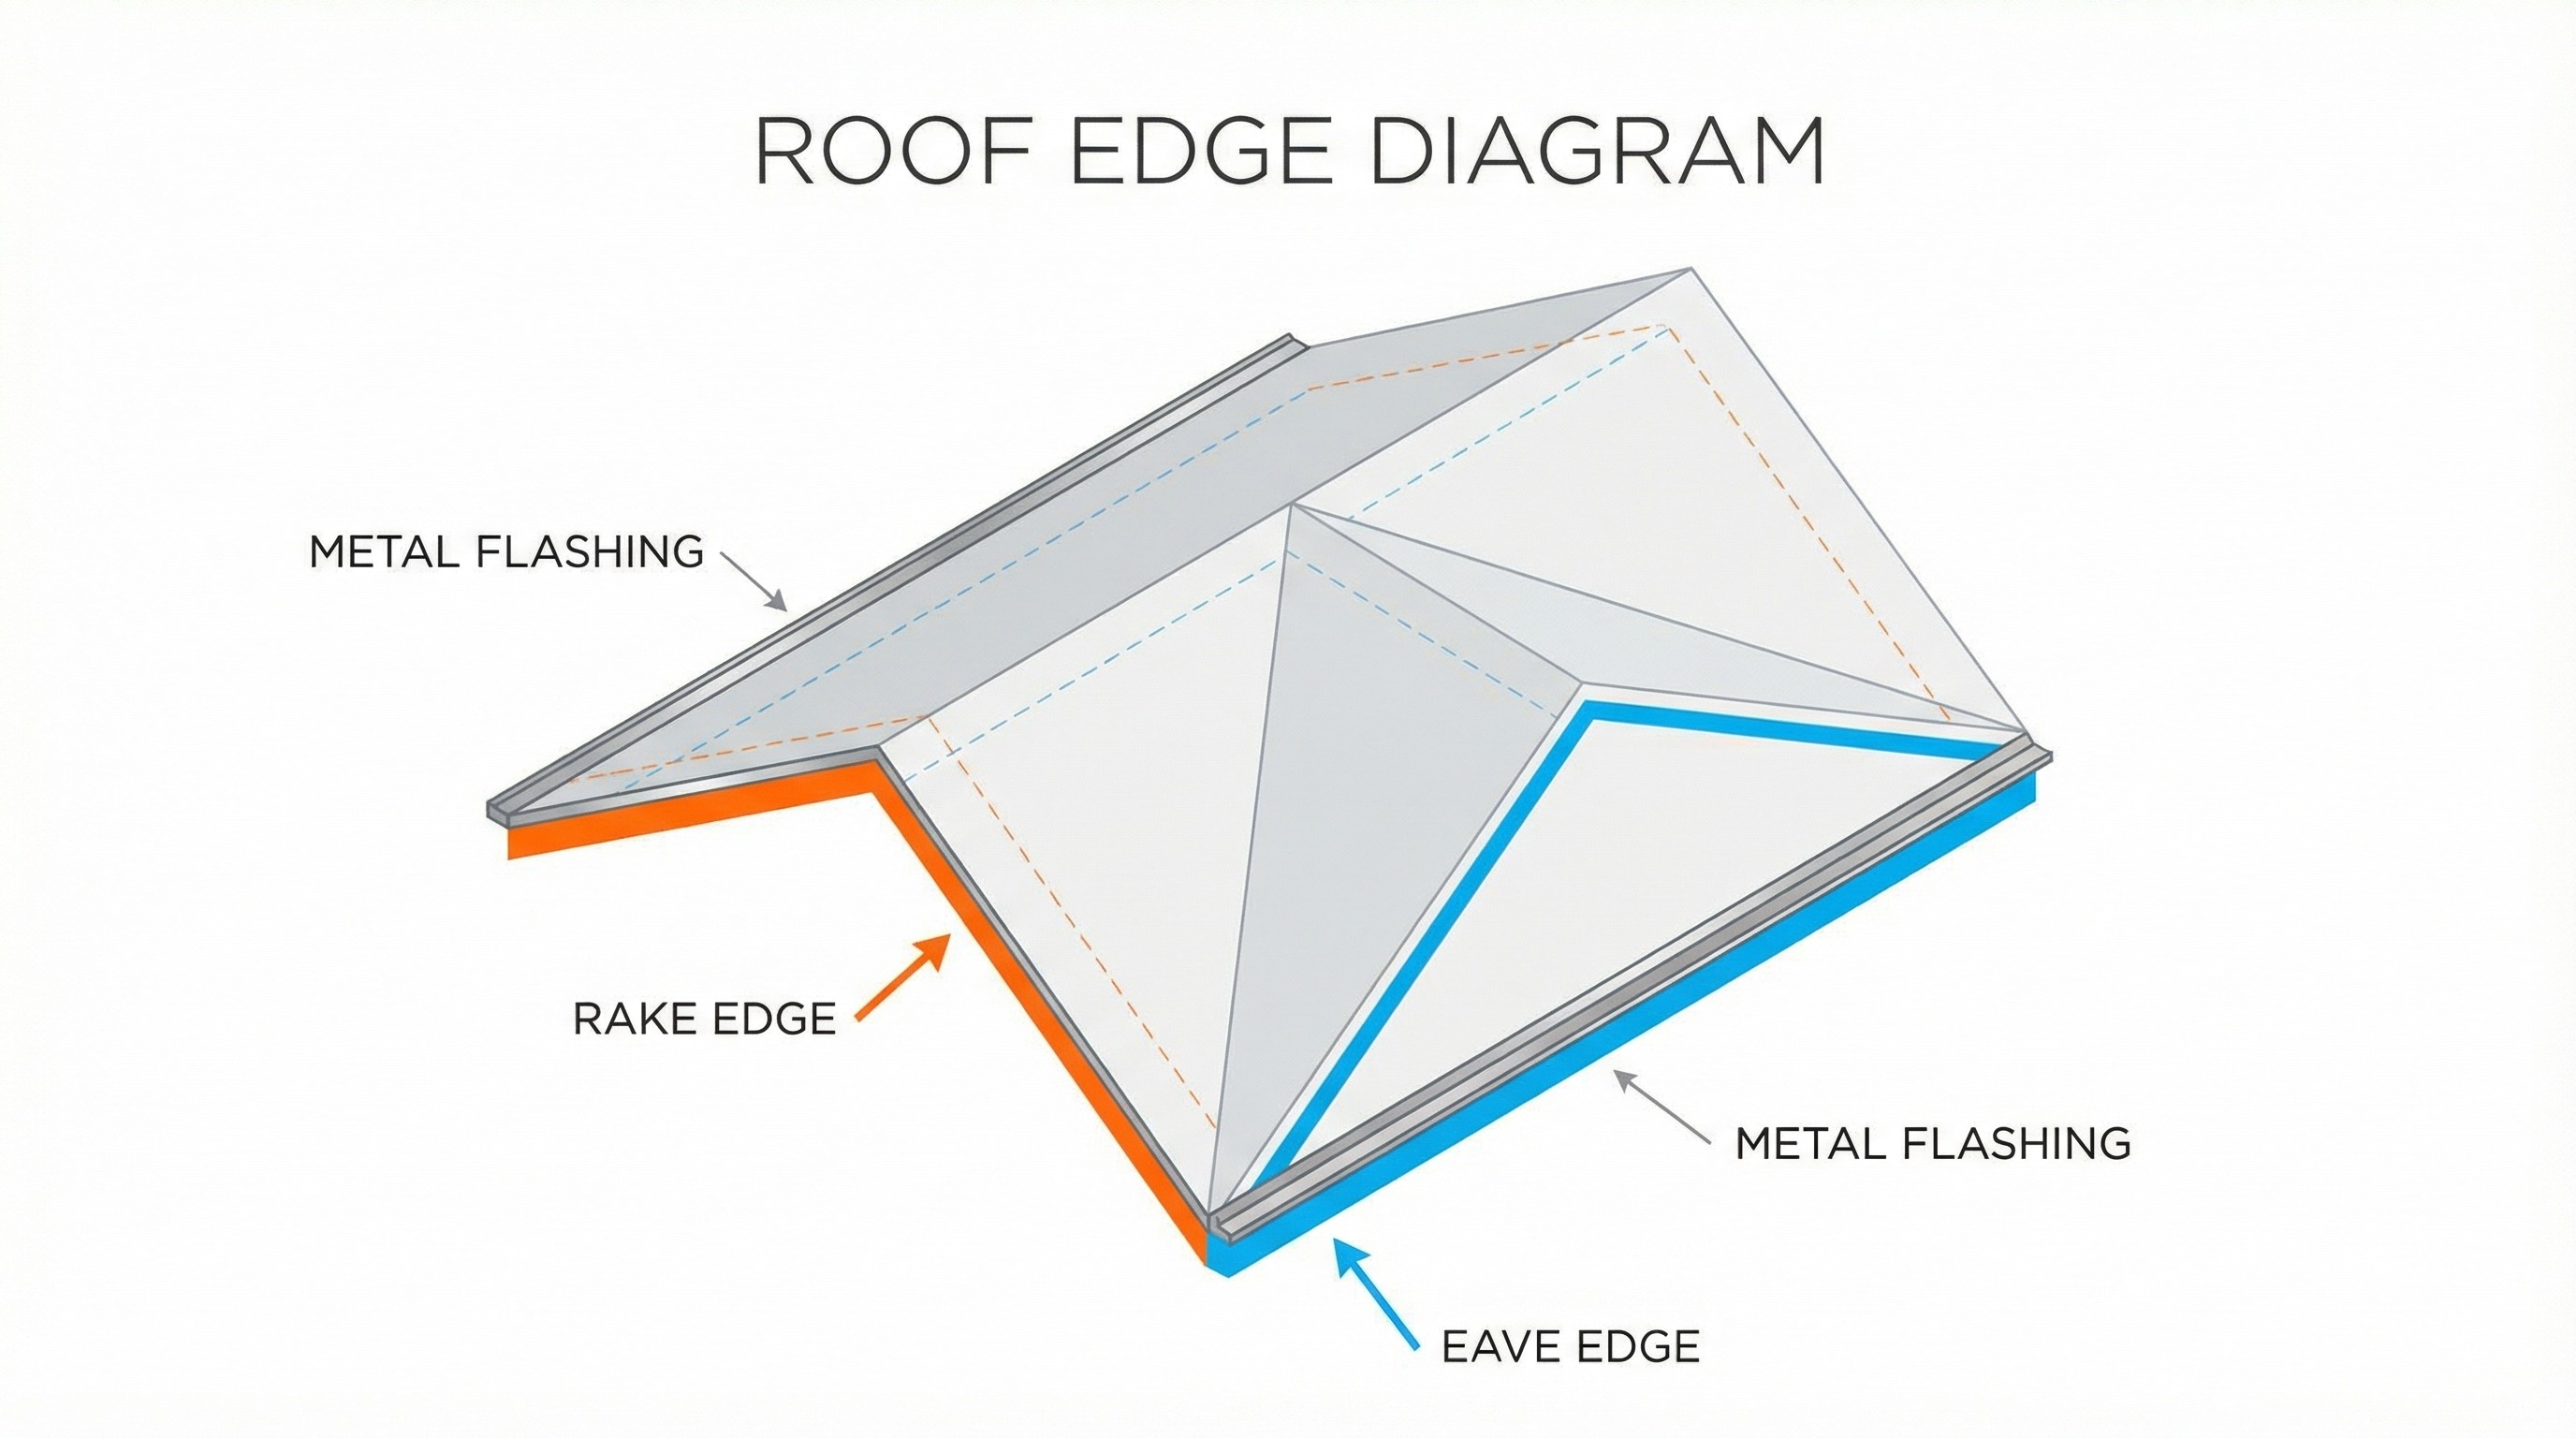
Your roof has this flashing in two locations. Eave flashing runs along the bottom horizontal edge where your gutters hang. Rake flashing runs along the sloped sides of your roof, which roofers sometimes call the gable ends. Both serve the same purpose, just in different spots.
The International Residential Code Section R905.2.8.5 now requires this component on most asphalt shingle installations. What was once considered optional has become standard practice, and for good reason. The relatively small upfront cost prevents much larger problems later.
Why Your Roof Needs Drip Edge
Water has a way of finding its path to vulnerable areas. Without proper edge flashing, rainwater rolls off your shingles and wicks backward underneath them. Over time, that moisture soaks into the fascia and roof decking, leading to rot, mold, and structural problems that cost far more to fix than the flashing ever would.
Here's what this component actually protects:
Fascia and soffit protection: Water can't travel backward under the roof edge and soak into the trim boards. The fascia stays dry and maintains its structural integrity. Replacing rotted fascia boards typically costs $6-20 per linear foot, compared to $2-4 per foot for proper edge flashing.
Roof decking preservation: The plywood or OSB beneath your shingles stays dry instead of slowly rotting. Once water penetrates the decking, you're looking at much more extensive repairs. A section of rotted decking can cost $500-1,500 to replace, not including the shingles that need to come off and go back on.
Shingle edge support: The starter row of shingles has a firm surface to grip, which helps them stay put in wind. Shingles installed without proper edge support are more likely to blow off during storms, especially along the vulnerable perimeter of your roof.
Pest and weather barrier: Gaps where insects, birds, and small animals could get in are sealed off. Bats and squirrels particularly like finding their way into attics through poorly protected roof edges. Once they're in, removal and cleanup can easily cost over $1,000.
Most building codes now require edge flashing on asphalt shingle roofs. Even in areas where it's not strictly required, insurance companies often look for proper installation when processing claims. A roof without code-compliant flashing might complicate your claim if wind or water damage occurs.
Regional Climate Considerations
Your local climate determines how critical proper edge protection becomes. In northern climates with freeze-thaw cycles, ice dams form more readily when water can't drain properly off the roof edge. The trapped water backs up under shingles and leaks into your home. Homes in Minnesota, Wisconsin, and similar climates see ice dam damage regularly on roofs without adequate edge protection.
In hurricane-prone coastal areas, wind-driven rain creates different challenges. Water doesn't just fall straight down. It gets pushed sideways and upward by strong winds. Properly installed edge flashing with sealed joints becomes essential for keeping water out during tropical storms and hurricanes. Florida building codes reflect this reality with stricter requirements for coastal construction.
Desert climates with intense UV exposure present another scenario. The metal flashing itself holds up fine, but the connection points and sealants can degrade faster in extreme heat. Homes in Arizona or Nevada benefit from checking these connections more frequently than homes in milder climates.
Types of Drip Edge Materials
Edge flashing comes in three common materials: aluminum, galvanized steel, and copper. Each has tradeoffs in durability, cost, and appearance.
Material | Best For | Durability | Cost Per Linear Foot |
|---|---|---|---|
Aluminum | Most shingle roofs | Rust-resistant, lightweight | $2-$4 |
Galvanized Steel | High-wind areas, budget projects | Strong but can rust over time | $1.50-$3 |
Copper | Historic homes, premium builds | Longest-lasting, develops patina | $8-$15 |
Aluminum Flashing
Aluminum is the most common choice for residential shingle roofs. It won't rust, weighs very little, and comes in many colors to match your trim. For most homes with asphalt shingles, aluminum edge flashing is the practical option. It does the job well without adding unnecessary cost.
The material bends easily during installation, which helps roofers work efficiently. It also expands and contracts with temperature changes without cracking or warping. In coastal areas with salt air, aluminum holds up better than steel options because it doesn't corrode the same way.
Galvanized Steel Flashing
Galvanized steel is more rigid than aluminum. That extra stiffness makes it a better fit in high-wind areas where flexibility could be a problem. The tradeoff is that if the protective zinc coating gets scratched, rust can develop over time. Steel versions show up more often on metal roofing installations where rigidity matters.
The material costs less per linear foot than aluminum, which makes it attractive for budget-conscious projects. However, you're trading some longevity for that lower price. In dry climates, galvanized steel can last just as long as aluminum. In humid or coastal environments, rust becomes more likely.
Copper Flashing
Copper outlasts both aluminum and steel by a wide margin. It develops a green patina as it ages, which gives it a distinctive look that works well on historic or high-end homes. The price is significantly higher, so copper edge flashing works best for projects where appearance and longevity are top priorities.
Expect copper to last 50+ years without significant degradation. The initial investment is roughly 3-4 times higher than aluminum, but if you plan to stay in your home long-term or you're restoring a historic property, the math can make sense. Just make sure your contractor uses copper nails and fittings to prevent galvanic corrosion where different metals touch.
Drip Edge Profile Types Explained
When roofers mention edge flashing "profiles," they're talking about the shape of the metal when you look at it from the end. Get a free quote review to ensure your estimate includes proper drip edge installation. Different profiles serve different purposes, though most residential roofs use Type C or Type D.
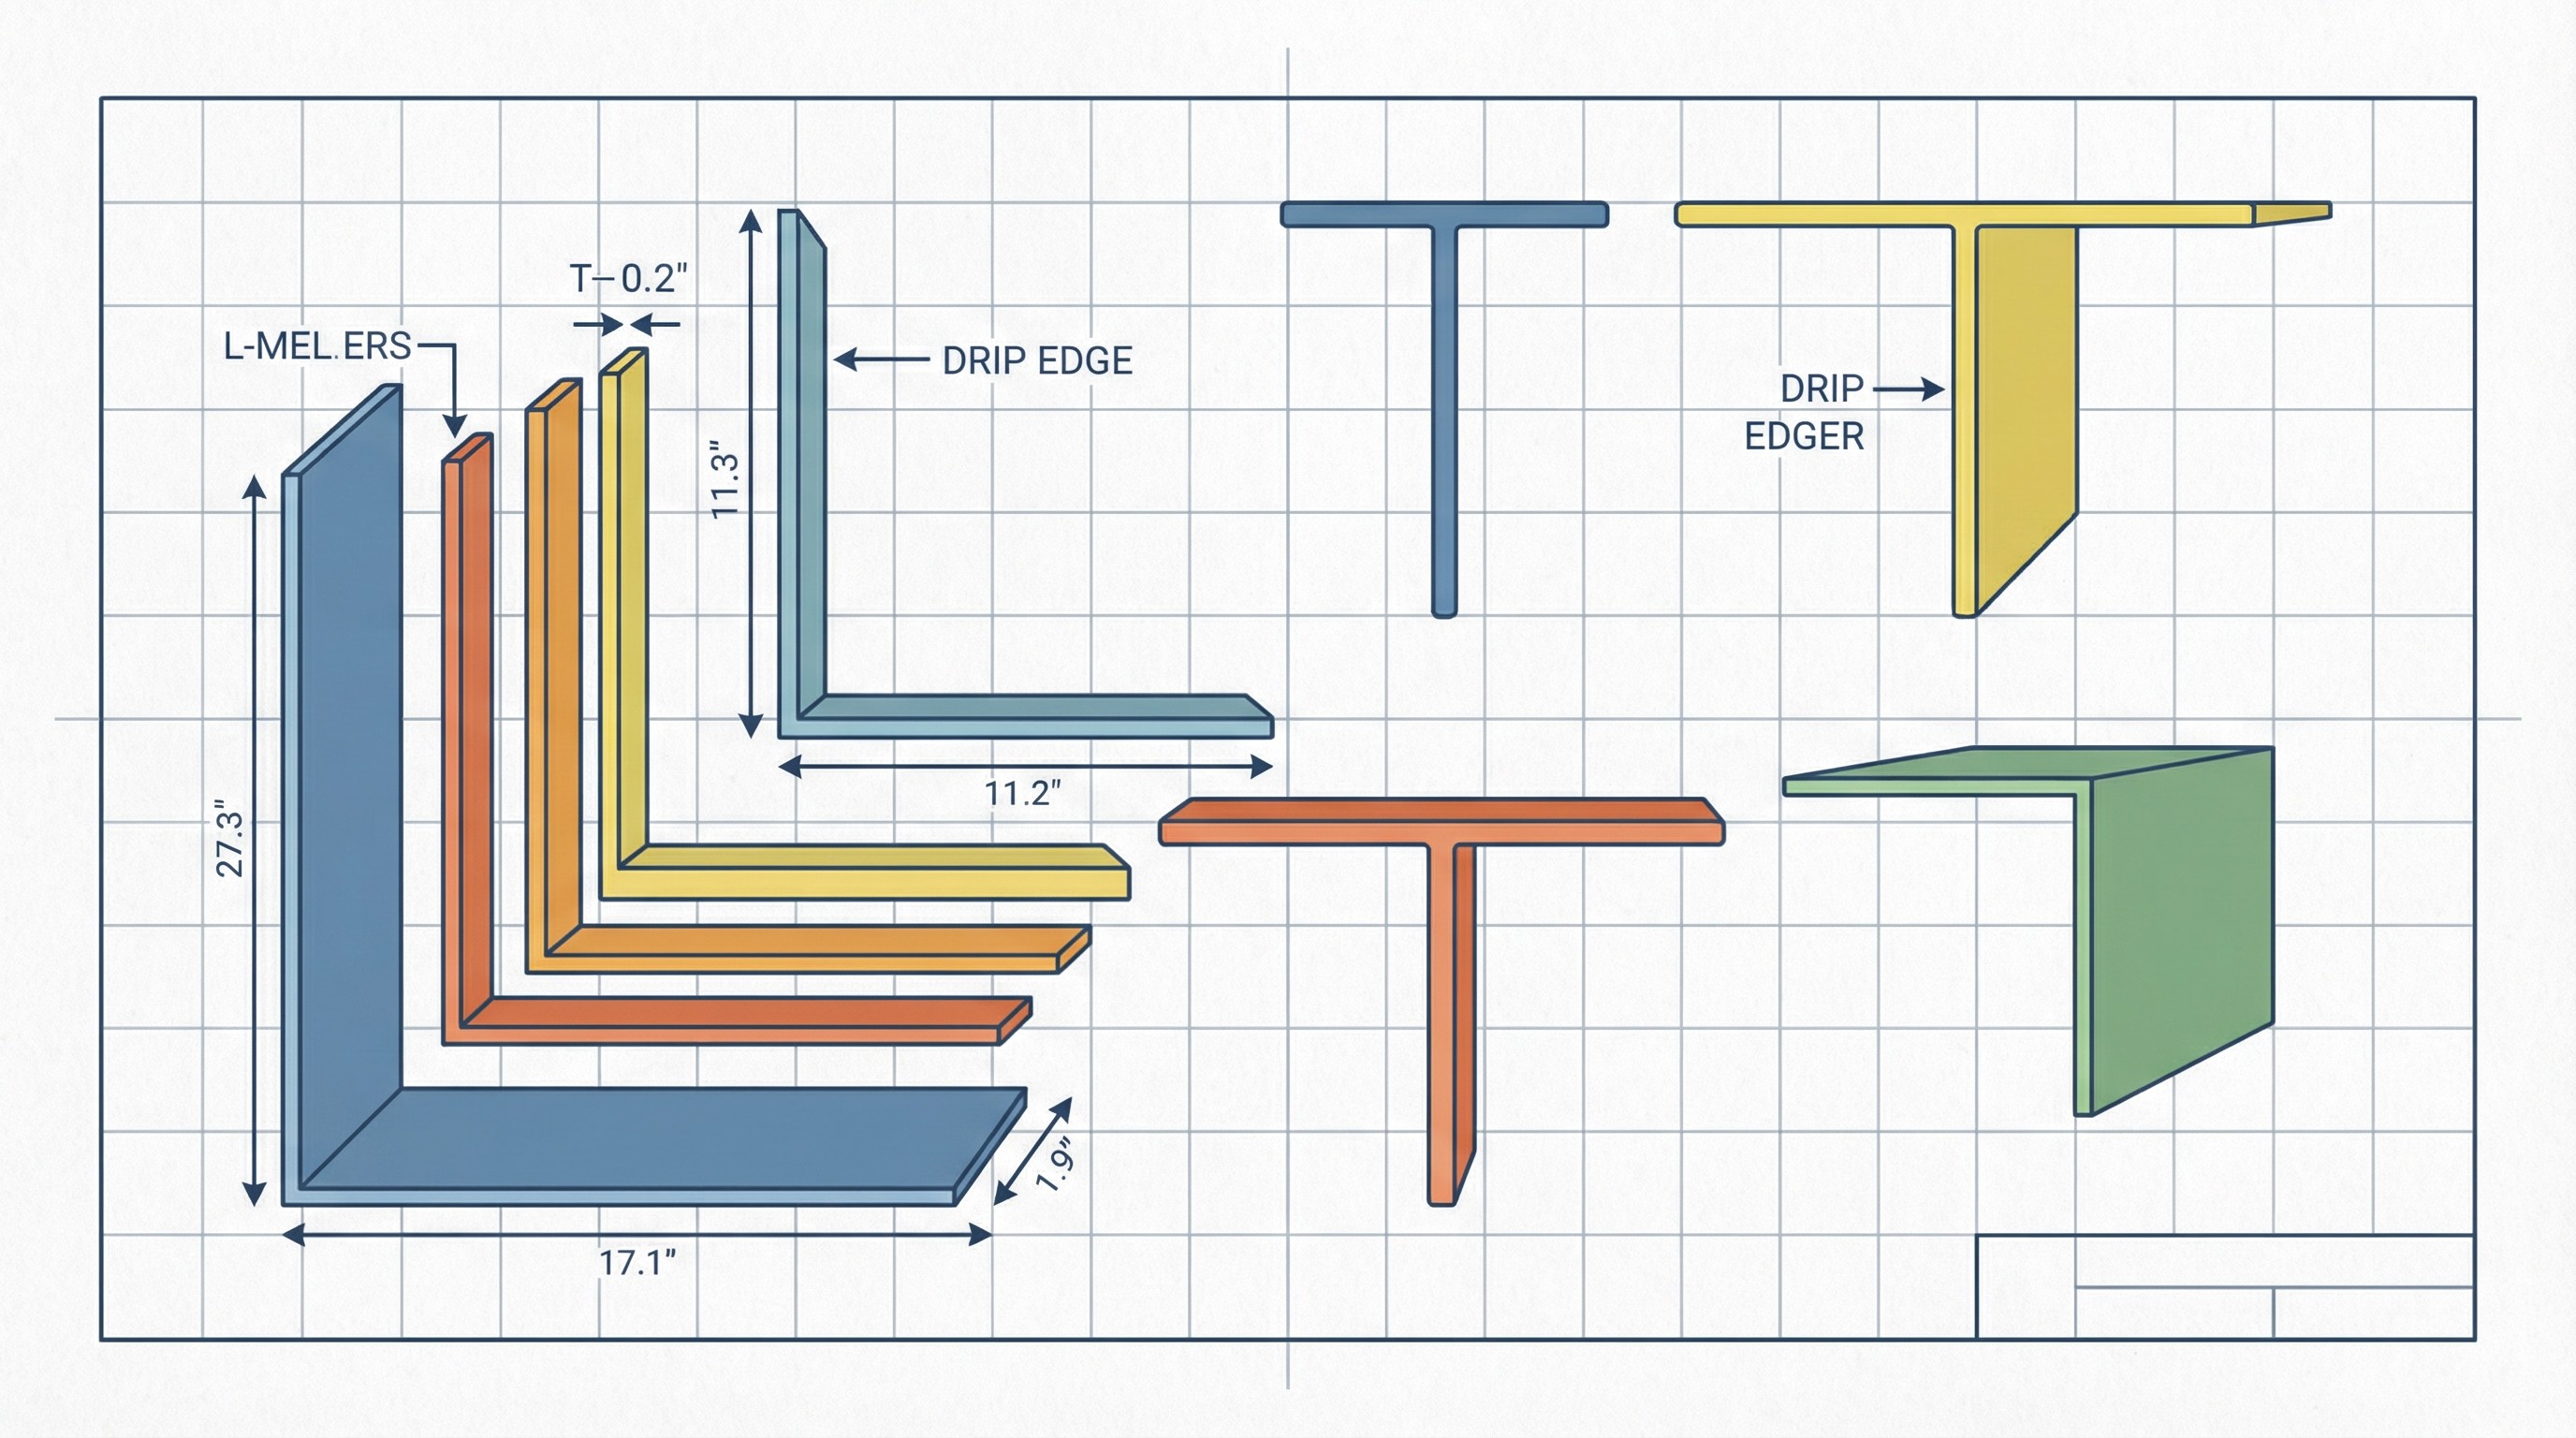
Type C (L-Style)
Type C is the simplest design. It's L-shaped with a basic 90-degree bend. This profile offers straightforward protection and works fine on roofs without gutters or on projects with tighter budgets. You might also hear it called "L-style" edge flashing.
The installation is faster because there are fewer bends to align. For sheds, detached garages, or other structures where water management is less critical, Type C does the job. Some contractors use it on homes without gutters, though Type D usually performs better even in that scenario.
Type D (T-Style)
Type D has an extra flange that extends out over the gutter. This is the most common profile for residential shingle roofs with gutters because it directs water cleanly into the gutter channel instead of letting it drip behind. Roofers sometimes call it "D-metal" or "T-style."
The extended flange creates a wider drip gap between the roof edge and the fascia. This gap matters more than you might think. Without it, wind can push water back against the fascia even when gutters are working properly. The extra standoff distance prevents that problem.
Type F (Gutter Apron)
Type F has an extended vertical flange, which makes it useful for covering wider fascia boards. Roofers often choose it for re-roofing projects where the existing fascia needs extra coverage. You might hear it called "gutter apron."
When contractors replace your roof but leave the existing fascia in place, Type F can cover minor imperfections or staining on the fascia face. It provides a clean finished look while still directing water properly. The longer vertical leg also helps in situations where the fascia board sits further back from the roof edge than typical.
Which Profile Should You Use?
For most residential applications with gutters, Type D is the standard choice. It performs well in varied weather conditions and works with standard gutter configurations. Type C works fine for buildings without gutters or where budget is the primary concern. Type F makes sense for re-roofing projects or situations where aesthetics and fascia coverage matter more than usual.
Your climate and roof design might push you toward one option over another. High-wind coastal areas benefit from the extra standoff that Type D provides. Homes in areas with heavy snow might need careful attention to how the profile interacts with ice dam prevention strategies.
How Roof Drip Edge Is Installed
Installation order matters with edge flashing. The sequence differs between the eaves and the rakes, and incorrect sequencing can trap water instead of directing it away.
Step 1: Inspect and Prepare the Roof Deck
Before any flashing goes on, roofers check the roof deck for damage. Soft spots, rot, or gaps get repaired first. The edge of the deck should be straight and solid. Any loose or damaged wood gets replaced or secured.
The fascia board also gets inspected. If it's rotted or damaged, now is the time to replace it, not after the flashing is installed. Trying to install flashing over damaged wood just covers up a problem that will get worse.
Step 2: Install Flashing at the Eaves
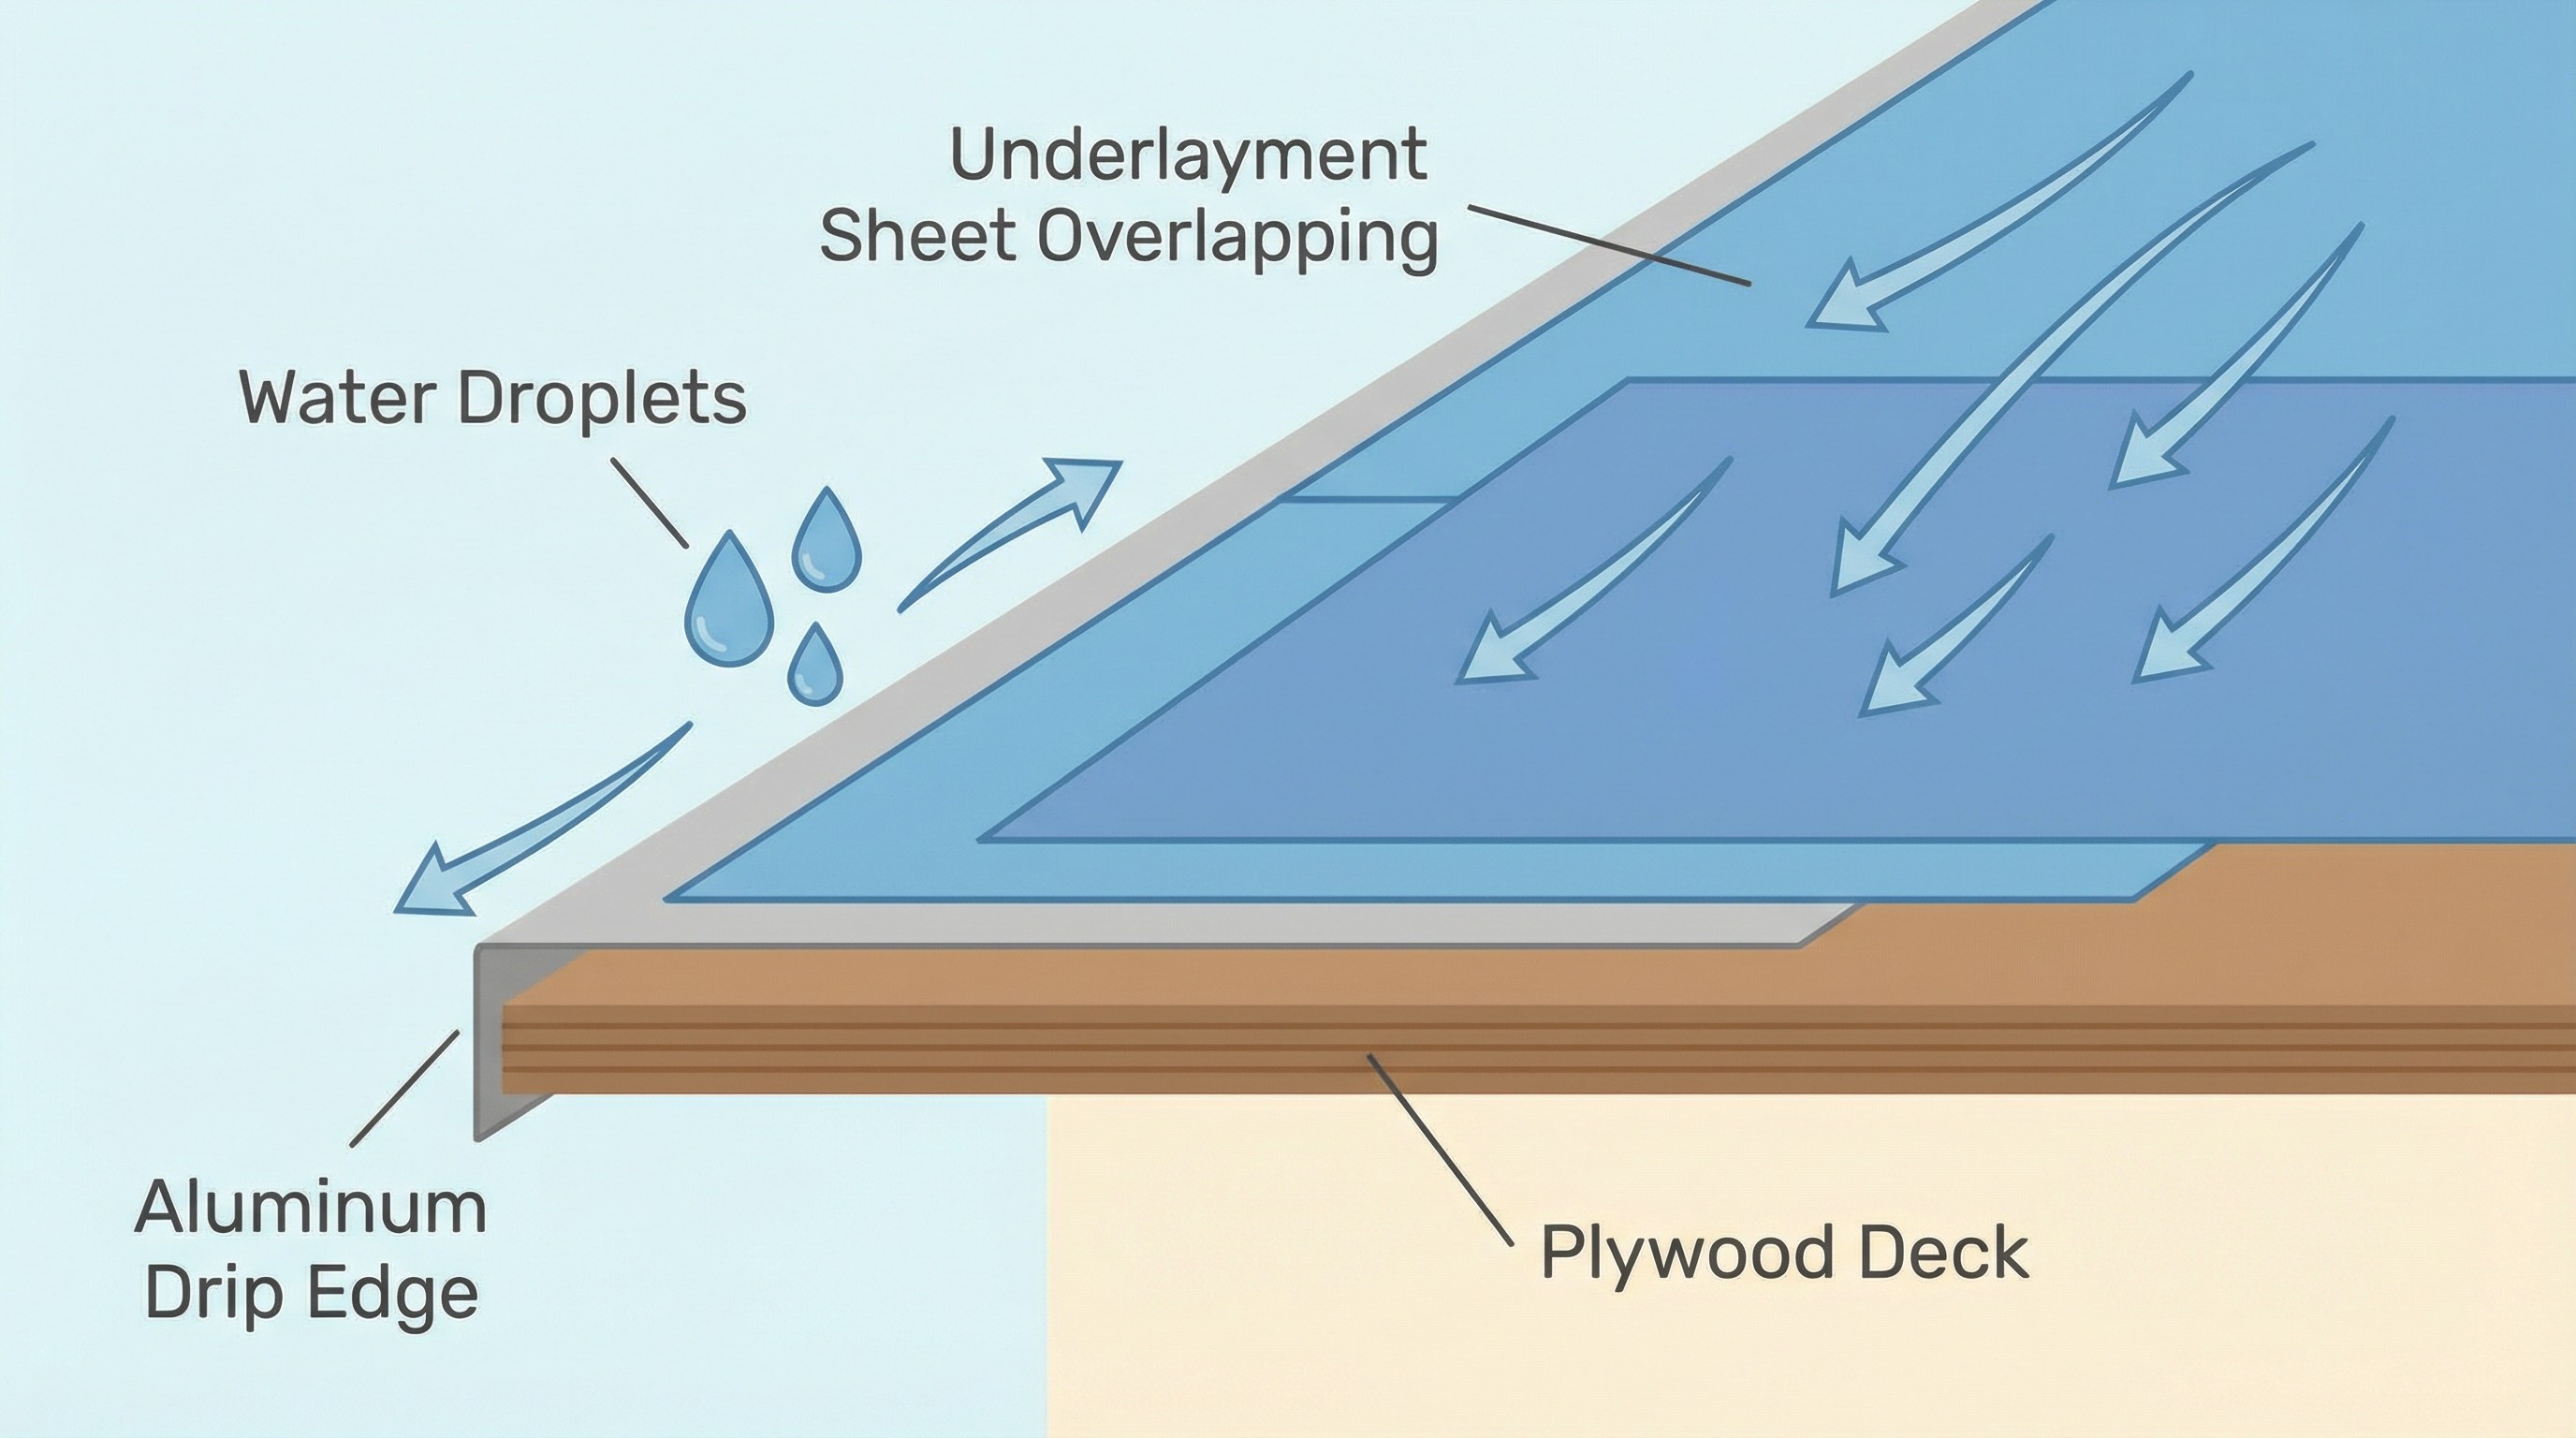
At the eaves, which is the horizontal bottom edge of your roof, the flashing goes directly on the roof deck before the underlayment. This layering allows water to flow over the metal and into the gutter without getting trapped underneath.
Sections overlap by 2-3 inches, with each new piece lapping over the previous one in the direction of water flow. Roofing nails secure the flashing every 8-12 inches, placed high enough that shingles will cover them later. The nails go through the flashing and into the roof deck, not into the fascia.
Step 3: Apply Underlayment Over Eave Flashing
The underlayment, whether felt paper or synthetic, lays on top of the eave flashing. This creates the correct water flow direction. Moisture always moves outward and down, never backward under the roofing materials.
Some contractors will tell you this doesn't matter or that they can do it either way. They're wrong. The International Residential Code specifies this sequence for a reason. Water that gets past the shingles needs to flow over the flashing, not under it. Incorrect layering creates a path for water to get trapped and cause rot.
Step 4: Install Flashing Along the Rake
At the rake edges, which are the sloped sides of your roof, the order reverses. Here, the flashing goes over the underlayment. This prevents wind-driven rain from getting underneath during storms. The overlap keeps water out even when rain is blowing sideways.
The rake flashing should extend slightly past the roof edge, just like at the eaves. The same overlap and nailing pattern applies. In high-wind areas, contractors often seal the joints with roofing cement for extra protection against wind-driven rain.
Step 5: Install Starter Shingles and First Course
Once the flashing is in place, starter shingles go down along the eaves and rakes. These specialized shingles have adhesive backing and create a solid seal at the roof edge. The first course of regular shingles follows, covering the starter course and the nail line of the flashing.
Step 6: Check Alignment With Gutters
After shingles are on, the contractor should verify that the bottom edge of the flashing extends into the gutter properly. The flashing should direct water into the gutter channel, not behind it or over the front edge. Adjusting gutter position might be necessary if the alignment isn't right.
Common Installation Mistakes
The most frequent mistake is installing eave flashing over the underlayment instead of under it. This backwards sequence creates a path for water to get trapped between the underlayment and the roof deck. The second most common error is inadequate overlap at joints. A 1-inch overlap isn't enough. You need 2-3 inches minimum.
Some contractors skip flashing on the rakes entirely, installing it only at the eaves. This saves them a few dollars in material but leaves your roof edge exposed to wind-driven rain. Others use the wrong nail placement, putting nails through the flashing face instead of high enough for shingles to cover them. Exposed nail heads create rust points and potential leak sources.
Adding Drip Edge to Existing Roofs
If you discover your roof is missing edge flashing, adding it after shingles are already in place is possible but not ideal. The best time to add it is during your next roof replacement. At that point, everything gets installed in the correct order, and the flashing can do its job properly.
For roofs that won't be replaced soon, contractors have two approaches for retrofitting edge protection:
Partial Shingle Removal Method
The contractor lifts the first few courses of shingles along the edge, slides the flashing underneath, and re-secures the shingles. This works better in theory than practice. Getting the flashing properly positioned without breaking shingles is difficult, and you can't layer it correctly with the underlayment since that's already buried under shingles.
This method costs $4-8 per linear foot installed, plus the risk of damaging shingles in the process. It provides some protection, but not as much as proper installation during a full roof replacement.
Face-Mounted Flashing
Some contractors install a modified edge protection over the existing shingle edge. This isn't true flashing in the technical sense, but it can provide some water deflection. The metal mounts to the fascia face and creates an overhang that directs water away.
This approach costs less ($3-5 per linear foot) but provides minimal protection compared to properly installed flashing. It might be worth considering if you have several years before your next roof replacement and you're seeing early signs of fascia damage.
When Retrofitting Makes Sense
If your roof is less than five years old and you discover it's missing edge flashing, retrofitting might be worth the expense. The roof has plenty of life left, and you can prevent damage from accumulating over the next 15-20 years. Get quotes for both retrofit options and compare them to the cost of early replacement.
If your roof is 10+ years old, you're probably better off waiting for full replacement and getting proper installation at that time. The money you'd spend on retrofitting could go toward your replacement fund instead.
Building Code Requirements
The International Residential Code Section R905.2.8.5 requires corrosion-resistant edge flashing on asphalt shingle roofs. This requirement applies to new construction and, in many jurisdictions, to roof replacements on existing homes.
Local building departments sometimes have stricter requirements based on regional climate conditions. Coastal areas might require upgraded materials or specific profiles. Areas with heavy snow loads might have additional specifications for ice dam prevention.
Insurance and Home Sale Implications
Missing or improperly installed edge flashing can affect your homeowners insurance. If a claim involves water damage and the adjuster finds that code-required flashing was never installed or was installed incorrectly, the claim might be denied or reduced. Insurance companies expect your roof to meet basic code requirements.
When selling your home, a home inspector will note missing or damaged edge flashing in their report. Buyers often request repairs before closing, or they negotiate a price reduction to cover future replacement. Installing it correctly during your next roof project eliminates this negotiating point.
Some insurance companies in high-risk areas now require proof of code-compliant installation before issuing or renewing policies. This trend is growing in coastal areas prone to hurricanes and in northern regions with ice dam problems.
Signs Your Drip Edge Needs Replacement
Like other roofing components, edge flashing will eventually show signs of wear and may need replacement.
Rust or Corrosion on the Metal
Visible rust spots, especially on galvanized steel versions, mean the protective coating has failed. Once rust starts, it spreads. Aluminum won't rust, but it can corrode in certain conditions, particularly in coastal environments with salt air.
Light surface rust on steel might not require immediate replacement, but keep an eye on it. If you're seeing rust holes or significant flaking, replacement should happen soon. Rust weakens the metal and defeats the purpose of having edge protection at all.
Visible Gaps Between Flashing and Fascia
Edge flashing is designed to sit snug against the fascia. Gaps allow water to get behind the metal and soak into the wood. Pests can also use gaps as entry points into your attic or soffit.
Gaps often form when the fascia board warps or when flashing was never properly secured in the first place. Sometimes roof settling creates gaps over time. Regardless of the cause, water will find its way through.
Water Stains on Fascia or Soffit
Brown stains or discoloration below the roofline often indicate water is bypassing the edge protection. The staining shows where moisture has been soaking into the wood repeatedly.
Drip Edge Cost Guide (2026)
Edge flashing is one of the more affordable parts of a roofing project. The total cost depends on material choice, linear footage, and whether you're installing it during new roof construction or retrofitting an existing roof.
Material Costs
Here's what you can expect to pay for materials per linear foot in 2026:
Material | Cost Per Linear Foot | Typical 1,500 SF Home (150 LF) |
Aluminum | $2–4 | $300–600 |
Galvanized Steel | $1.50–3 | $225–450 |
Copper | $8–15 | $1,200–2,250 |
These prices reflect the flashing itself, not installation labor. The material cost is typically a small fraction of the total roofing project budget.
Labor Costs
Labor varies significantly based on whether installation happens during new roof construction or as a retrofit:
New roof installation: Labor is usually bundled into the overall roofing price. Expect $1-2 per linear foot, or $150-300 for a typical home. Many contractors don't break this out separately since it's part of the standard roofing process.
Retrofit installation: Labor costs more because the work is more difficult. Expect $3-6 per linear foot, or $450-900 for a typical home. This assumes partial shingle removal to access the roof edge.
Replace damaged sections: Spot repairs cost $100-300 per section, including materials and labor. A "section" typically means one side of your roof.
Total Project Costs
For a complete roof replacement on a 1,500 square foot home (roughly 150 linear feet of edge):
Budget option (galvanized steel, new roof): $375-750
Standard option (aluminum, new roof): $450-900
Premium option (copper, new roof): $1,350-2,550
These numbers assume installation as part of a full roof replacement. Retrofit installation costs roughly double these amounts.
Return on Investment
The cost of edge flashing is negligible compared to the damage it prevents. Replacing rotted fascia boards costs $1,000-3,000 for a typical home. Roof decking replacement costs $1,500-5,000 depending on the extent of damage. Interior water damage from leaks can easily exceed $5,000 once you factor in drywall, insulation, and paint.
Spending $500-900 on proper edge protection during roof installation prevents problems that cost 5-10 times that amount to repair. The ROI is clear.
How to Choose a Contractor
When reviewing roofing estimates, edge flashing should appear as its own line item or be clearly included in the materials specification. Here's what to look for:
Verify Flashing Will Be Installed
Not all contractors automatically include proper edge protection, especially in areas where code enforcement is lax. Ask specifically: "Is edge flashing included in this quote?" If the answer is vague or the contractor seems unsure what you're talking about, that's a red flag.
Check Material Options Offered
A good contractor will explain your material options and make a recommendation based on your roof type, climate, and budget. If they only offer one option without discussion, ask why. For most residential applications, aluminum is the right choice, but you should hear the reasoning.
Review the Installation Sequence
Ask how they install edge flashing relative to the underlayment. The correct answer is: "Eave flashing goes under the underlayment, rake flashing goes over it." If they tell you it doesn't matter or they do it all one way, find another contractor.
Watch for These Red Flags
Significantly cheaper quote: If one quote is $500 less than others and all else looks equal, they probably skipped the edge flashing or are using inferior materials.
Bundled pricing: "All materials included" without itemization makes it impossible to know what you're actually getting. Ask for a detailed breakdown.
Dismissive attitude: If a contractor brushes off your questions about edge protection as "no big deal" or "not necessary," they're not someone you want on your roof.
Questions to Ask
Here are specific questions that help you evaluate contractors:
"What type of edge flashing profile do you recommend for my roof, and why?"
"What material do you use, and what warranty does it carry?"
"Can you show me examples of completed projects where I can see the edge detail?"
"Do you seal the joints in high-wind applications?"
"How do you handle corners and transitions between rake and eave?"
Good contractors welcome these questions. They'd rather explain their process upfront than deal with callbacks for problems later.
Drip Edge vs Other Solutions
Edge flashing is sometimes confused with similar components. Here's how it differs from alternatives:
Drip Edge vs Gutter Apron
Gutter apron is essentially Type F edge flashing. The terms are often used interchangeably, though "gutter apron" specifically refers to the extended vertical flange design. Functionally, they serve the same purpose. The naming difference is more about regional terminology than actual product differences.
Drip Edge vs Rake Edge
Rake edge is just edge flashing installed on the rake (sloped sides) of your roof. Some suppliers sell "rake edge" as a separate product, but it's typically the same profile as what's used on the eaves. The installation sequence differs, but the product is usually identical.
Drip Edge vs Ice and Water Shield
Ice and water shield is a self-adhering waterproof membrane that goes under shingles in vulnerable areas. It works with edge flashing, not instead of it. Ice and water shield typically runs along the eaves and in valleys. Edge flashing runs along all roof edges. You need both components for proper protection in cold climates.
When Alternatives Apply
In some situations, modified versions of standard edge protection work better:
Steep slopes: Extra-wide flashing profiles help on roofs steeper than 8:12 pitch.
Metal roofing: Metal roofs often use specialized edge trim that integrates with the panel system rather than standard profiles.
Flat or low-slope roofs: These applications require different edge details entirely, often involving gravel stops or edge coping instead of standard residential flashing.
Peeling paint near the roofline
Paint bubbling or peeling on fascia boards suggests moisture is getting trapped behind the surface. This often traces back to drip edge that isn't directing water properly.
Bent or missing drip edge sections
Storm damage, ladder damage, or simple age can bend or dislodge sections of drip edge. Missing sections leave the roof edge completely unprotected, which accelerates damage to everything underneath.


