
When heavy rain pours over your front door or soaks the walkway to your porch, you might wonder if there's a simple fix. Gutters aren't always practical for every part of your roof, and sometimes you just need targeted water control for specific problem areas. That's where rain diverters come in.
A rain diverter is a metal or plastic flashing device installed on a roof to redirect rainwater away from specific areas like doors, windows, AC units, or walkways. Think of it as a targeted drainage solution that channels water sideways instead of letting it cascade straight down. In this guide, you'll learn what rain diverters are, the different types available, how much they cost, their pros and cons, and when to choose them over a full gutter system.
What Is a Rain Diverter?

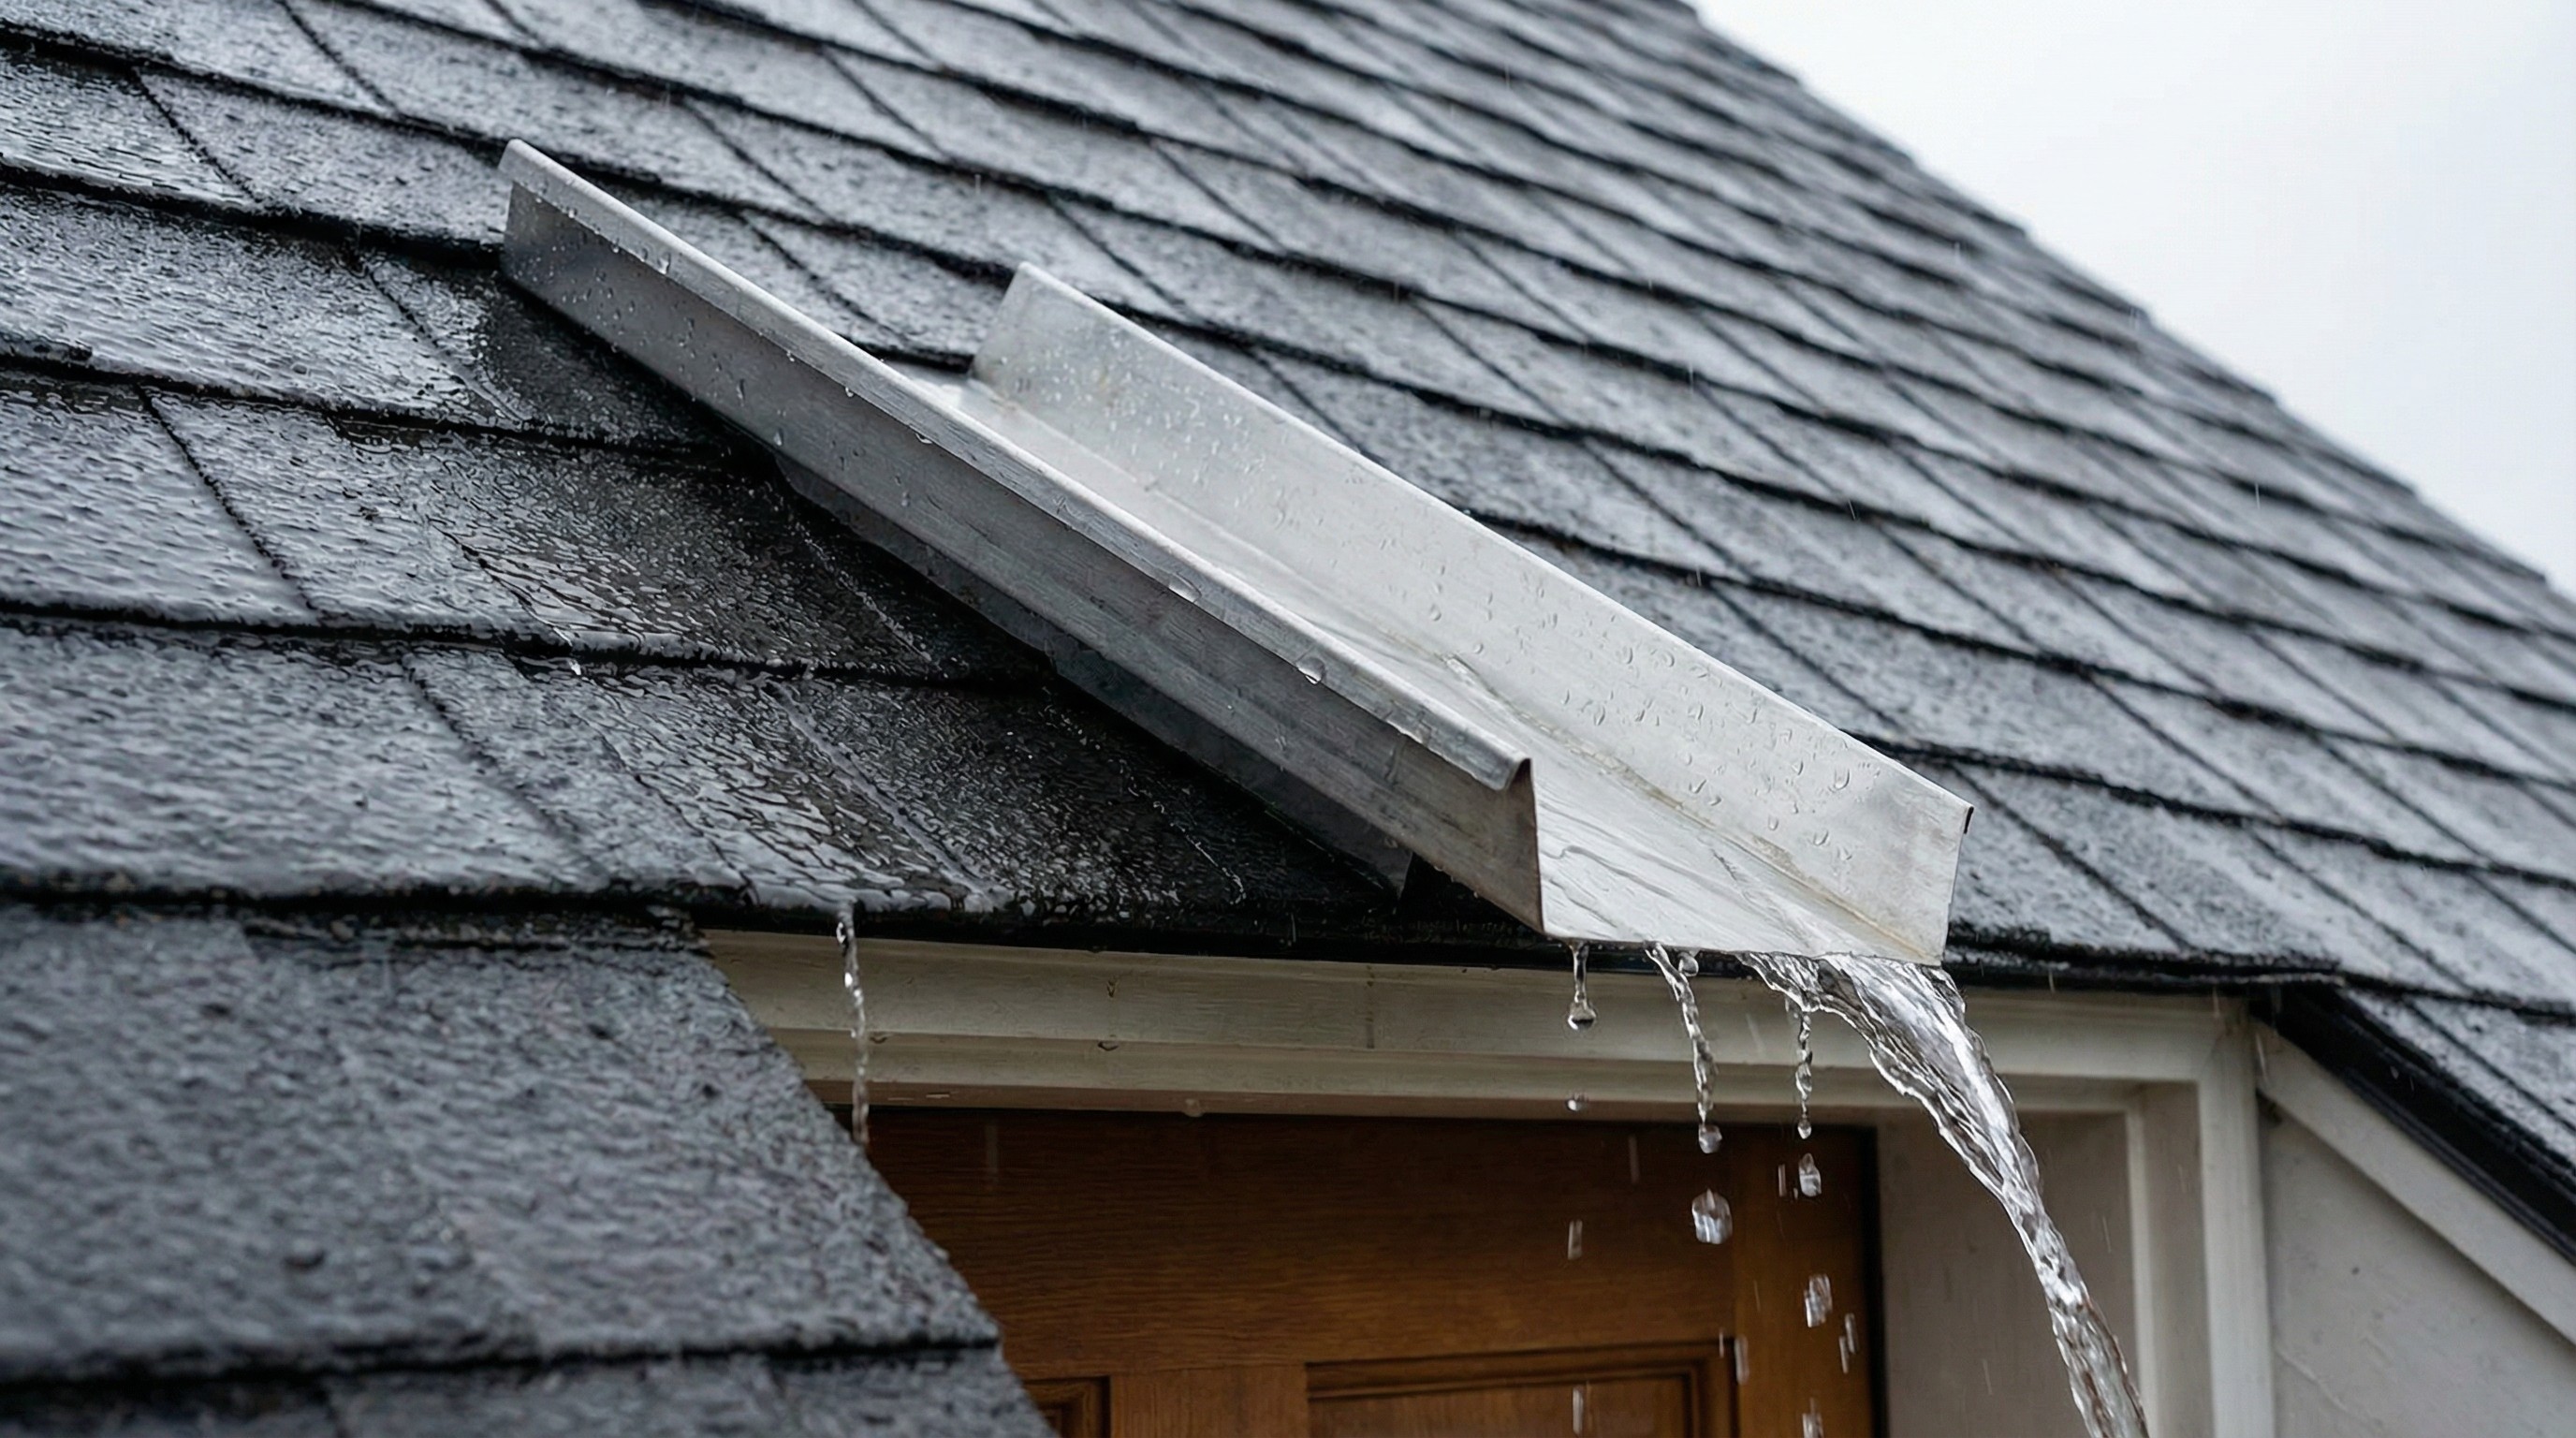
A rain diverter is a simple angled piece of metal or plastic flashing that redirects roof runoff away from vulnerable areas. It works by creating a physical barrier that catches water flowing down your roof and channels it sideways, preventing concentrated runoff from damaging specific spots.
Here's how it functions:
The diverter is installed under your roof shingles, typically a few courses above the roof edge. When rainwater flows down the roof, it hits the angled surface of the diverter and gets redirected sideways, away from the protected area below. It's essentially a traffic cop for roof water, steering it away from trouble spots.
Rain diverters are commonly used to protect:
Entry doors and walkways (so you don't get soaked entering your home)
Windows (preventing water from running down walls)
AC units (keeping debris and excess water out of equipment)
Patios and decks (avoiding water damage to outdoor living spaces)
Lower roof sections (preventing concentrated runoff from upper roofs)
Most rain diverters are made from aluminum, galvanized steel, or plastic. They typically measure 7 to 10 feet in length and stand 2.5 to 3 inches tall. The angled design creates enough height to redirect even heavy rainfall while remaining relatively unobtrusive on your roofline.
Types of Rain Diverters
Not all rain diverters serve the same purpose. Understanding the two main types will help you choose the right solution for your specific drainage problem.
Roof-Mounted Diverters
Roof-mounted diverters are installed directly on the roof surface, tucked under shingles at the eaves. These are what most people think of when they hear "rain diverter."
Purpose: Protect specific areas below the roofline from concentrated water runoff.
Installation: The diverter slides under asphalt shingles and gets nailed into place. Roofers typically install them a few rows above the roof edge, positioned directly over the area that needs protection.
Best for: Situations where full gutters aren't practical or cost-effective. Perfect for protecting a single door, window, or walkway without installing an entire gutter system.
Downspout Diverters
Downspout diverters attach to existing gutter downspouts and serve a completely different purpose than roof-mounted versions.
Purpose: Feed rainwater from your gutter system into rain barrels, cisterns, or water storage tanks for harvesting and reuse.
Installation: These devices connect to your downspout and include a valve or channel that diverts water into a collection container. When the container fills, excess water continues down the downspout normally.
Best for: Homeowners who want to collect rainwater for landscaping, gardening, or other outdoor uses. They work with existing gutter systems, not as replacements.
Material Comparison
The material you choose affects durability, cost, and appearance:
Material | Durability | Cost Range | Pros | Cons |
|---|---|---|---|---|
Aluminum | 15-20 years | $20-$150 | Lightweight, rust-resistant, most common | Can dent with hail impact |
Galvanized Steel | 20-30 years | $50-$200 | Heavy-duty, very durable | Can rust over time, heavier |
Plastic/Vinyl | 5-10 years | $15-$40 | Cheapest option, easy DIY | Less durable, aesthetic concerns |
Aluminum is the most popular choice because it balances cost, durability, and rust resistance. Galvanized steel is worth considering for heavy-use areas or regions with severe weather. Plastic works for temporary solutions or very tight budgets, but expect to replace it more frequently.
When to Choose a Rain Diverter Over Gutters
Rain diverters aren't the right solution for every situation. Here's when they make sense and when gutters are the better choice.

Situations Where Rain Diverters Work Well
Architectural constraints: Some roof designs make full gutter installation difficult or impossible. Flat roof sections, unusual angles, or decorative features may prevent proper gutter mounting.
Limited roof space: If you only have one problem spot (a single door or window), installing 40 feet of gutter is overkill. A rain diverter solves the specific issue for a fraction of the cost.
HOA restrictions: Some homeowners associations limit or prohibit visible gutters for aesthetic reasons. Rain diverters are smaller and less noticeable.
Budget constraints: A basic rain diverter costs $20 to $50 in materials. Professional installation runs $199 to $500. Compare that to $1,000 to $2,500 for a full gutter system.
Temporary or targeted needs: If you're planning a roof replacement soon but need immediate protection for one area, a rain diverter provides a quick, affordable interim solution.
When Gutters Are the Better Choice
Whole-house drainage: If water management is an issue along most of your roofline, gutters provide comprehensive coverage that rain diverters can't match.
Heavy rainfall regions: In areas with frequent downpours (Pacific Northwest, Southeast), rain diverters can overflow. Gutters with proper downspouts handle high volumes better.
Long-term solution: Gutters last 20 to 30 years with minimal maintenance. Rain diverters work well but aren't designed to be a complete drainage system.
Foundation protection: If you're trying to keep water away from your foundation to prevent settling or basement flooding, a complete gutter system with extensions is more effective.
Need help deciding what's right for your home? A professional roof inspection can assess your drainage needs and recommend the most cost-effective solution.
Pros of Rain Diverters
Rain diverters offer several practical benefits, especially when you need targeted water control without the expense of a full gutter system.
Cost-effective solution: Material costs range from $20 to $200 depending on type and quality. Even with professional installation ($199 to $500), you're spending far less than the $1,000 to $2,500 typical for a complete gutter system. For a single problem area, the savings are substantial.
Easy installation: A skilled roofer can install a rain diverter in one to two hours. The process involves lifting a few shingles, sliding the diverter underneath, nailing it in place, and sealing with roofing cement. Some homeowners with roof access and basic DIY skills handle it themselves.
Targeted protection: Unlike gutters that cover your entire roofline, rain diverters solve specific problems. If water only pours over your back door during storms, you fix that one spot without altering the rest of your roof drainage.
Low maintenance: Rain diverters have fewer moving parts and smaller surface areas than gutter systems. There's less to clean, fewer joints to leak, and less debris accumulation. An annual check during roof inspection is usually sufficient.
Aesthetic flexibility: Rain diverters have a smaller footprint than gutters. They're less visible from the ground and don't alter your home's appearance as dramatically. For homeowners concerned about curb appeal or HOA rules, this matters.
Quick fix for urgent problems: If you're dealing with water damage and need an immediate solution, a rain diverter can be installed in days, not weeks. No permits, no extensive planning, just a straightforward fix.
Versatile application: Rain diverters work on various roof types, including asphalt shingle, metal, and tile roofs. They adapt to different pitch levels and can be cut to custom lengths for specific situations.
Cons and Limitations of Rain Diverters
Rain diverters aren't perfect. Understanding their limitations helps you make an informed decision and avoid problems down the road.
Heavy rain volume limitations: Rain diverters work well for moderate rainfall, but they can overflow during severe storms. If your area experiences frequent downpours or you have a large upper roof section funneling water to one spot, the diverter may not handle the volume. You'll still get some protection, but water can spill over the edges.
Ice dam risks in cold climates: In northern states or areas with freeze-thaw cycles, rain diverters can create a foothold for ice dams. Snow melts during the day, runs down to the diverter, and refreezes at night. This ice buildup can damage shingles and create leaks. FORTIFIED Home standards specifically warn against this risk.
Shingle sealant damage potential: Installing a rain diverter requires lifting shingles and driving nails through the roof surface. If done improperly, this can break the adhesive seal that holds shingles down. Broken seals increase the risk of wind uplift during storms. Professional installation minimizes this risk, but it's still a concern, especially on older roofs.
Maintenance requirements: While lower-maintenance than gutters, rain diverters still need attention. Leaves, twigs, and debris can accumulate at the diverter's edge, reducing effectiveness. Ice and snow can build up in winter. You'll need to inspect and clear the diverter periodically, which means roof access.
Limited coverage area: A rain diverter protects one spot. If you have drainage issues in multiple locations, you'll need multiple diverters or a different solution altogether. At some point, installing gutters becomes simpler and more cost-effective.
Aesthetic concerns: Some homeowners find the visible metal strip less attractive than hidden gutters. The diverter creates a break in the roofline's consistency. It's functional, but it's not invisible.
Leak risk from penetrations: Every nail hole in your roof is a potential leak point. Proper sealing with roofing cement reduces this risk, but over time, sealants degrade. Temperature changes cause roof materials to expand and contract, which can work fasteners loose. Regular inspection helps catch problems early.
FORTIFIED Roof Standards and Rain Diverters
If you're pursuing FORTIFIED Home certification or live in a hurricane or severe storm zone, understanding how rain diverters interact with FORTIFIED standards is important.
What FORTIFIED Certification Requires
FORTIFIED Home is a voluntary construction and re-roofing program that strengthens homes against severe weather. The standards focus on creating a continuous roof deck seal, properly attaching shingles, and reinforcing edges and connections.
FORTIFIED guidelines emphasize keeping shingle sealant intact and minimizing penetrations through the roof surface. The goal is a roof system that works as a unified whole, not a collection of parts and patches.
Why Rain Diverters May Conflict
FORTIFIED guidance generally discourages rain diverters because they can:
Disrupt shingle sealant: Lifting shingles to install a diverter can break the adhesive seal. This compromises the wind resistance that FORTIFIED certification requires.
Increase wind uplift risk: Broken seals create weak points where high winds can get under shingles and peel them back during storms.
Add penetration points: The nails securing the diverter create holes in the roof surface. While sealed, these are still potential failure points during extreme weather.
FORTIFIED-Approved Alternatives
Instead of adding diverters, FORTIFIED standards recommend:
Proper gutter and downspout design: Correctly sized gutters with adequate downspouts handle runoff without roof surface attachments.
Drip edge installation: Properly installed drip edge guides water into gutters efficiently, often solving drainage issues without additional devices.
Roof valley improvements: Better valley flashing and design manage concentrated water flow safely.
When Diverters May Still Be Acceptable
In some cases, rain diverters can coexist with FORTIFIED standards if:
Installed by a certified roofer who maintains shingle sealant integrity
Used temporarily until a more permanent drainage solution is implemented
Positioned in areas where wind uplift risk is minimal (lower roof slopes, protected locations)
Always consult with a FORTIFIED evaluator before installing rain diverters on a certified home or one pursuing certification.
Cost to Install a Rain Diverter
Understanding the full cost picture helps you decide if a rain diverter is worth it for your situation.
Material Costs
Basic aluminum diverter: $20 to $50 for a 10-foot section. This is the most common type, available at Home Depot, Lowe's, or local hardware stores. Sufficient for most residential applications.
Premium aluminum diverter: $75 to $150 for heavier gauge material with better corrosion resistance. Worth considering in coastal areas or for long-term durability.
Galvanized steel diverter: $50 to $200 depending on thickness and coating. The most durable option, but also the heaviest. Best for commercial applications or severe weather zones.
Plastic/vinyl diverter: $15 to $40. The budget option works for temporary fixes or very light-duty use. Expect to replace it in five to 10 years.
Installation Costs
DIY installation: $0 labor cost, one to two hours of your time. You'll need a pry bar, hammer, roofing nails, and roofing cement. Total out-of-pocket is just the material cost plus about $10 in supplies.
Professional installation: $199 to $500 for a typical residential installation. This often includes a roof tune-up where the roofer seals exposed nail heads and checks for other issues. Cost varies based on roof pitch, accessibility (one-story vs. two-story), and the number of diverters needed.
Cost Comparison to Alternatives
Section of gutter (10 to 20 feet): $200 to $400 installed. More expensive than a rain diverter but provides broader coverage.
Full gutter system: $1,000 to $2,500 for an average home. Comprehensive solution but significant investment if you only have one problem spot.
ROI consideration: If you have one or two isolated areas where water is an issue, rain diverters save you $500 to $2,000 compared to full gutters. If you need protection in three or more locations, or if you're dealing with heavy runoff along most of your roofline, gutters become more cost-effective.
Use our roofing calculator to estimate costs for your specific situation and compare drainage solutions.
Installation Overview
Installing a rain diverter is straightforward but requires attention to detail to avoid damaging your shingles.

Difficulty Rating: Moderate
This is a manageable DIY project if you're comfortable working on a roof. The technical skill required is low, but you need proper safety equipment and care when handling shingles.
Tools Needed
Pry bar (for lifting shingles gently)
Hammer or nail gun
Roofing nails (1.5-inch galvanized)
Roofing cement or sealant
Measuring tape
Ladder and roof safety equipment
Step-by-Step Summary
Position the diverter: Measure and mark where the diverter should sit (typically centered over the door or window below).
Lift the shingles: Use a pry bar to carefully lift the shingles in the installation area. Work slowly to avoid breaking the adhesive seal on surrounding shingles.
Slide diverter underneath: Position the diverter under the lifted shingles with the angled edge facing down-roof.
Nail in place: Drive nails through the back flange of the diverter into the roof deck. Position nails so the shingles will cover them when laid back down.
Seal the nails: Apply roofing cement over each nail head to prevent leaks.
Replace shingles: Carefully press the shingles back down over the diverter. The shingles should lay flat and seal against the diverter's surface.
When to Hire a Professional
Call a roofer if:
Your roof is steep (7/12 pitch or greater)
You have a two-story home or higher
You're uncomfortable with heights or ladder work
Your shingles are old or brittle (high risk of breaking during installation)
You want the work warrantied
Professional installation costs $199 to $500 but includes proper sealing and often a broader roof inspection that catches other issues.
Where to Buy Rain Diverters
You can find rain diverters at:
Big box stores: Home Depot, Lowe's, Menards
Roofing supply stores: ABC Supply, 84 Lumber, local roofing suppliers
Online: Amazon, roofing specialty retailers
Check your local hardware store first. Roofing supply stores carry heavier-duty options and can cut custom lengths.
Alternatives to Rain Diverters
If rain diverters don't quite fit your needs, several other solutions handle roof drainage effectively.
Proper Gutter Systems
Full gutter systems provide comprehensive water management for your entire roofline. While more expensive ($1,000 to $2,500 installed), they handle high water volumes, protect your foundation, and work in all weather conditions. If you have multiple problem areas or heavy rainfall, gutters are worth the investment.
Drip Edge Improvements
Drip edge is the metal strip installed along roof edges to guide water into gutters. If water runs behind your existing gutters or soaks your fascia, the problem might be missing or improperly installed drip edge. Fixing this (typically $200 to $500) often solves drainage issues without adding diverters.
Roof Valley Modifications
Roof valleys concentrate large amounts of water into a single channel. If a valley dumps excessive water onto a lower roof section or doorway, improving the valley flashing and design redirects flow more safely. This usually happens during roof replacement or major repair.
Surface Grading and Drainage
Sometimes the issue isn't your roof, it's where the water lands. Improving ground slope away from your foundation, adding splash blocks at downspout outlets, or installing French drains addresses the root problem. These ground-level solutions work alongside or instead of roof modifications.
Each alternative has its place. The best choice depends on your specific drainage problem, budget, and long-term plans for your home.


