

Your roof has a hidden ventilation system working 24/7 to protect your home from heat, moisture, and expensive damage. Most homeowners don't realize this system exists until something goes wrong (like a $4,000 mold remediation bill or ice dams that destroy gutters every winter).
Here's the thing: Your attic probably hits 150°F on summer days. Without proper ventilation moving that heat out, your shingles bake from below, your AC works overtime, and moisture builds up in places you can't see. The fix? Understanding the different types of roof vents and making sure you have the right combination working together.
This guide breaks down all major types of roof vents, how they work as a system, and which types of roof vents your home actually needs. No technical jargon, just straightforward advice from someone who's inspected thousands of attics.
How Your Roof Ventilation System Works
Think of your roof ventilation like breathing. You need air coming in (intake vents at the bottom) and air going out (exhaust vents at the top). Hot air rises naturally, creating continuous airflow from your soffits up through your ridge. This isn't optional engineering, it's physics doing the heavy lifting.
A balanced system means equal ventilation area at the intake and exhaust points. When you have 10 square feet of soffit vents pulling air in, you need 10 square feet of ridge or other exhaust vents letting it out. Unbalanced systems create negative pressure, pulling conditioned air from your living space through ceiling cracks (which wastes energy and money).
Building codes require 1 square foot of net free ventilation area per 300 square feet of attic space, split evenly between intake and exhaust. For a 1,500 square foot attic, that's 5 square feet of intake and 5 square feet of exhaust. Some jurisdictions use a 1:150 ratio if you don't have a vapor barrier, which doubles the requirement.
Without proper ventilation, three expensive problems show up:
Summer heat damage: Attic temperatures hit 150-160°F, cooking your shingles from below and shortening their lifespan by years. Your AC runs constantly fighting heat radiating through the ceiling.
Winter ice dams: Warm attic air melts snow on your roof. Water runs down and refreezes at the cold eaves, creating ice dams that force water under shingles and into your home.
Year-round moisture: Bathroom fans, cooking steam, and normal humidity rise into the attic. Without ventilation moving that moisture out, you get mold, rotted wood, and ruined insulation.

Intake Vents (Bottom of Roof)
Intake vents pull cool air into your attic from the lowest point of your roof. These are the foundation of any ventilation system. Without adequate intake, your exhaust vents can't do their job (like trying to drain a bathtub with the faucet turned off).
Location matters. Intake vents install at the eaves, soffits, or drip edge where cool air naturally enters. You need enough intake area to match your exhaust capacity, or the whole system stalls.
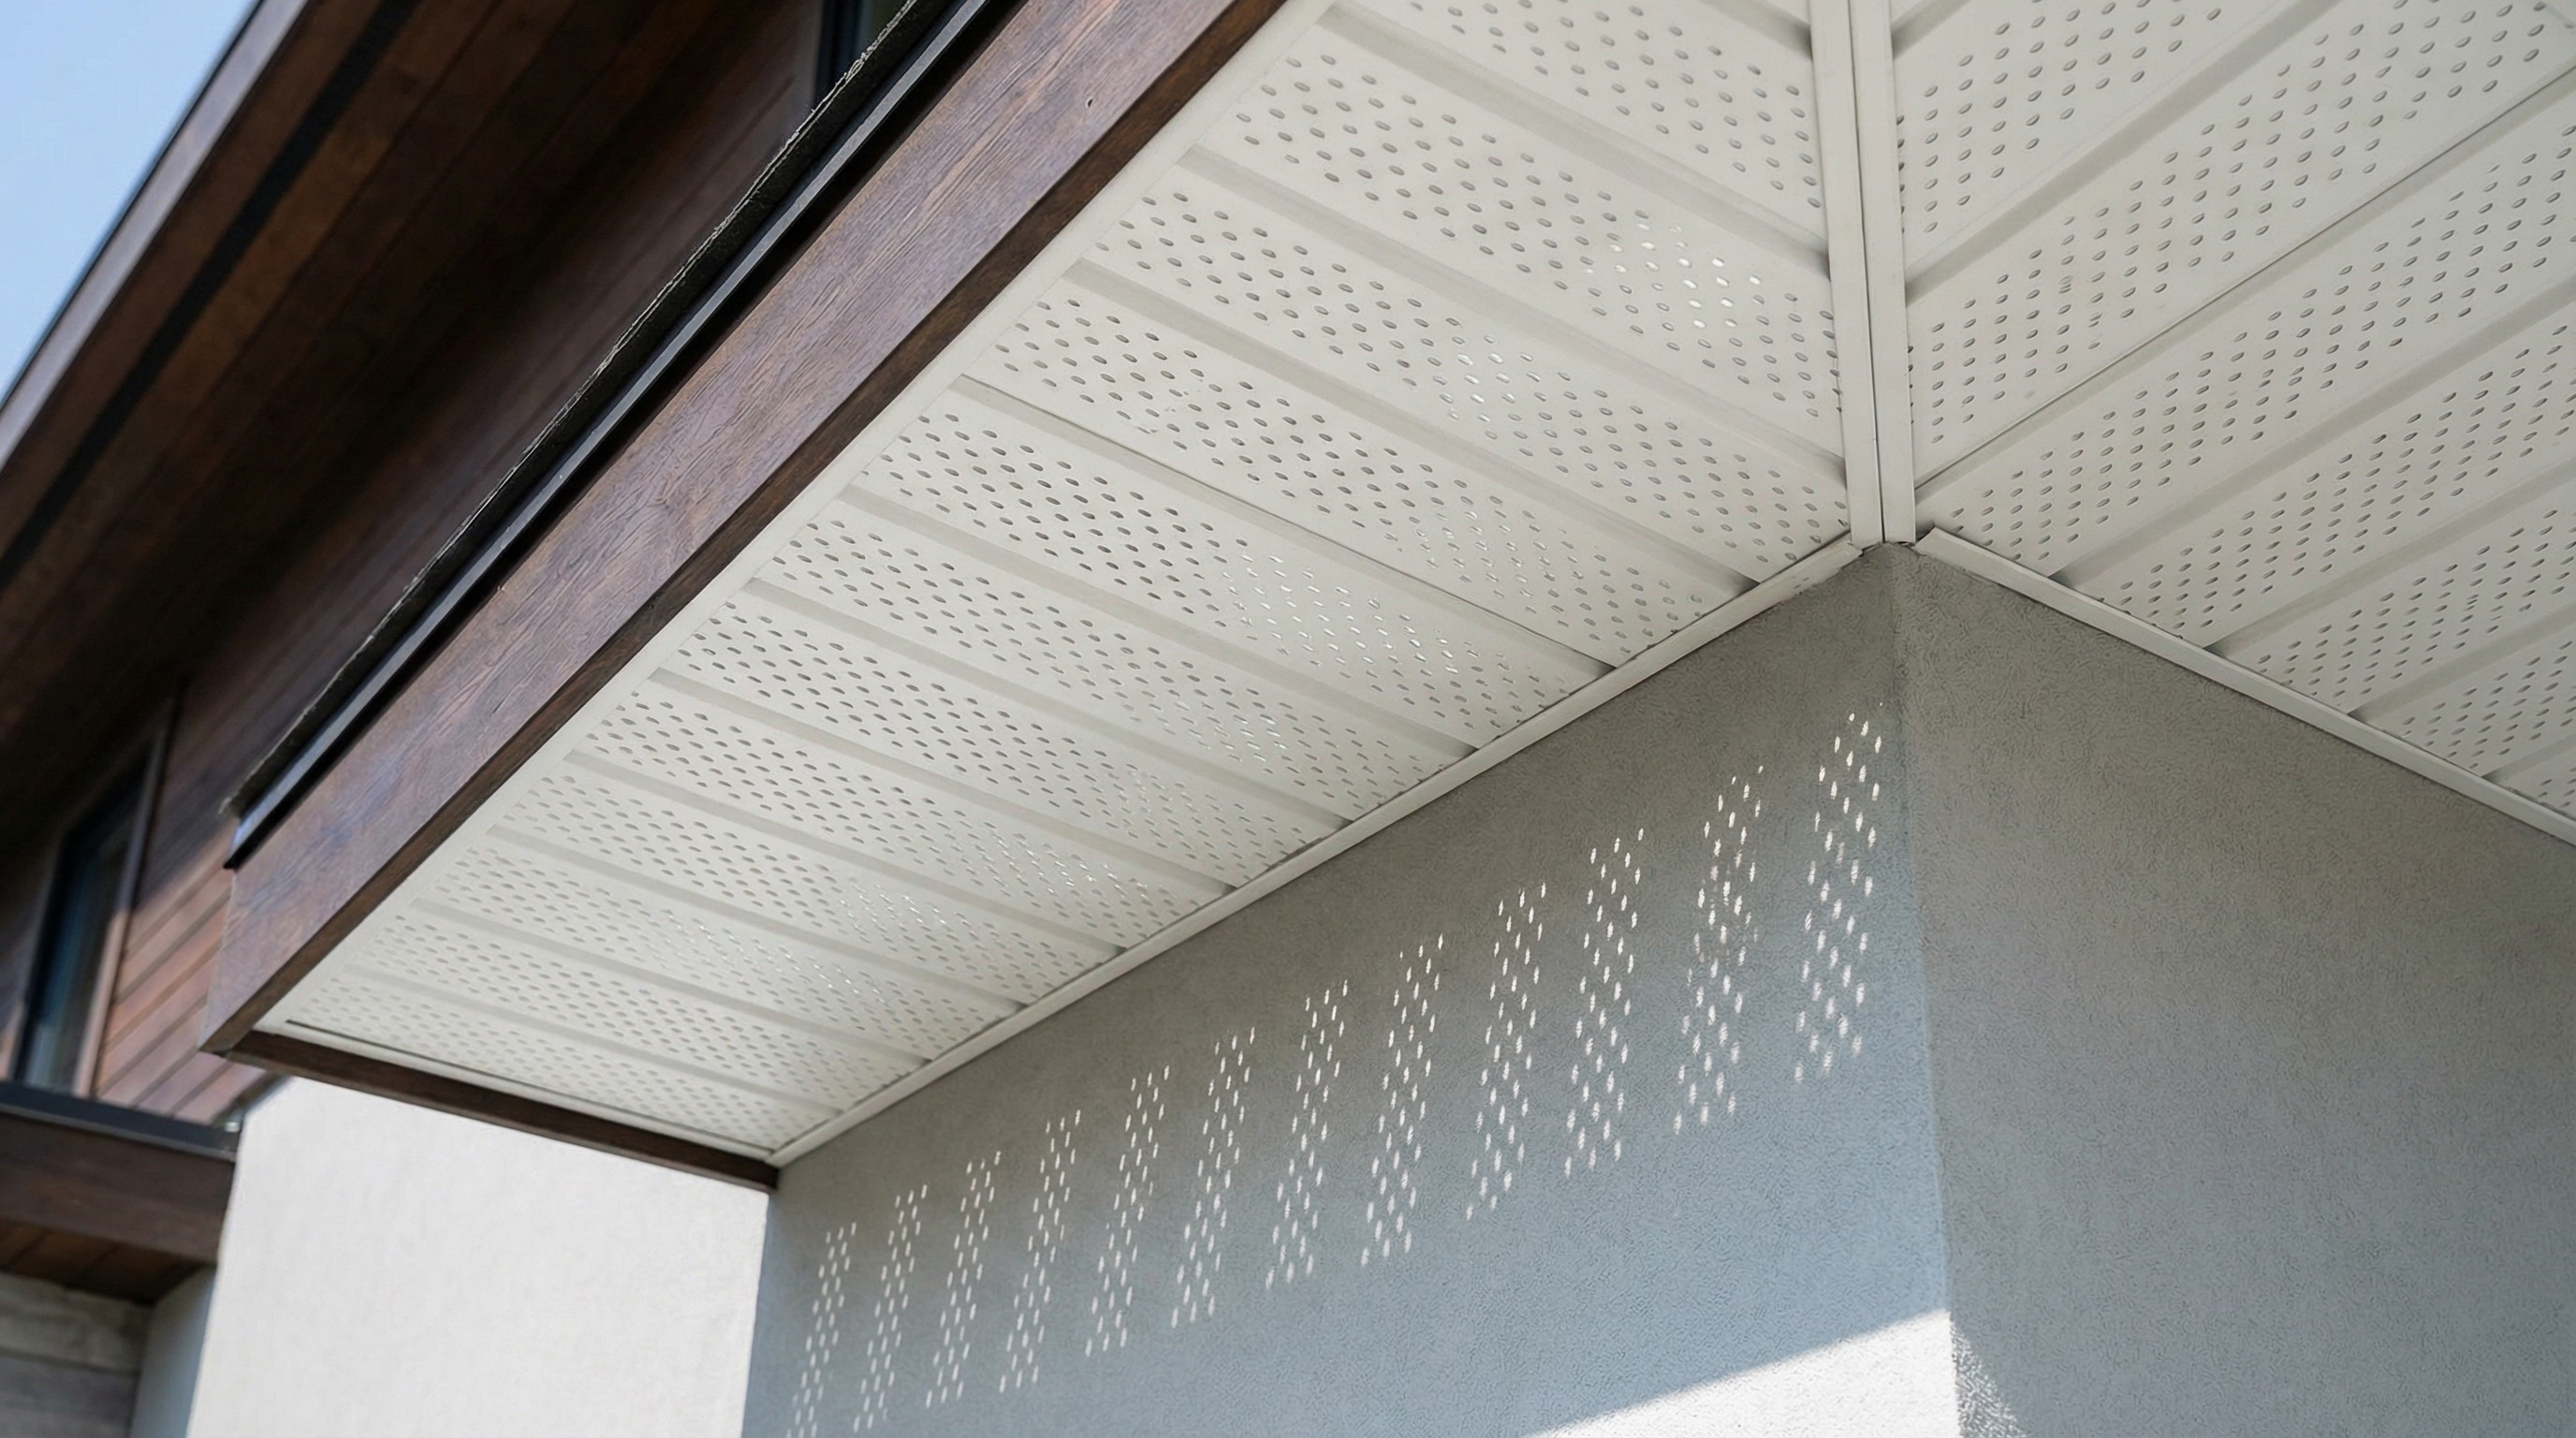
Soffit Vents
Soffit vents are perforated panels or individual vents installed in the horizontal surface under your roof overhang (the soffit). They're the most common and effective intake option because they're hidden from view and provide excellent airflow when installed correctly.
How they work: Air enters through the perforations, travels up the underside of your roof deck (between rafters), and exits through exhaust vents at the top.
Pros: Completely hidden, highly effective, works with all exhaust vent types, no moving parts to fail, inexpensive.
Cons: Requires open rafter bays. If insulation blocks the pathway from soffit to attic, airflow stops. Many older homes have this problem.
Cost: $2-5 per linear foot installed. Continuous soffit vents cost more upfront but provide better airflow than individual vents spaced every few feet.
Best for: New construction and any home with adequate eave overhang (typically 12+ inches). This is the gold standard for intake ventilation.
Installation note: Make sure insulation baffles (rigid foam channels) keep insulation from blocking the airflow path between the soffit and attic space.
Drip Edge Vents
Drip edge vents combine the metal drip edge (standard on all roofs) with a built-in intake vent. They install at the very edge of your roof where shingles meet the gutter line.
How they work: Mesh or louvers along the drip edge allow air to enter while keeping debris and pests out.
Pros: Works when you have no soffit or minimal overhang, clean appearance, protects roof edge from water damage.
Cons: Less airflow capacity than soffit vents. You'll need more linear footage to match soffit vent performance.
Cost: $3-6 per linear foot installed (higher than standard drip edge, but adds ventilation function).
Best for: Homes without soffits, minimal eave overhang, or when retrofitting ventilation on older homes where soffit access is difficult.
Over-Fascia Vents
Over-fascia vents are mesh vent strips installed over the fascia board (the vertical board at your roof edge). Think of them as a last-resort intake option when soffit venting isn't possible.
How they work: Continuous mesh strip allows air to enter above the gutter but below the roof deck.
Pros: Retrofit solution when soffits can't be vented, relatively easy installation.
Cons: Visible from the ground (aesthetics), less common (harder to find), lower airflow than soffit vents, can clog with debris more easily.
Cost: $2-4 per linear foot.
Best for: Older homes with enclosed soffits that can't be modified, situations where drip edge vents won't provide enough intake area.
Exhaust Vents (Top of Roof)
Exhaust vents release hot air from the peak or upper portion of your roof. When comparing types of roof vents for exhaust, you'll find dramatically different effectiveness, cost, and maintenance requirements. Location is critical: exhaust vents work best at the highest point of your roof where hot air naturally accumulates.
One warning before we dive into the different types of roof vents for exhaust: Don't mix multiple exhaust vent types on the same roof plane. When you combine ridge vents with gable vents or power fans, you create short-circuiting where air takes the path of least resistance instead of flowing through the entire attic. Stick with one exhaust type per roof section.
Ridge Vents
Ridge vents run continuously along your entire roof peak, covered by special cap shingles that make them nearly invisible from the ground. This is what most roofing professionals recommend as the best overall exhaust solution for most homes.
How they work: A slot cut along your roof ridge allows hot air to escape through a mesh vent covered by a special ridge cap. High-quality ridge vents include internal baffles that prevent rain, snow, and wind-driven moisture from entering while maintaining airflow.
Pros: Most effective exhaust option, completely invisible from the ground, works on all roof pitches 3:12 and steeper, no moving parts to fail, provides continuous ventilation along entire ridge length.
Cons: Requires adequate soffit intake to function (no intake = no airflow), highest upfront cost among passive vents, doesn't work on hip roofs with minimal ridge length.
Cost: $5-12 per linear foot installed. For a typical home with 40 feet of ridge, expect $200-500 in materials and labor during a roof replacement.
Effectiveness: Provides up to 18 square inches of net free ventilation area per linear foot (varies by product). A 40-foot ridge vent delivers roughly 5 square feet of exhaust capacity.
Best for: New roofs, roof replacements, any home with adequate ridge length (20+ feet) and proper soffit intake ventilation.

Box Vents (Static Vents)
Box vents (also called turtle vents, flat vents, or static vents) are square or rectangular metal boxes installed near your roof ridge. They have no moving parts and rely entirely on natural convection and wind to exhaust hot air.
How they work: Hot air rises into the vent through a screened opening at the base. Wind passing over the top creates slight negative pressure that helps pull air out.
Pros: Inexpensive, easy to install, no maintenance, no electricity required, work reliably for decades.
Cons: Less effective than ridge vents (you need multiple units), visible from the ground, each roof penetration is a potential leak point if not flashed correctly.
Cost: $10-50 per vent installed (depends on size and quality). Most homes need 4-8 vents minimum.
Effectiveness: Moderate. Each vent exhausts roughly 50-144 square inches of net free area depending on size. You'll need approximately one box vent per 150 square feet of attic space.
Best for: Budget-conscious homeowners, situations where ridge vents won't work (hip roofs with limited ridge), supplemental ventilation when adding to existing systems.
Calculation example: A 1,500 square foot attic needs 10 square feet (1,440 square inches) of exhaust. If each box vent provides 100 square inches, you'll need 14-15 vents. That's why ridge vents are more practical for most homes.
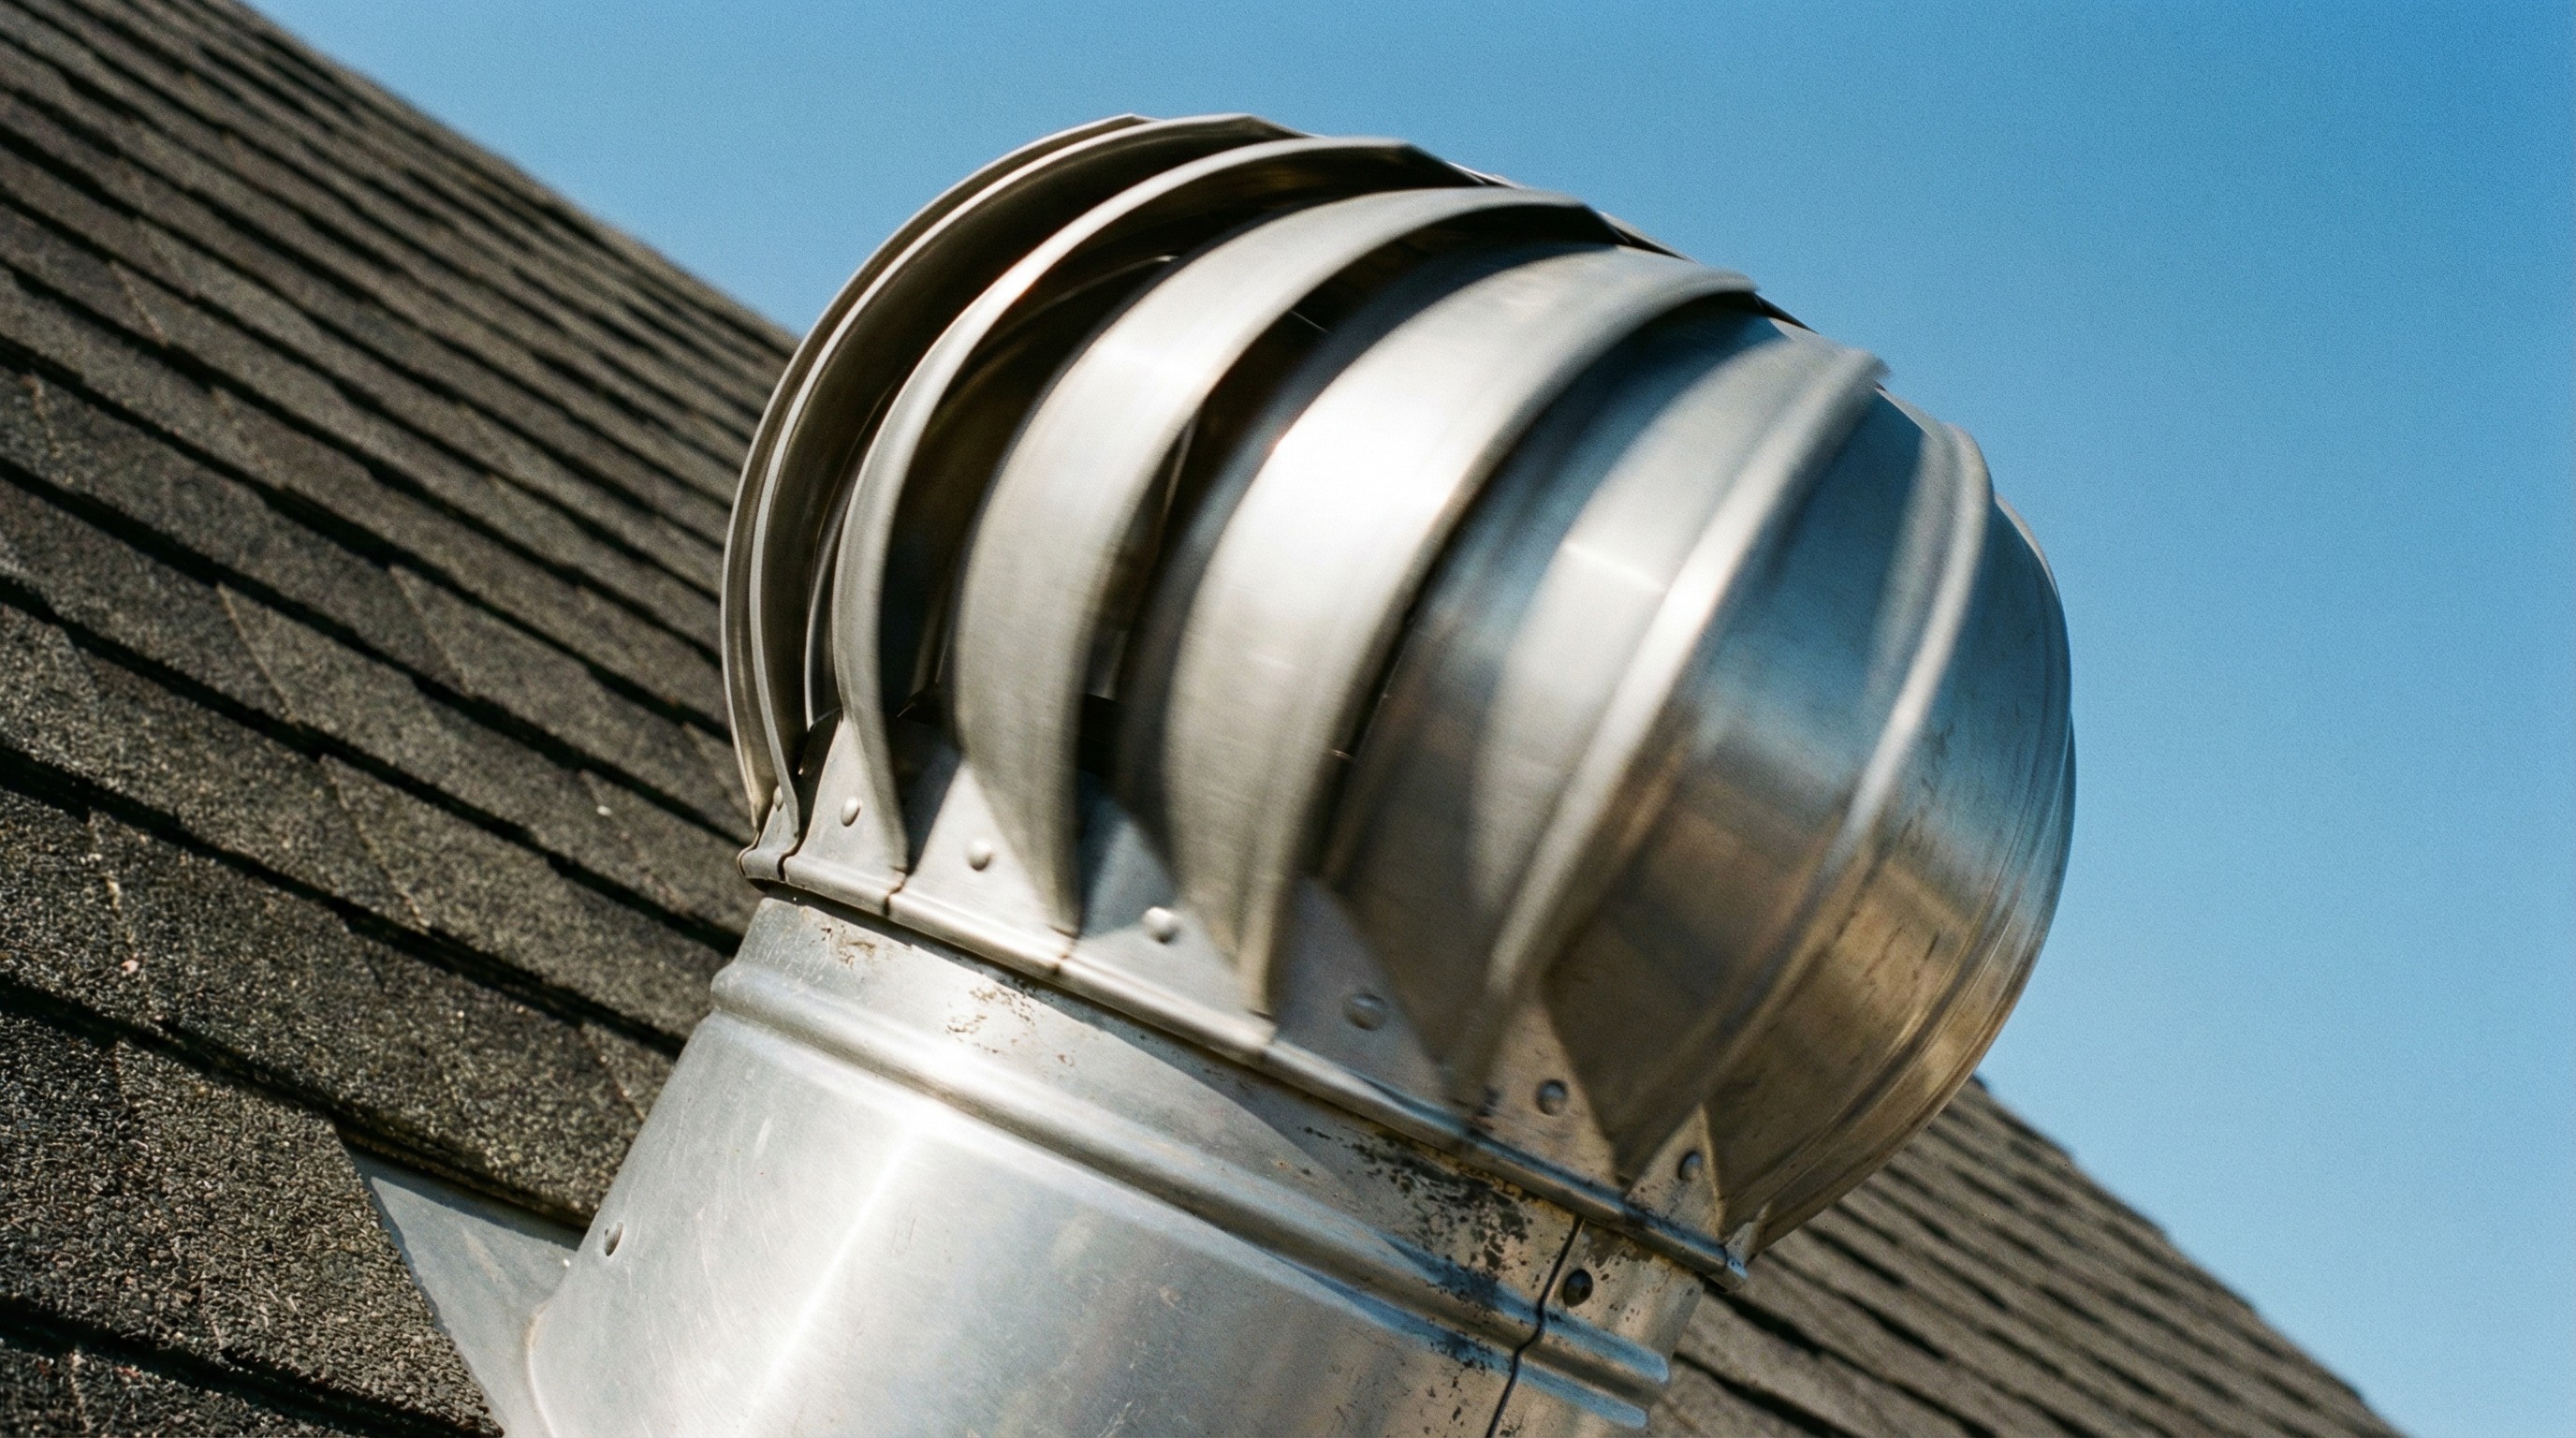
Turbine Vents (Wind-Driven)
Turbine vents (whirlybird vents) are the spinning metal vents you see on older homes and commercial buildings. Wind spins internal fins that actively pull hot air from your attic.
How they work: Wind catches external vanes and spins the turbine. This creates a vacuum that pulls hot air up from the attic. When there's no wind, they function like static box vents.
Pros: More effective than static box vents when wind is blowing, no electricity required, can move significant air volume in windy conditions.
Cons: Noisy when spinning (especially as bearings wear), highly visible and often considered ugly, moving parts eventually fail (bearings seize, vanes break), ineffective in calm weather, requires periodic lubrication.
Cost: $20-100 per vent installed depending on size and quality. Higher-quality units with sealed bearings cost more but last longer.
Effectiveness: Good in consistently windy climates, poor in calm areas. Can move 800-1,400 CFM (cubic feet per minute) in moderate wind, dropping to static vent performance when calm.
Best for: Windy regions, barns and sheds (where noise and aesthetics don't matter), situations where you want active exhaust without electricity.
Not recommended for: Modern homes where aesthetics matter, quiet neighborhoods (spinning can be annoying), coastal areas where salt air corrodes bearings quickly.
Maintenance reality: Expect to lubricate or replace turbine vents every 5-10 years. When bearings fail, they squeak, rattle, or stop spinning entirely.
Power Attic Fans (Active Vents)
Power attic fans are electric or solar-powered exhaust fans that force hot air out of your attic. These are active ventilation systems controlled by thermostats or humidistats.
How they work: When your attic hits a set temperature (usually 90-110°F), the fan kicks on and blows hot air out through a gable or roof-mounted unit. Some models include humidity sensors to run when moisture levels climb.
Pros: Powerful exhaust capacity (1,000-3,000+ CFM), can quickly drop attic temperature 20-40°F, thermostat control means they only run when needed.
Cons: Uses electricity ($5-15/month in summer), can depressurize your attic and pull AC-cooled air from living space through ceiling penetrations (lights, fans, attic hatches), expensive upfront, requires maintenance, fans eventually fail.
Cost: $300-600 installed for hardwired electric models, $600-1,200 for solar-powered units with battery backup.
Effectiveness: Highest CFM rating among all vent types, but effectiveness is questionable. Many energy experts argue powered fans waste energy by fighting your AC system.
Best for: Rarely recommended by professional roofers. Passive ridge vent systems are usually sufficient and don't have the depressurization issues.
The controversy: Power attic fans can create negative pressure that pulls conditioned air from your home through ceiling leaks (recessed lights, plumbing penetrations, attic hatches). This forces your AC to work harder, potentially canceling out any cooling benefit. Most building science experts recommend passive ventilation instead.
When they might make sense: Homes with inadequate passive ventilation that can't be fixed (hip roofs with no ridge, enclosed soffits that can't be vented), but even then, fixing the passive system is usually better long-term.
Installation warning: If you do install a powered fan, make sure your attic is properly air-sealed first (seal all ceiling penetrations with appropriate materials). Otherwise, you're just pulling expensive conditioned air into your attic.
Which Types of Roof Vents Do You Need?
The best ventilation system for your home depends on your roof design, climate, and budget. Choosing the right types of roof vents requires understanding how intake and exhaust work together. Here's how to figure out which types of roof vents you need.
Recommended Combinations
Best Overall: Ridge Vents + Continuous Soffit Vents
This combination provides maximum airflow, remains invisible from the ground, requires zero maintenance, and works effectively in all climates. Hot air naturally rises to your ridge and exits continuously along the entire peak while cool air enters through hidden soffit vents.
Cost: $800-2,000 for an average home (see typical roofing costs for full breakdown)
Why this works: Continuous ventilation along the entire roof ridge means no hot spots. Every part of your attic gets airflow.
Budget Option: Box Vents + Soffit Vents
If ridge vents aren't in your budget or won't work on your roof design (hip roofs with limited ridge), properly-sized box vents provide adequate ventilation at lower cost.
Cost: $300-800 for an average home
The catch: You need enough box vents to match your attic square footage (approximately one vent per 150 square feet). Don't skimp and install too few, or you'll have inadequate exhaust.
No Soffit Option: Drip Edge Intake + Ridge Vent Exhaust
When your home has minimal eave overhang or enclosed soffits that can't be modified, drip edge vents provide intake ventilation without requiring soffit access.
Cost: $1,000-1,800
Trade-off: Drip edge vents provide less intake capacity than soffit vents, so you may need supplemental intake vents installed low on the roof deck (less ideal but functional).
Climate Considerations
Hot Climates (Southern States, Desert Regions)
Maximize your intake area and pair with ridge vents for constant cooling. Attic temperatures can hit 160°F in summer, so moving that heat out quickly protects your shingles and reduces AC costs. Light-colored roofing materials also help reflect heat.
Avoid: Powered attic fans (they fight your AC and waste electricity)
Cold/Snow Climates (Northern States, Mountain Regions)
Prevent ice dams with adequate year-round ventilation. The goal is keeping your attic cold in winter so snow doesn't melt and refreeze at the eaves. Proper insulation on your attic floor (R-49 to R-60) combined with ventilation is critical.
Bonus benefit: Ventilation also removes moisture from cooking and showers before it condenses and causes mold.
Hurricane Zones (Coastal Areas)
Ensure all roof vents meet local wind rating requirements. Most building codes in hurricane zones require impact-resistant vents rated for 110+ mph winds. Check with your local building department before installation.
Calculating Your Ventilation Requirements
Here's the simple formula: Divide your attic square footage by 300. That gives you the total net free ventilation area needed in square feet. Split that number evenly between intake and exhaust.
Example: 1,500 sq ft attic ÷ 300 = 5 sq ft of total ventilation needed
Intake: 2.5 sq ft (soffit vents)
Exhaust: 2.5 sq ft (ridge vent or box vents)
Convert to inches: 2.5 sq ft = 360 square inches
If you're using box vents rated at 100 sq inches each, you'd need four vents (400 sq inches total) for adequate exhaust.
Most ridge vent products list their net free area per linear foot (usually 12-18 square inches). For 360 square inches, you'd need 20-30 linear feet of ridge vent.
Important: Net free area is the actual open space for airflow, not the size of the vent. A 12-inch square box vent doesn't provide 144 square inches of ventilation because screens and louvers block some area. Always check manufacturer specs for net free area ratings.
Common Roof Ventilation Mistakes to Avoid
1. Not Enough Intake Ventilation
This is the most common problem. You have beautiful ridge vents or box vents exhausting air, but blocked or insufficient soffit intake means no air can enter. The National Roofing Contractors Association estimates 90% of attic ventilation problems stem from inadequate intake, not exhaust.
Check your soffits: Are they vented? Are the vents blocked by insulation inside? Can you see light through them from the attic? A professional roof inspection can identify blocked vents and ventilation imbalances.
2. Mixing Exhaust Vent Types Incorrectly
Installing ridge vents and gable vents on the same roof creates short-circuiting. Air enters through soffit vents, immediately exits through the gable vents (path of least resistance), and never makes it to the ridge. Your ridge vents become decorative.
Same problem with ridge vents plus powered attic fans. The fan pulls air through the ridge vent instead of pulling it from the entire attic, defeating the purpose of continuous ridge ventilation.
Rule: Pick one exhaust type per roof plane and stick with it.
3. Blocked Soffit Vents
You've seen this if you've ever crawled around an attic. Someone blew in insulation and covered the soffit vents completely, blocking all intake airflow. The fix requires installing insulation baffles (rigid foam channels) that keep a 2-inch air gap between the roof deck and insulation.
This happens in 60-70% of homes with blown-in insulation. It's an easy fix but requires accessing the eaves from inside the attic.
4. Over-Ventilating with Power Fans
Bigger isn't better with attic ventilation. Oversized powered fans create negative pressure that pulls conditioned air from your living space through ceiling leaks. You end up cooling your attic with your AC (expensive and counterproductive).
Passive ventilation sized correctly can't over-ventilate. It's self-limiting based on temperature differential and wind.
5. No Ventilation Balance
Having 10 square feet of exhaust and 2 square feet of intake doesn't work. Air can only exit as fast as it can enter. Similarly, massive intake with minimal exhaust creates positive pressure (air wants out but can't escape efficiently).
Balance the system: Equal net free area for intake and exhaust.
6. Ignoring Attic Air Sealing
Ventilation removes heat and moisture from your attic, but it can't fix air leaks from your living space. Seal all ceiling penetrations (recessed lights, plumbing stacks, attic hatches, wiring holes) before adding ventilation. Otherwise, you're venting conditioned air instead of attic air.
According to Energy.gov, proper attic ventilation combined with adequate insulation can reduce cooling costs by 10-15% and prevent ice dams that cause thousands in damage.


