

A $20,000 metal roof can fail in 5 years instead of 50 if overlap is wrong. The difference between a watertight roof and one that leaks comes down to a few inches and proper technique.
Metal roofing overlap is the most critical part of installation. Get it wrong, and you'll deal with water infiltration, wood rot, and premature roof failure. Get it right, and your metal roof will protect your home for decades.
This guide explains exactly how to overlap metal roofing panels, the correct measurements for different panel types, and when DIY makes sense versus hiring a professional. Whether you install it yourself or hire help, you'll know the proper techniques to ensure a watertight roof.
Why Metal Roofing Overlap Matters
Overlap creates the waterproof barrier that protects your home. When panels don't overlap correctly, water finds its way underneath, causing damage that spreads quickly.
The Consequences of Poor Overlap
Water infiltration from improper overlap leads to serious problems. Once water gets under your panels, it soaks into the roof deck, causing wood rot and mold growth. Your insulation becomes saturated and loses effectiveness. What starts as a small leak becomes structural damage costing thousands to repair.
Manufacturer warranties become void if overlap specifications aren't followed. Most metal roofing warranties require installation per their exact specifications. If an adjuster inspects your roof and finds insufficient overlap, the manufacturer won't cover premature failure.
Wind uplift during storms becomes a real danger with inadequate side laps. Panels without proper overlap can lift and peel back in high winds. This exposes your roof deck directly to rain and can require emergency repairs during the worst possible weather.
The real cost of poor overlap is a complete roof replacement at $15,000 to $30,000, far earlier than the 50-year lifespan you paid for.
How Proper Overlap Protects Your Investment
Correct overlap creates a watertight seal against wind-driven rain. When panels overlap properly and seal with the right fasteners and sealant, water can't work its way between the layers. Rain runs down the roof surface and into your gutters, exactly as designed.
Proper overlap prevents capillary action, where water wicks between panels through tiny gaps. Even a quarter-inch gap can allow water to climb upward through surface tension, defeating gravity and your roof's slope. Adequate overlap eliminates these gaps.
In high-wind zones, correct overlap ensures structural integrity. The interlocking panels create a unified roof system that resists uplift forces. This matters when spring storms bring 70 to 90 mph gusts.
Most importantly, proper overlap protects the 50-plus year lifespan you invested in. Metal roofing costs more upfront than asphalt shingles, but that investment only pays off if the roof actually lasts. Correct overlap is the difference between getting your money's worth and needing a replacement decades early.
Understanding Metal Roofing Panel Types
Different panels require different overlap methods. Knowing your panel type ensures you use the right measurements and techniques.
Panel Type | Side Lap Overlap | End Lap Overlap | Effective Width |
|---|---|---|---|
Corrugated (26") | 1.5-2 corrugations (3-4") | 6-12" | 23-24" |
Standing Seam (16") | Interlocking seam | N/A | 14-15" |
R-Panel (36") | 1 rib (3-4") | 6-12" | 32-34" |
Corrugated Metal Roofing
Corrugated panels feature alternating ridges and valleys in a wavy pattern. You'll recognize them instantly by the repeating curves running the length of each panel. These are the most common choice for residential roofs, barns, and agricultural buildings.
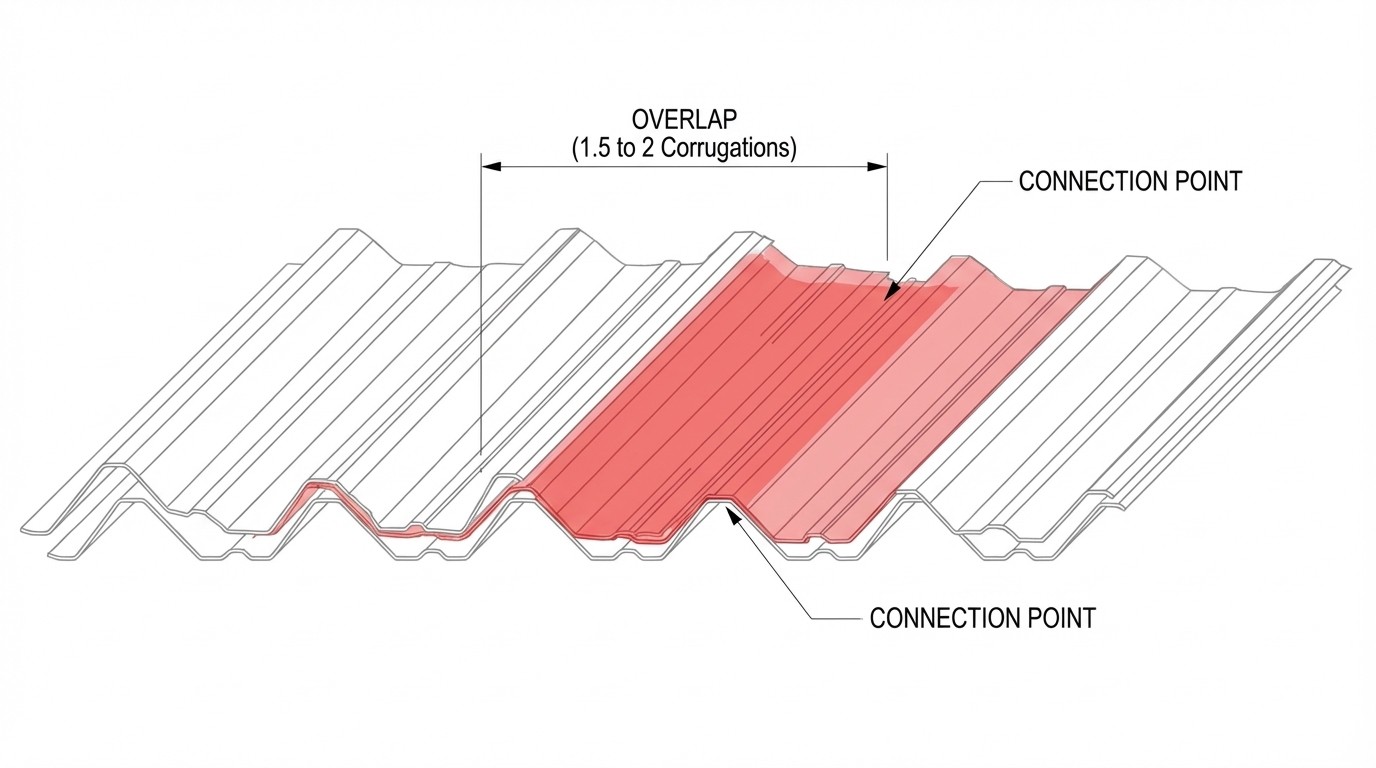
For corrugated panels, overlap requirements are 1.5 to 2 full corrugations for side laps and 6 to 12 inches for end laps. A standard 26-inch panel becomes 23 to 24 inches of effective coverage after you account for overlap.
The wavy design makes overlap straightforward. You simply align the ridges of one panel with the valleys of the adjacent panel, creating a natural interlock.
Standing Seam Metal Roofing
Standing seam panels look completely different. Instead of waves, they have flat surfaces with vertical ribs at the panel edges. These ribs stand up from the roof surface, giving the system its name.
Standing seam doesn't use traditional overlap. Instead, the raised seams interlock and get crimped together, creating a concealed fastener system. This means no screws penetrate the panel surface, reducing leak points significantly.
A 16-inch standing seam panel provides 14 to 15 inches of coverage after the seams interlock. The premium appearance and superior leak resistance make standing seam popular for modern residential installations, though it costs more and requires specialized installation skills.
R-Panel (Ribbed Panels)
R-panels split the difference with shallow ribs running vertically. The profile is less dramatic than corrugated but more defined than flat panels. Commercial and industrial buildings commonly use R-panels.
R-panel overlap requires one full rib for side laps and 6 to 12 inches for end laps, similar to corrugated. A 36-inch R-panel yields 32 to 34 inches of effective coverage.
The shallower ribs make R-panels lighter and easier to handle than deep corrugated panels, while still providing good water shedding.
Side Lap vs. End Lap Explained
Understanding these two types of overlap is essential. They serve different purposes and have different requirements.
Side Lap (Horizontal Overlap Between Panels)
Side lap is where two panels meet side by side as they run up your roof slope. Picture panels laid next to each other like fence boards. Where the edges meet is the side lap.
The purpose of side lap is preventing water from seeping horizontally between panels. When wind drives rain sideways, side lap keeps water on the surface instead of letting it sneak between panels.
For corrugated panels, the standard measurement is 1.5 to 2 full corrugations, which translates to approximately 3 to 4 inches of actual overlap. In basic wind areas, 1.5 corrugations work fine. In coastal or high-wind zones, use 2 full corrugations for extra security.
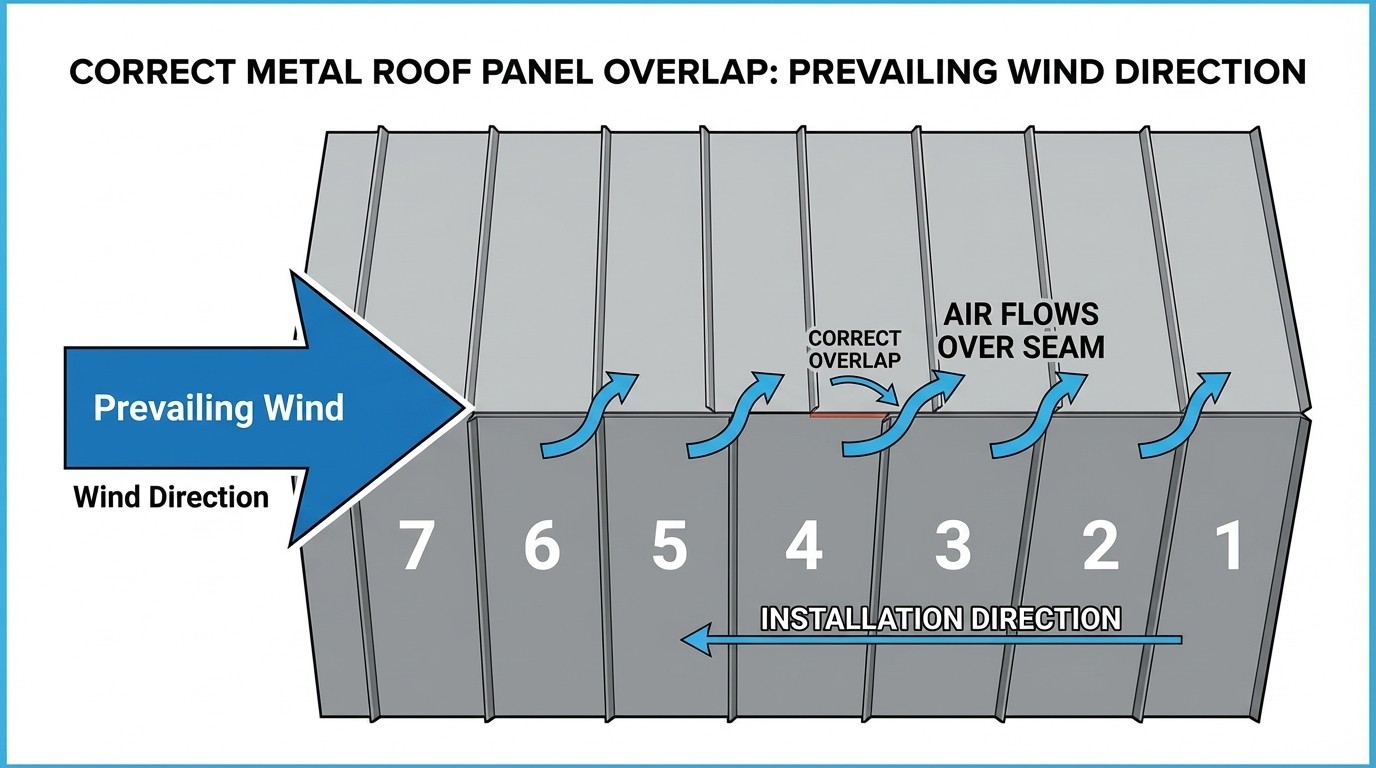
Here's a critical rule most DIYers miss: overlap in the direction of prevailing wind. In most of the U.S., wind comes from the west or southwest. This means your eastern panels should overlap your western panels, so wind blows over the overlap instead of getting underneath it.
End Lap (Vertical Overlap Where Panels Meet End-to-End)
End lap happens when a panel ends and you need to continue up the roof slope with another panel. The bottom panel extends underneath the top panel, creating a vertical overlap.
End lap creates a barrier against water running downhill. As rain flows down your roof, the overlap prevents water from finding gaps and getting under the panels.
Minimum measurement for end lap is 6 inches in light rain climates. However, 8 to 12 inches is recommended for areas with heavy rainfall, strong winds, or low roof pitch. The extra overlap provides insurance against water backing up during severe weather.
Side laps handle sideways rain. End laps handle water running downhill. Both must be correct or you will get leaks.
Proper Metal Roofing Overlap Measurements
Specific measurements make the difference between a roof that works and one that fails. Here's exactly what you need for different situations.
Standard Overlap Specifications
For corrugated metal panels, side lap should be 1.5 to 2 full corrugations. Use 1.5 corrugations minimum in low-wind areas with standard roof pitch. Bump up to 2 full corrugations in coastal zones, tornado-prone areas, or anywhere that sees regular high winds. This translates to roughly 3 to 4 inches of actual overlap.
End lap requirements vary by conditions. Six inches minimum works for low-slope roofs with less than 3:12 pitch in light rainfall regions with minimal wind exposure. Eight to 10 inches is recommended for moderate climates with standard roof pitches of 4:12 to 6:12. Jump to 12 inches for heavy rain areas like the Pacific Northwest or Southeast during hurricane season, high-wind zones including coastal regions, and low-pitch roofs in any climate.
Regional Considerations
In Tennessee and the Southeast, use 8 to 10-inch end laps as your baseline. Heavy spring thunderstorms, occasional severe wind events, and high humidity all drive moisture infiltration risks. The extra overlap provides protection during those intense weather events.
Most of Tennessee falls in wind zone 1 to 2, but use zone 3 standards near mountain areas. The exposed ridges and valleys see higher sustained winds that demand better overlap specifications.
Adjusting for Roof Pitch
Low pitch roofs from 2:12 to 3:12 need special attention. Increase end lap to 12 inches minimum, use additional sealant between all overlaps, and consider switching to standing seam instead of corrugated panels. Water doesn't shed as quickly on low slopes, so it has more opportunity to find gaps.
Standard pitch roofs from 4:12 to 6:12 can use the basic 6 to 8-inch end lap following manufacturer specifications. Water sheds at a normal rate on these slopes.
Steep pitch roofs at 7:12 and above can often get away with 6-inch end lap. Water sheds quickly on steep slopes, reducing infiltration risk. However, using larger overlap doesn't hurt and provides extra security.
Pro Tip: When in doubt, go with the larger overlap. An extra 2 inches of overlap costs a few dollars more in material but can prevent thousands in leak repairs.
Step-by-Step: How to Overlap Metal Roofing Correctly
Installing metal roofing is advanced-level DIY work. Before you start, assess whether this project matches your skill level.
Before You Start: Is DIY Metal Roofing Right for You?
Metal roofing installation is not a beginner project. Consider hiring a professional if your roof pitch exceeds 6:12, your roof is over 20 feet high, you have complex roof geometry with valleys and dormers, you live in a high-wind or heavy-snow region, or you lack experience with roofing projects.
DIY may be feasible if you have a simple gable or hip roof design, you're comfortable working at heights with proper safety equipment, you have helpers since metal panels are unwieldy alone, your roof pitch stays under 6:12, and you have time to do it right without rushing.
Safety requirements are non-negotiable. You need fall protection harness and anchor points, non-slip footwear, work gloves since metal edges are sharp, and eye protection against metal shavings from cutting. Never work alone. Never work in wet, windy, or icy conditions. One mistake at height can be fatal.
Tools and Materials Needed
Essential tools include a 25-foot measuring tape minimum, chalk line for panel alignment, electric shears or metal snips for cutting panels, impact driver or drill with adjustable torque, roofing square for maintaining alignment, and sealant gun.
Critical materials include metal roofing panels (calculate for overlap loss where a 36-inch panel becomes 32 to 34 inches effective), #12 self-tapping screws with EPDM washers at ridges not valleys, butyl tape or polyurethane sealant for overlap seams, synthetic roofing underlayment, and drip edge and flashing.
Do not use grinders to cut metal since they create heat that damages protective coating. Regular screws without EPDM washers will leak. Nails don't work since metal roofing requires screws for secure fastening.
Step 1: Install Underlayment with Proper Overlap
Roll out synthetic underlayment horizontally across your roof. Overlap each row by 4 inches minimum. Secure with cap nails or staples every 12 to 18 inches. Overlap in the direction away from prevailing wind.
Underlayment is your backup waterproofing if panel overlap ever fails. Don't skip this step.
Step 2: Install First Panel Square and True
Start at the edge opposite your prevailing wind direction so wind blows over overlaps, not under them. Overhang the eave edge by 1 to 2 inches for proper drip edge. Use a roofing square to ensure the first panel is perfectly aligned. Secure with screws at ridges (high points), never in valleys. Space screws every 12 to 16 inches vertically.
If your first panel is crooked, every subsequent panel will be off. Take time to get it perfect.
Step 3: Overlap Side Laps Correctly
Place the second panel to overlap the first panel by 1.5 to 2 corrugations. Ensure ridges align perfectly since misalignment creates gaps. Apply butyl tape sealant along the overlap before fastening. Drive #12 screws through both panels at the overlap every 12 to 16 inches.
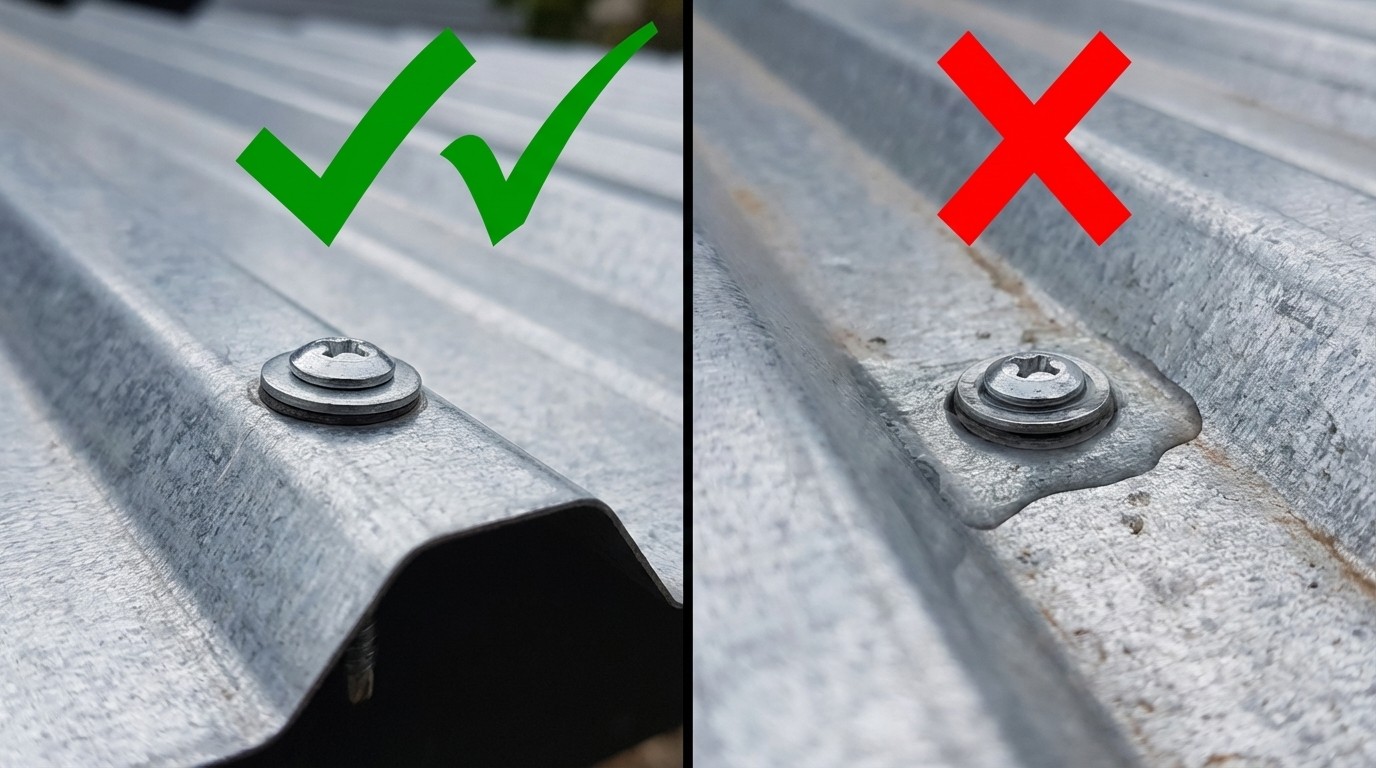
Torque screws until the EPDM washer compresses slightly with visible "pout" around the screw, but don't over-tighten since this strips threads or dimples the metal.
Remember the overlap direction rule: overlap should face away from prevailing wind direction. In most of the U.S., wind comes from west or southwest, so eastern panels overlap western panels.
Step 4: Overlap End Laps (When Panels Meet End-to-End)
When you reach the end of a panel and need to continue up the roof, overlap the next panel by 6 to 12 inches depending on your climate and pitch. Apply sealant generously along the entire end lap. Stagger end laps so they don't align in vertical rows, which creates weak structural spots. Secure with screws every 6 to 8 inches along the end lap seam.
Use belt-and-suspenders redundancy with both butyl tape and polyurethane sealant on end laps in high-risk areas.
Step 5: Fastener Placement and Spacing
Fasten at ridges (high points), never in valleys where it creates leak points. Space fasteners 12 to 16 inches vertically from eave to ridge. At overlap seams, place screws every 12 to 16 inches through both panels. At end laps, use screws every 6 to 8 inches.
For proper torque, use an impact driver with adjustable torque setting. Tighten until the EPDM washer compresses and creates a visible seal around the screw. Stop before dimpling the metal since over-tightening weakens the panel and creates a leak point.
Step 6: Seal, Inspect, and Finish
Apply sealant at all overlaps, flashing, and penetrations. Walk the roof carefully to inspect alignment and fastener placement. Check for consistent overlap measurements, no gaps or misalignments, proper fastener torque with no loose screws or over-tightened dimples, and sealant coverage at all seams.
Look at your roof from the ground. Do the panel lines run straight? Any visible gaps or misalignment? Fix now, not after the first rain.
Common Metal Roofing Overlap Mistakes to Avoid
Learning from others' mistakes saves you expensive repairs.
Mistake 1: Insufficient Overlap
Less than 1.5 corrugations or less than 6 inches end lap allows wind-driven rain to infiltrate. Water backs up under panels, rotting the roof deck underneath. Always use minimum specs and increase for high-risk climates.
Mistake 2: Overlapping in Wrong Direction
Overlapping into prevailing wind lets wind lift panels and drive rain underneath. This causes panel blow-off in storms and chronic leaking. Identify prevailing wind direction before starting. In Tennessee, wind generally comes from the southwest, so overlap panels toward the northeast.
Mistake 3: Skipping Sealant
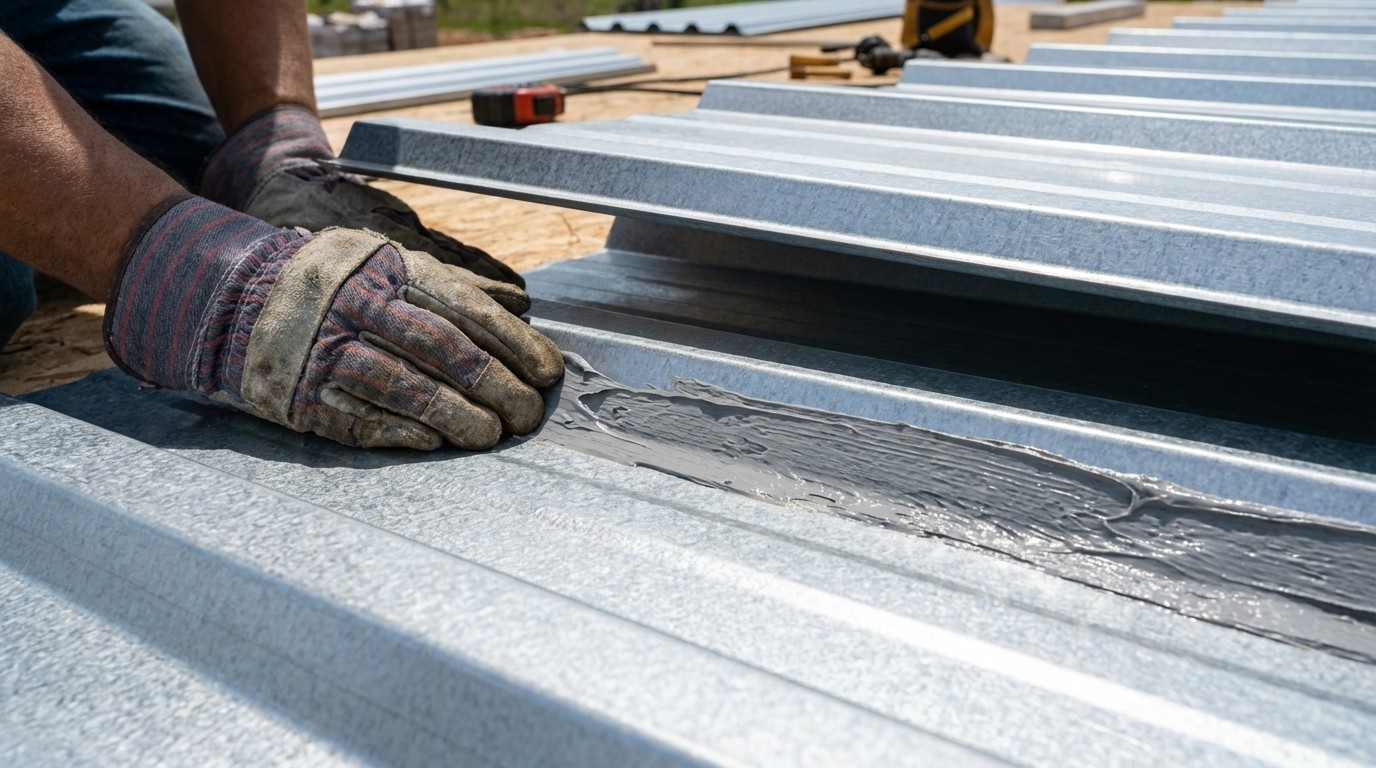
Relying on overlap alone without sealant creates gaps from capillary action. Slow leaks cause hidden damage over time that you won't notice until mold appears or ceilings sag. Use butyl tape or polyurethane sealant on every overlap seam.
Mistake 4: Fastening in Valleys
Screws in low points (valleys) create water collection points and leak paths. You're guaranteed leaks at every fastener placed in valleys. Only fasten at ridges (high points) where water flows away from the fastener.
Mistake 5: Over-Tightening Fasteners
Screws driven too tight dimple the metal and compress EPDM washers excessively. Washers fail prematurely, fastener holes enlarge, and leaks develop. Tighten until the washer compresses visibly, then stop. Use an adjustable torque setting to maintain consistency.
Mistake 6: Misaligned Panels
Panels that aren't square or ridges that don't align at overlaps create gaps, poor appearance, and water infiltration. Take time to square the first panel perfectly. Use chalk lines for alignment guides on subsequent panels.
Mistake 7: Not Staggering End Laps
All end laps aligning in a vertical row creates a weak structural line and concentrates water flow. This can lead to leaks right down that line. Stagger end laps like bricks in a wall.
Safety mistake: working alone or without fall protection on metal roofs is dangerous since they're slippery when wet. Always use a safety harness, work with a helper, and avoid wet conditions.
When to Hire a Professional vs. DIY
The honest truth about DIY metal roofing helps you make a smart decision.
DIY Metal Roofing Overlap Makes Sense When
You have simple roof geometry like a basic gable with no complex valleys or dormers. Your roof pitch stays under 6:12. You're working on a single-story structure at safer heights. You have roofing experience and this isn't your first roof project. Weather conditions are favorable during the dry season with no wind. You have two or more helpers since metal panels require multiple people.
Realistic time investment for a 2,000-square-foot roof: expect 3 to 5 full days with an inexperienced crew, or 2 to 3 days with experience.
Hire a Professional When
Your roof pitch exceeds 6:12, making it steep and dangerous. You have complex roof design with multiple valleys, dormers, and angles. You're working on a two-story or higher structure. You live in a high-wind coastal area or tornado-prone region where installation errors have severe consequences. You lack proper safety equipment, which costs $300 to $500 for fall protection. Your time is limited, and a contractor crew finishes in 1 to 2 days.
The Cost Reality
DIY costs include materials only at $4 to $8 per square foot, tools you don't own at $200 to $500, safety equipment at $300 to $500, and your time at 3 to 5 days. Total for a 2,000-square-foot roof runs $8,000 to $16,000 plus significant labor.
Professional installation costs $8 to $16 per square foot installed, including labor, materials, and warranty. Total for a 2,000-square-foot roof is $16,000 to $32,000, completed in 1 to 2 days with manufacturer warranty and insurance coverage.
If professional installation stretches your budget, explore financing options for roof replacement that make the investment more manageable.
The hidden cost of DIY mistakes is serious. A $20,000 roof can fail if overlap is wrong, requiring full replacement. Professional installation includes workmanship warranty, typically 2 to 10 years, protecting your investment.
At roofquotes.com, you can compare quotes from vetted metal roofing contractors who follow proper overlap techniques. Our contractors are screened for installation quality, so you get professional results without paying inflated prices.
How Improper Overlap Affects Warranties and Insurance
Poor installation can void your protection and cost you tens of thousands.
Manufacturer Warranty Implications
Most metal roofing warranties require installation per manufacturer specifications. Improper overlap with insufficient measurements or wrong fastener placement voids the warranty completely. The manufacturer won't cover premature failure if installation was incorrect.
Professional installation is often required for 30 to 50-year warranties. What this means: DIY installation may save money upfront but costs you warranty protection. If the roof fails in year 10, you pay the full replacement cost.
Insurance Claim Considerations
Insurance adjusters inspect installation quality when processing storm damage claims. Improper overlap discovered during inspection can lead to claim denial. The insurer may argue damage resulted from poor installation, not the storm, leaving you to pay for repairs yourself.
Professional installation documentation protects claim eligibility by proving the roof was installed correctly.
Resale Value Impact
Home inspectors check roof installation quality during pre-sale inspections. Visible poor overlap like misaligned panels and inadequate fastening raises red flags. Buyers may demand roof replacement or price reduction, costing you thousands at closing.
Professional installation with documentation preserves home value and makes sales smoother.
If you DIY, photograph every step including underlayment, overlap measurements, and fastener placement. Documentation proves you followed specs if warranty or insurance questions arise.
Inspecting and Troubleshooting Existing Metal Roof Overlaps
Catching problems early prevents bigger repairs later.
Signs Your Metal Roof Overlap May Be Failing
Interior warning signs include water stains on ceilings or walls, especially after wind-driven rain, musty odors indicating hidden moisture, and sagging or soft spots in the ceiling from wood rot caused by chronic leaks.
Exterior warning signs include visible gaps between overlapping panels, rusted fasteners or fastener holes, panels lifting or flapping in wind, misaligned panels where ridges don't match at seams, and missing or deteriorated sealant at overlaps.
DIY Inspection Steps
Start with a visual inspection from the ground using binoculars to check panel alignment and visible gaps. Next, inspect the attic looking for light coming through the roof, which indicates gaps, and water stains on decking. After a rainstorm, check the attic during or right after heavy rain for active leaks.
When to Call a Professional Inspector
Call a pro if you see any warning signs above. Schedule a professional roof inspection before buying a home with a metal roof for pre-purchase protection. After a major storm, get documentation for insurance. Every 5 years, schedule routine maintenance inspection to catch problems early.
Can Overlap Issues Be Fixed?
Minor issues are fixable. Missing sealant can be added retroactively. Loose fasteners can be tightened or replaced. Small gaps can be sealed with proper sealant.
Major issues require professional repair or replacement. Panels overlapping in the wrong direction can't be easily fixed. Insufficient overlap measurements (less than 1.5 corrugations or 6 inches) need panel replacement. Widespread fastener failure indicates systemic problems. Structural damage from chronic leaks requires extensive repair.
Cost to fix: minor sealant repairs run $200 to $500. Major overlap correction costs $2,000 to $5,000. Full roof replacement runs $16,000 to $32,000.
Getting Metal Roof Overlap Right
Metal roofing overlap determines whether your roof lasts 50 years or fails in 5. The measurements are simple: 6 to 12 inches for end lap and 1.5 to 2 corrugations for side lap. However, execution requires precision, proper tools, and attention to detail.
Overlap is non-negotiable. Side laps need 1.5 to 2 corrugations, and end laps need 6 to 12 inches. Direction matters since you must overlap away from prevailing wind to prevent uplift and infiltration. Sealant is essential, so never rely on mechanical overlap alone. Use butyl tape or polyurethane sealant at every seam. Fastener placement is critical: ridges only, never valleys, with proper torque. Climate adjustments are necessary since heavy rain and high-wind areas need larger overlaps.


