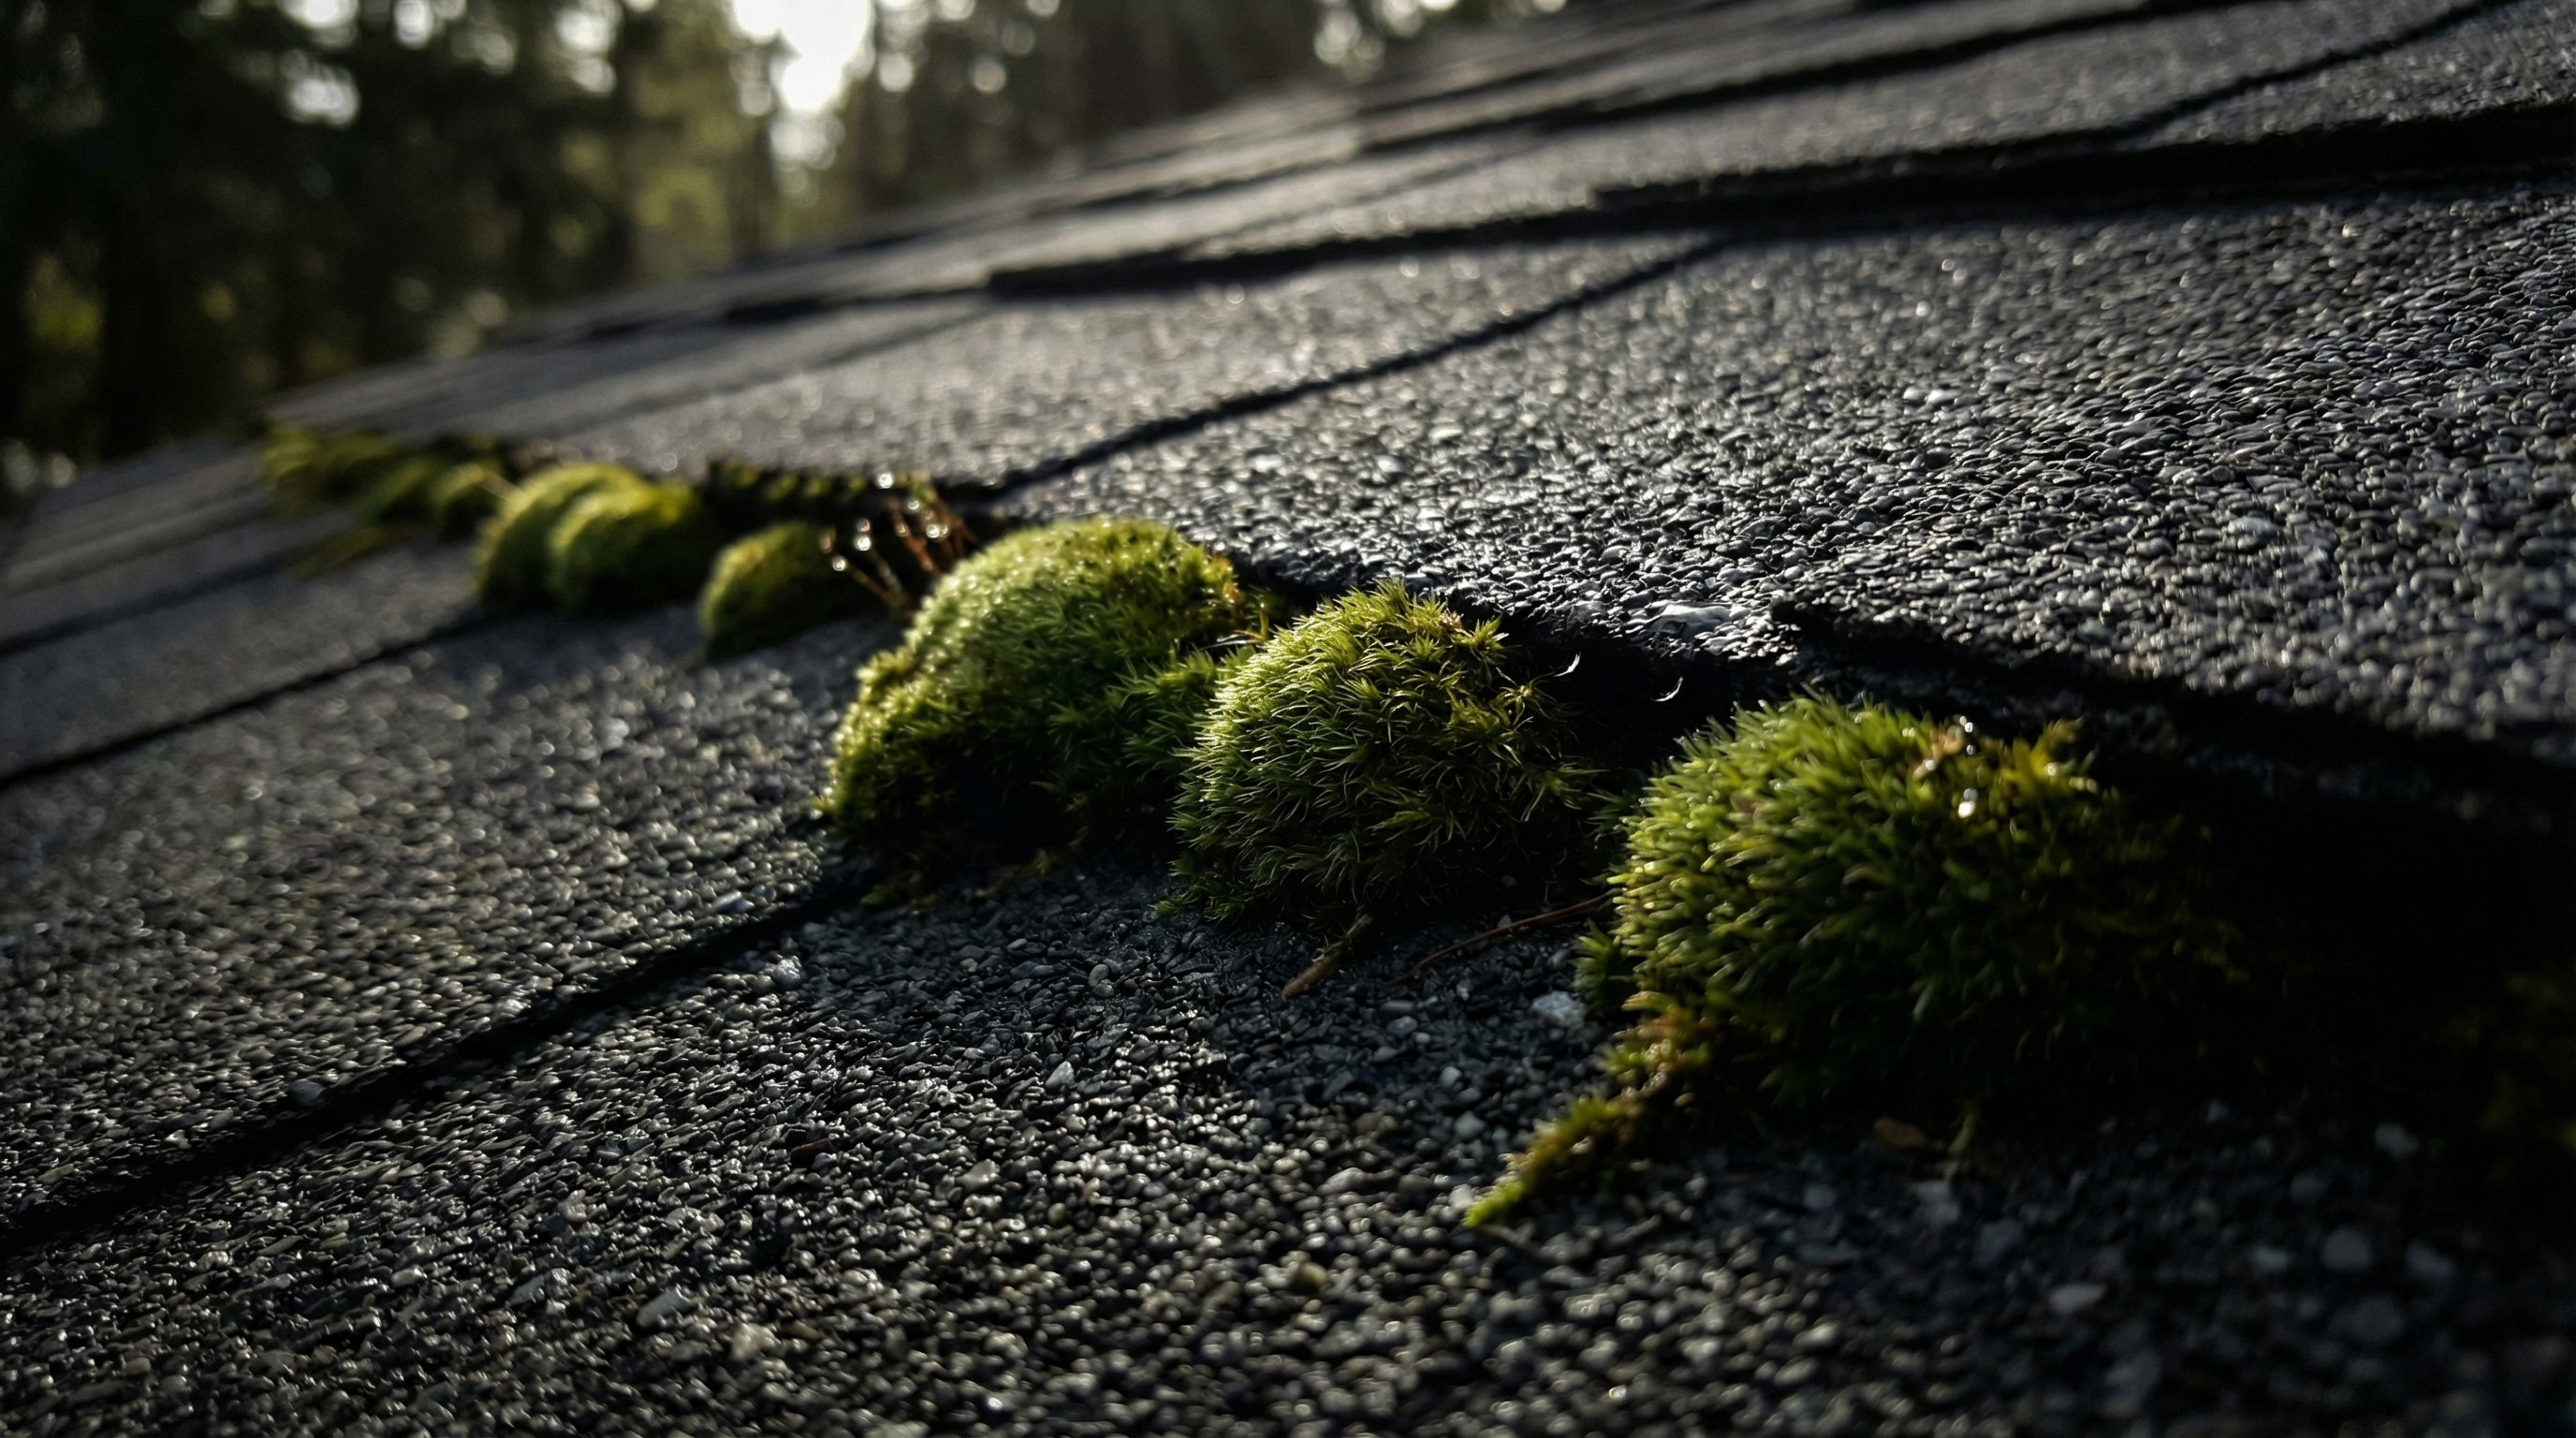
In humid climate, moss growth on roofs is particularly common. Homeowners are often all too familiar with the sight.
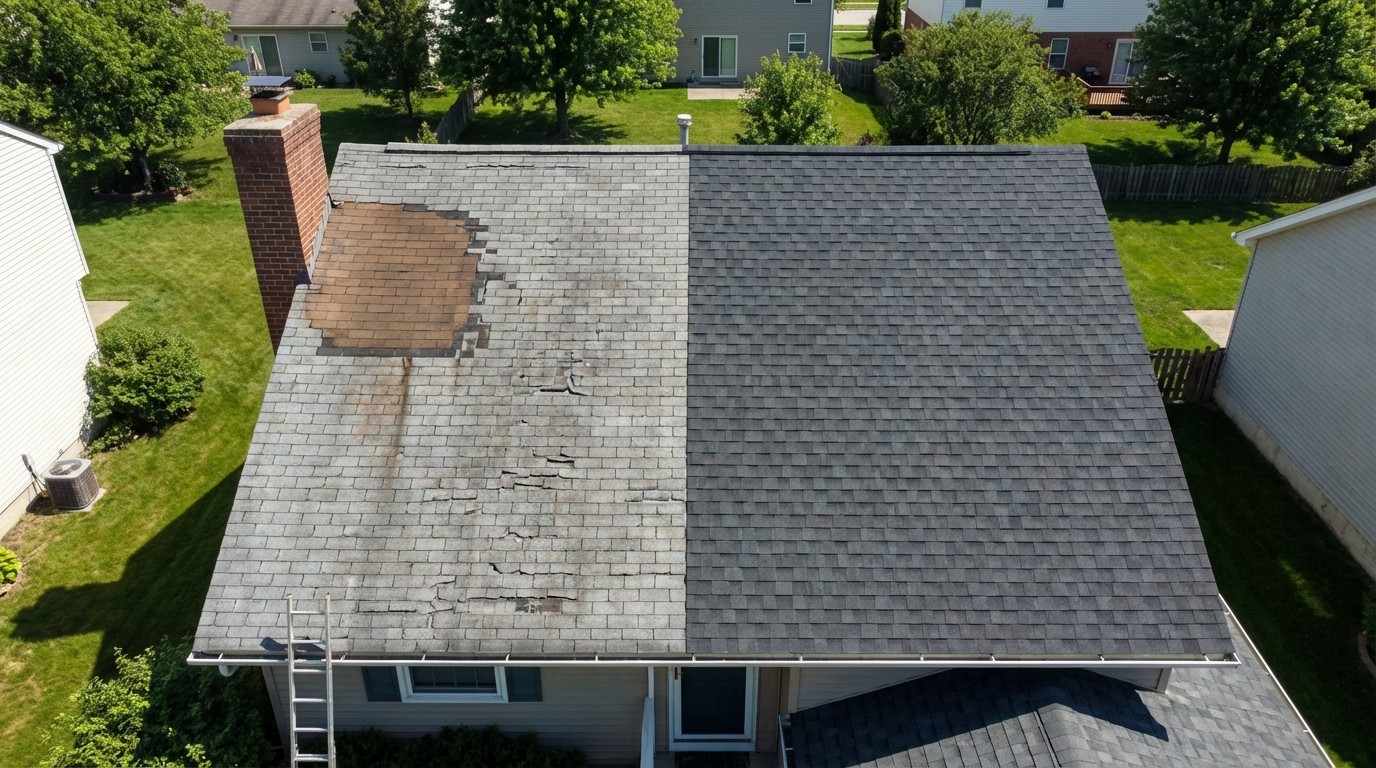
That green fuzz creeping across your shingles is not just an eyesore. Moss traps moisture against your roof, and over time, that constant dampness breaks down asphalt, lifts shingle edges, and opens the door to leaks and rot.
The good news is that removing moss is straightforward when you know the right approach. This guide covers the safest removal methods, the best moss-killing solutions, when to call a professional, and how to keep moss from coming back.
Why moss on your roof causes real damage
Moss holds moisture against your shingles like a sponge that never fully dries out. That constant dampness breaks down asphalt over time, works its way under shingle edges, and eventually creates paths for water to reach the wood underneath. What looks like a harmless green patch can quietly cause rot and leaks if it sits there long enough.
When moss remains on a roof, it creates a predictable pattern of damage:
Moisture stays trapped: Moss absorbs rain and morning dew, keeping shingles wet for days instead of hours. Asphalt shingles are designed to shed water quickly, not sit in it.
Shingle edges lift: Moss roots grow underneath shingle tabs, prying them up slightly. Even small gaps let water in during heavy rain.
Wood rot follows: Once water reaches the plywood decking below your shingles, rot can spread faster than you might expect. At that point, you are looking at more than just a cleaning job.
Catching moss early makes removal straightforward. Waiting too long turns a weekend project into a repair bill.
Best time to remove moss from your roof
Summer is the easiest time to remove moss. The heat dries it out, makes it brittle, and loosens its grip on your shingles. This timing reduces the effort required for removal and improves overall results.
Spring and fall growing seasons
Moss grows most actively when the weather is cool and damp. Spring and fall give it exactly what it wants, so removing it during those months takes more effort. The moss clings harder, and any spores you disturb have ideal conditions to spread and regrow.
Why summer works best for removal
Dry heat puts moss into a dormant state. It stops growing, loses moisture, and becomes easier to brush off without aggressive scrubbing. If you can wait for a stretch of warm, dry weather, the job goes faster.
Can Winter Kill Moss on Your Roof
Cold weather slows moss down but does not kill it. Moss simply goes dormant when temperatures drop, then wakes back up once spring rain returns. Freezing temperatures will not solve a moss problem for you.
How to safely remove moss from roof shingles
The safest way to remove moss combines gentle brushing with a moss-killing solution. Start at the top of your roof and work downward. Always brush in a downward direction so you don't lift shingle edges. Then rinse with a regular garden hose. Pressure washers damage shingles and force water underneath them, so leave those out of the equation entirely.
1. Gather safety gear and cleaning tools
Before you climb up, get everything together so you are not making multiple trips. You will want safety goggles, rubber gloves, and non-slip shoes like work boots or athletic shoes with deep treads. If your roof has a steep pitch, a harness is worth the extra setup time.
For the actual cleaning, grab a long-handled soft-bristle brush or push broom, a pump-style garden sprayer, and a standard garden hose. These basic tools provide everything necessary for effective moss removal.
Tip: Avoid using pressure washers for this task. It strips granules off asphalt shingles and can blast water under the shingle tabs, causing the exact kind of damage you are trying to prevent.
2. Brush away loose moss with a soft bristle broom
Start at the ridge and work your way down toward the gutters. Brush in a downward motion, following the direction the shingles overlap.
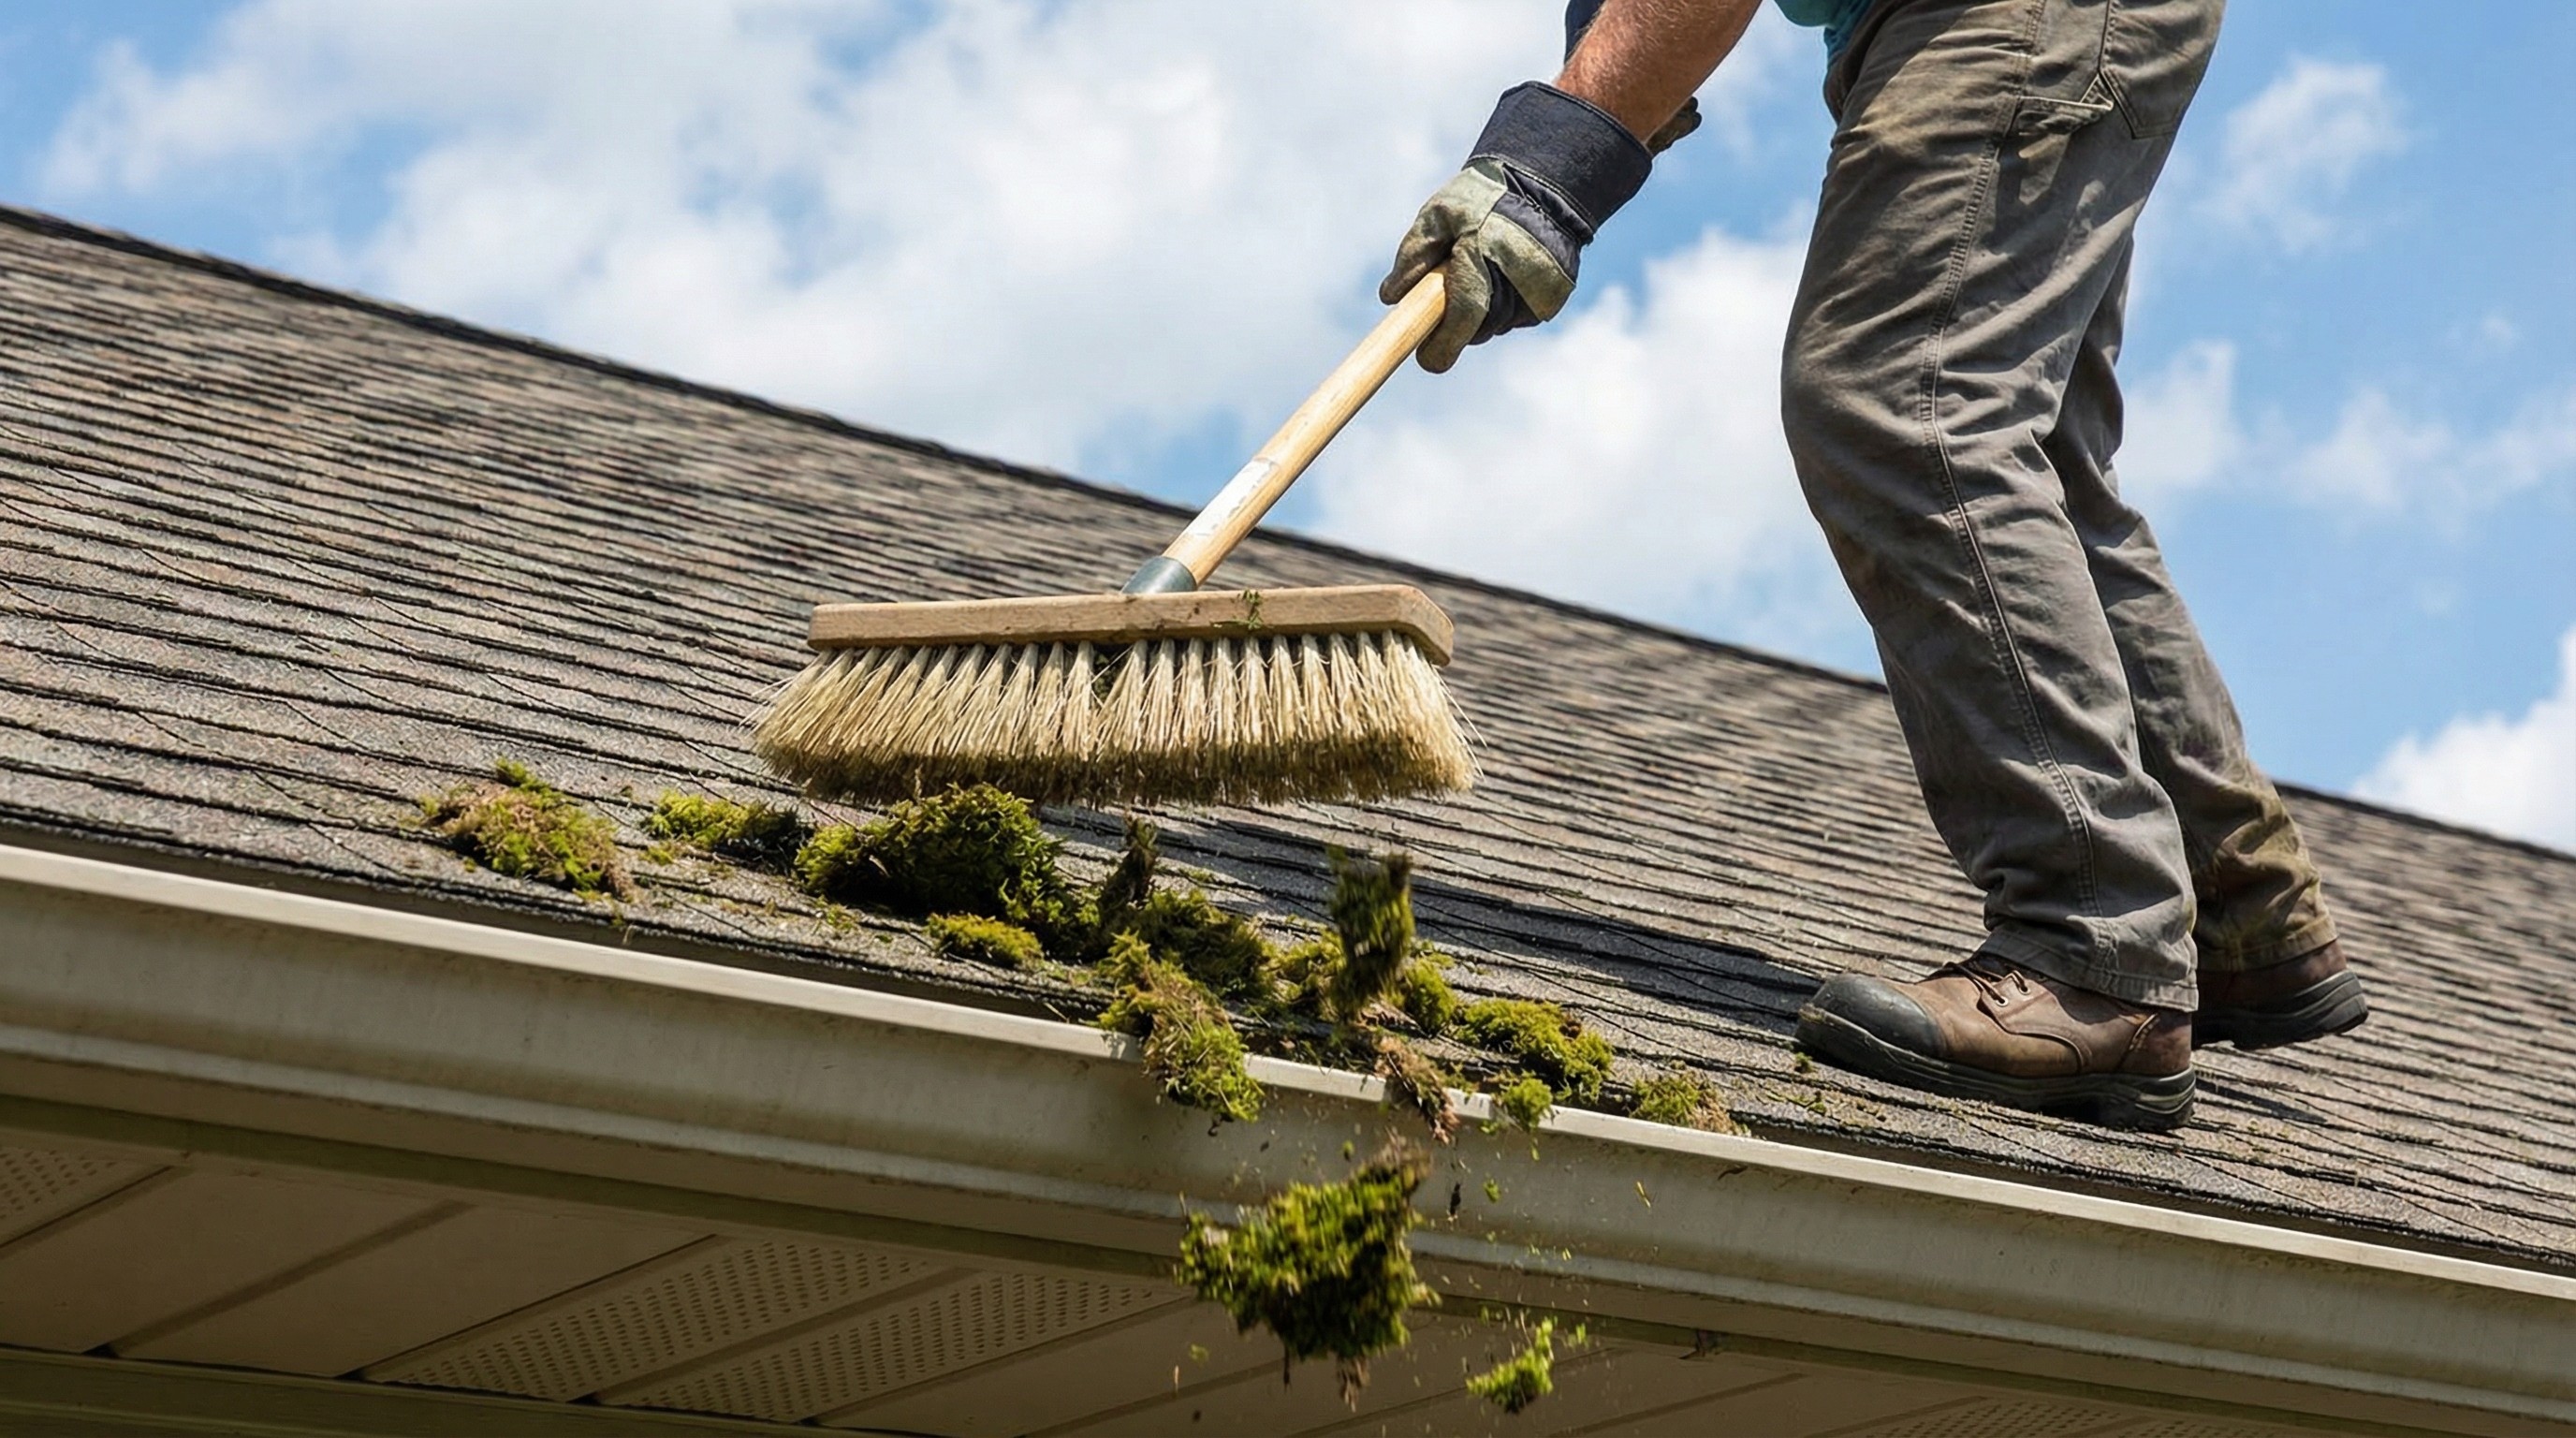
Brushing upward or sideways can catch shingle edges and crack them.
For thicker moss clumps, use gentle scraping motions at the base where the moss attaches. Take your time here. Rushing leads to torn shingles and missing granules, which shortens your roof's lifespan.
3. Apply a moss killing solution to the shingles
Once the loose moss is cleared, spray your chosen solution over the remaining green areas. Use a pump sprayer for even coverage and work in sections so you do not miss spots. Let the solution sit for 15 to 20 minutes before rinsing, or follow the timing on the product label.
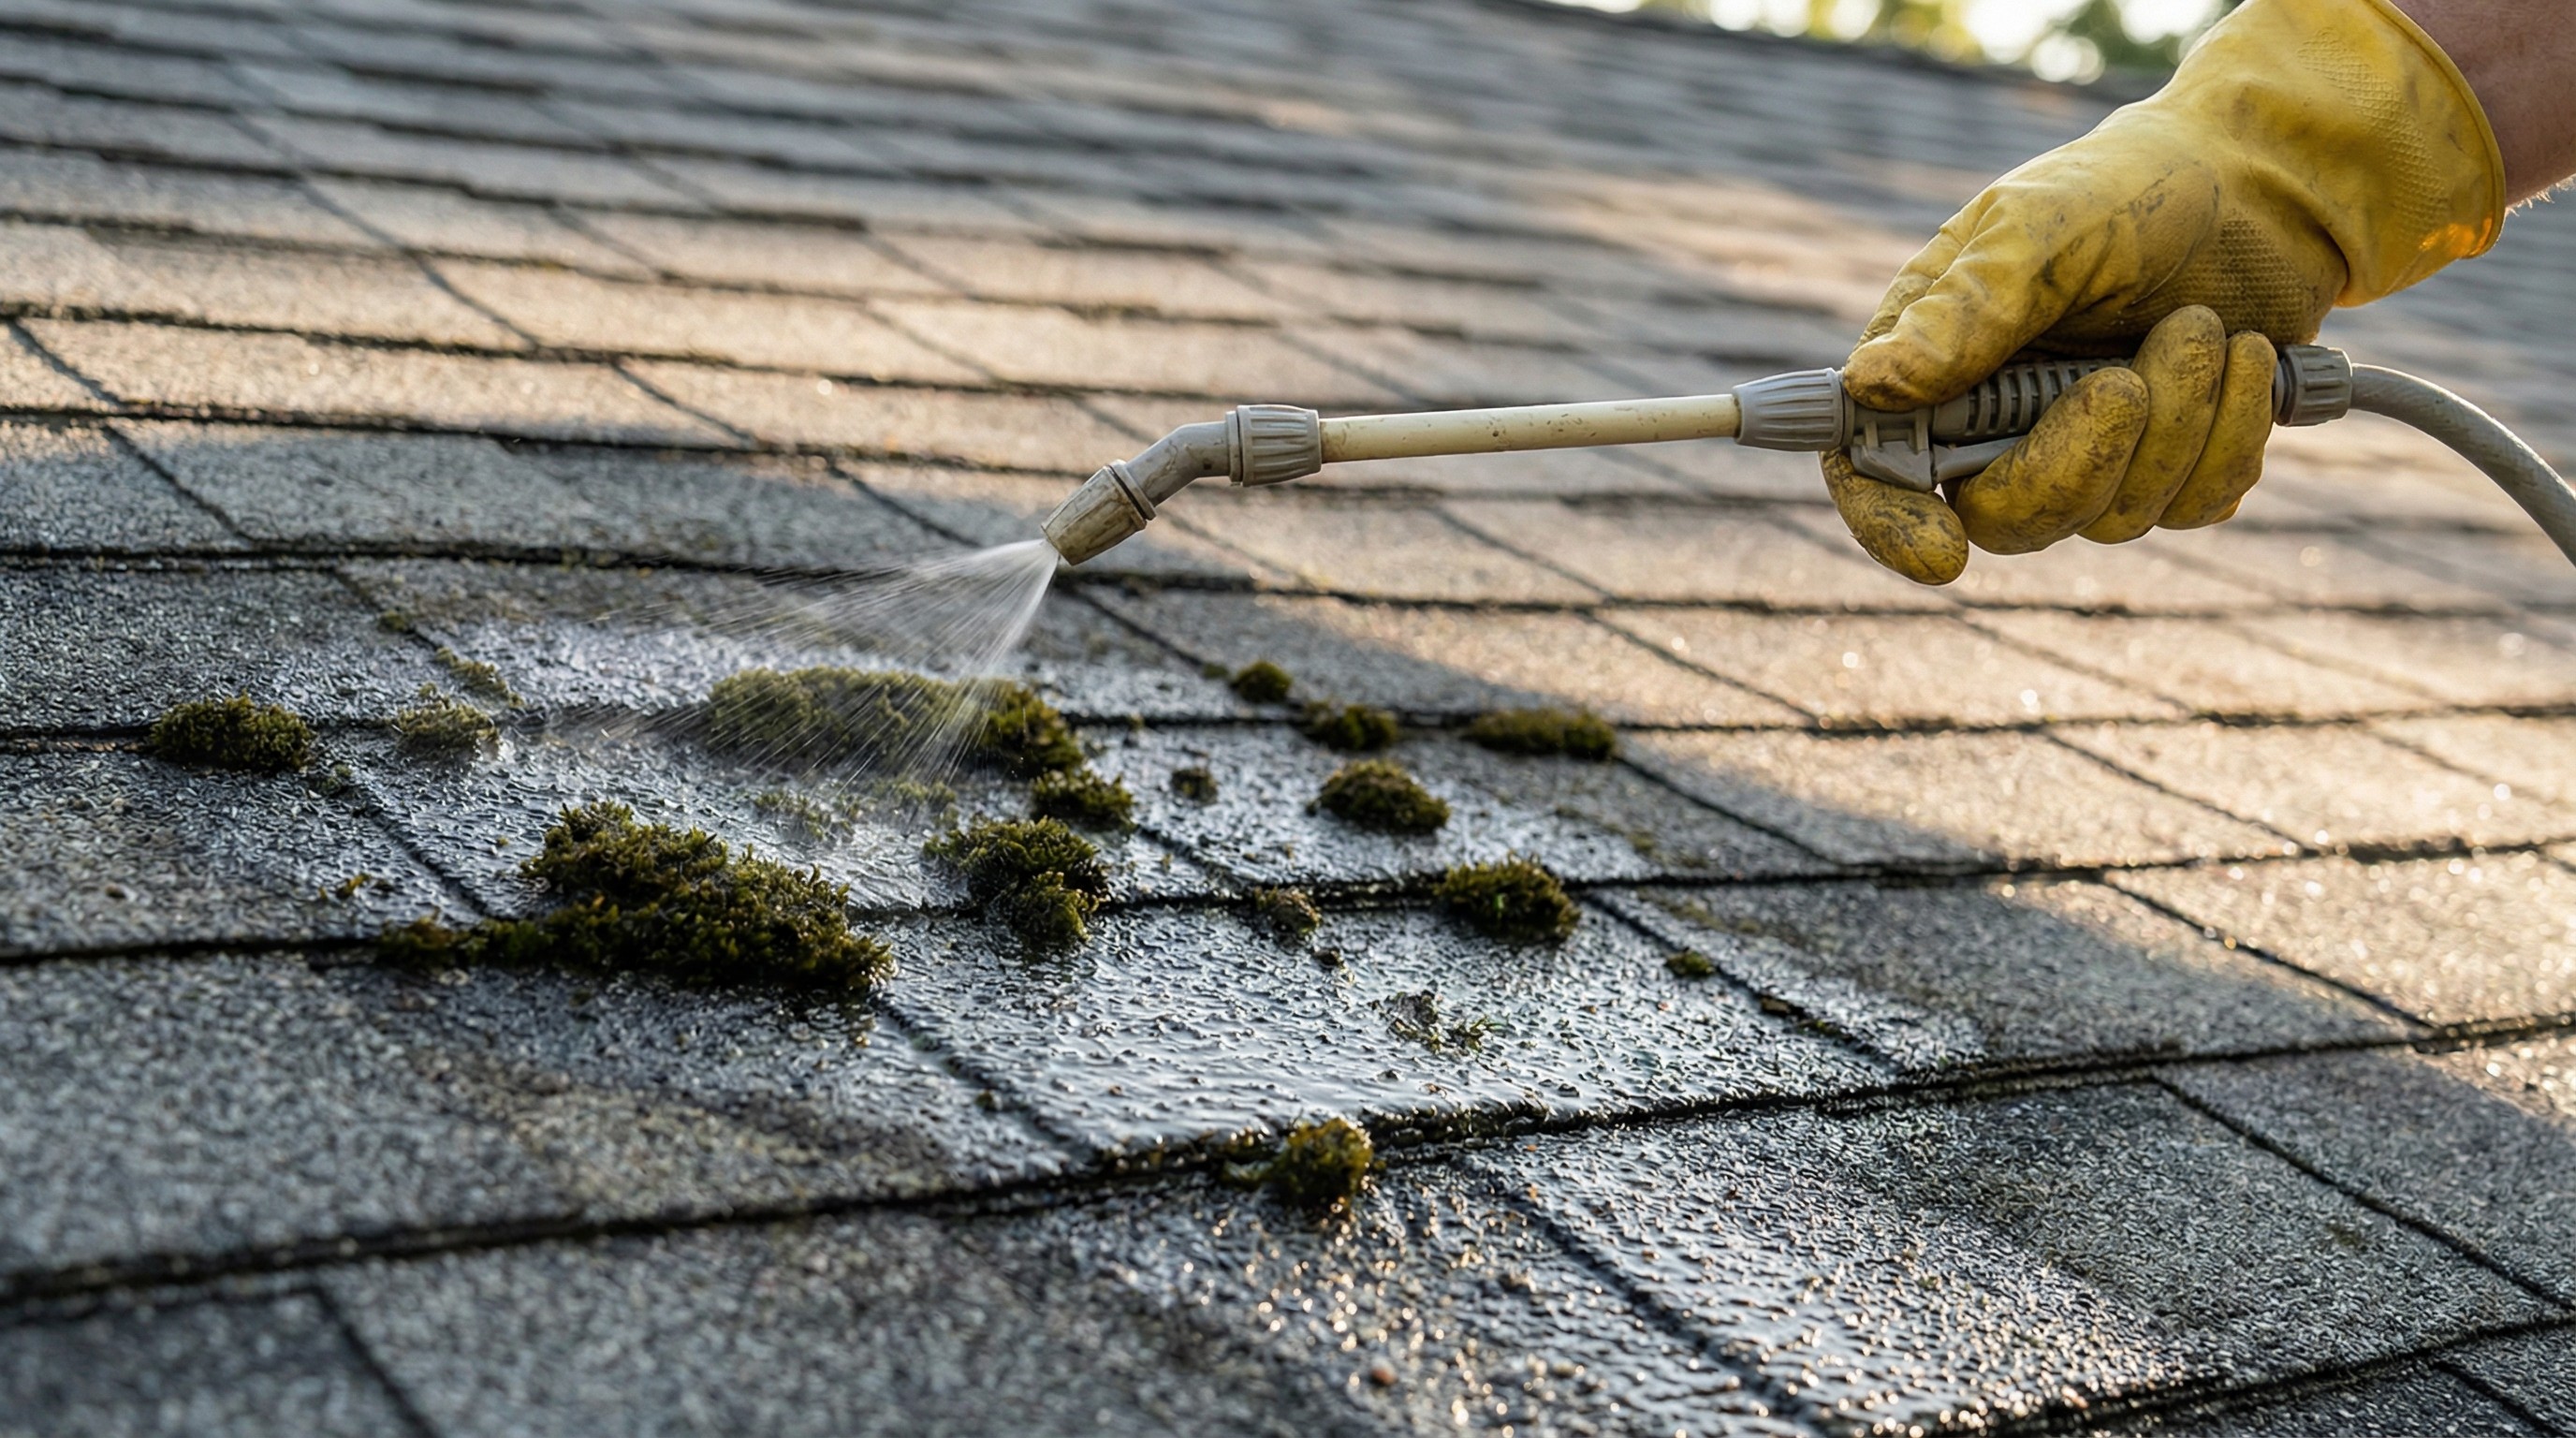
The solution does the real work of killing moss roots. Brushing alone removes what you can see, but the roots stay behind and regrow within a few months if you skip this step.
4. Rinse gently and allow the roof to dry
After the solution has had time to work, rinse the roof with a garden hose. Point the water downward, following the natural slope. Avoid aiming water up under shingle edges.
Once you finish rinsing, clean out your gutters. All that moss debris washes down and can clog your downspouts if you leave it. Give the roof a day or two to dry completely before checking your results. Stubborn patches may need a second treatment.
Best moss killer solutions for roof shingles
Several effective solutions are available, depending on the severity of moss growth and your specific priorities.
Solution Type | How to Mix | Best For | Watch Out For |
|---|---|---|---|
Zinc sulfate powder | Mix with water per package | Heavy moss, long-term prevention | Can stain concrete below |
Commercial moss killer | Ready to use or dilute per label | Convenience, moderate moss | Follow label directions carefully |
Vinegar and water | Equal parts white vinegar and water | Light moss, eco-friendly | May need repeat applications |
Bleach solution | Equal parts bleach and water | Severe moss | Can discolor shingles, kills plants |
Zinc sulfate powder mix
Zinc sulfate is a professional-grade option that works well on heavy moss and provides some ongoing prevention. You mix the powder with water and apply it with a pump sprayer. It is effective, though it can leave white stains on concrete walkways or driveways below your roofline if you are not careful about overspray.
Commercial moss killer products
Products like Moss Out ($15-25), Wet and Forget ($20-35), and Spray and Forget ($25-40) are formulated specifically for roofs and typically cost less than hiring a professional for small jobs. They come ready to use or require simple dilution, and the labels tell you exactly how long to let them sit. For moderate moss, commercial products are often the most straightforward choice.
Homemade vinegar and water solution
Mix equal parts white vinegar and water in a spray bottle or garden sprayer. Adding a small squirt of dish soap helps the solution stick to the moss instead of running off immediately. Vinegar is gentler on plants below and works well for light moss, though heavier growth usually requires a second or third application.
Why bleach can damage asphalt shingles
Bleach kills moss effectively, but it comes with downsides. It can discolor shingles, especially darker colors. It kills grass and plants below if it drips or runs off. And some shingle manufacturers specifically warn against bleach in their warranty terms.
Should you choose to use bleach despite these concerns, dilute it equally with water and protect surrounding landscaping before beginning the process.
How professional roofers kill roof moss
Professional roofers typically use a method called soft washing. This involves applying commercial-grade moss treatments at low pressure, which cleans the roof without stripping granules or forcing water under shingles.
Beyond just cleaning, a good roofer will also look for damage the moss may have already caused. Lifted shingles, soft spots in the decking, and early signs of water intrusion are all things a professional can spot that you might miss from ground level. Many roofers also apply zinc or copper-based treatments after cleaning to slow regrowth.
If your roof is steep, multi-story, or covered in heavy moss, hiring a professional is often the safer and more thorough option.
How to prevent moss from growing on your roof
Removing moss is only half the job. Keeping it from coming back protects your roof and saves you from repeating the whole process every year or two.
Install zinc or copper strips at the roof ridge
Metal strips installed along the roof ridge release particles when rain washes over them. Those particles run down the roof and create an environment where moss cannot take hold.
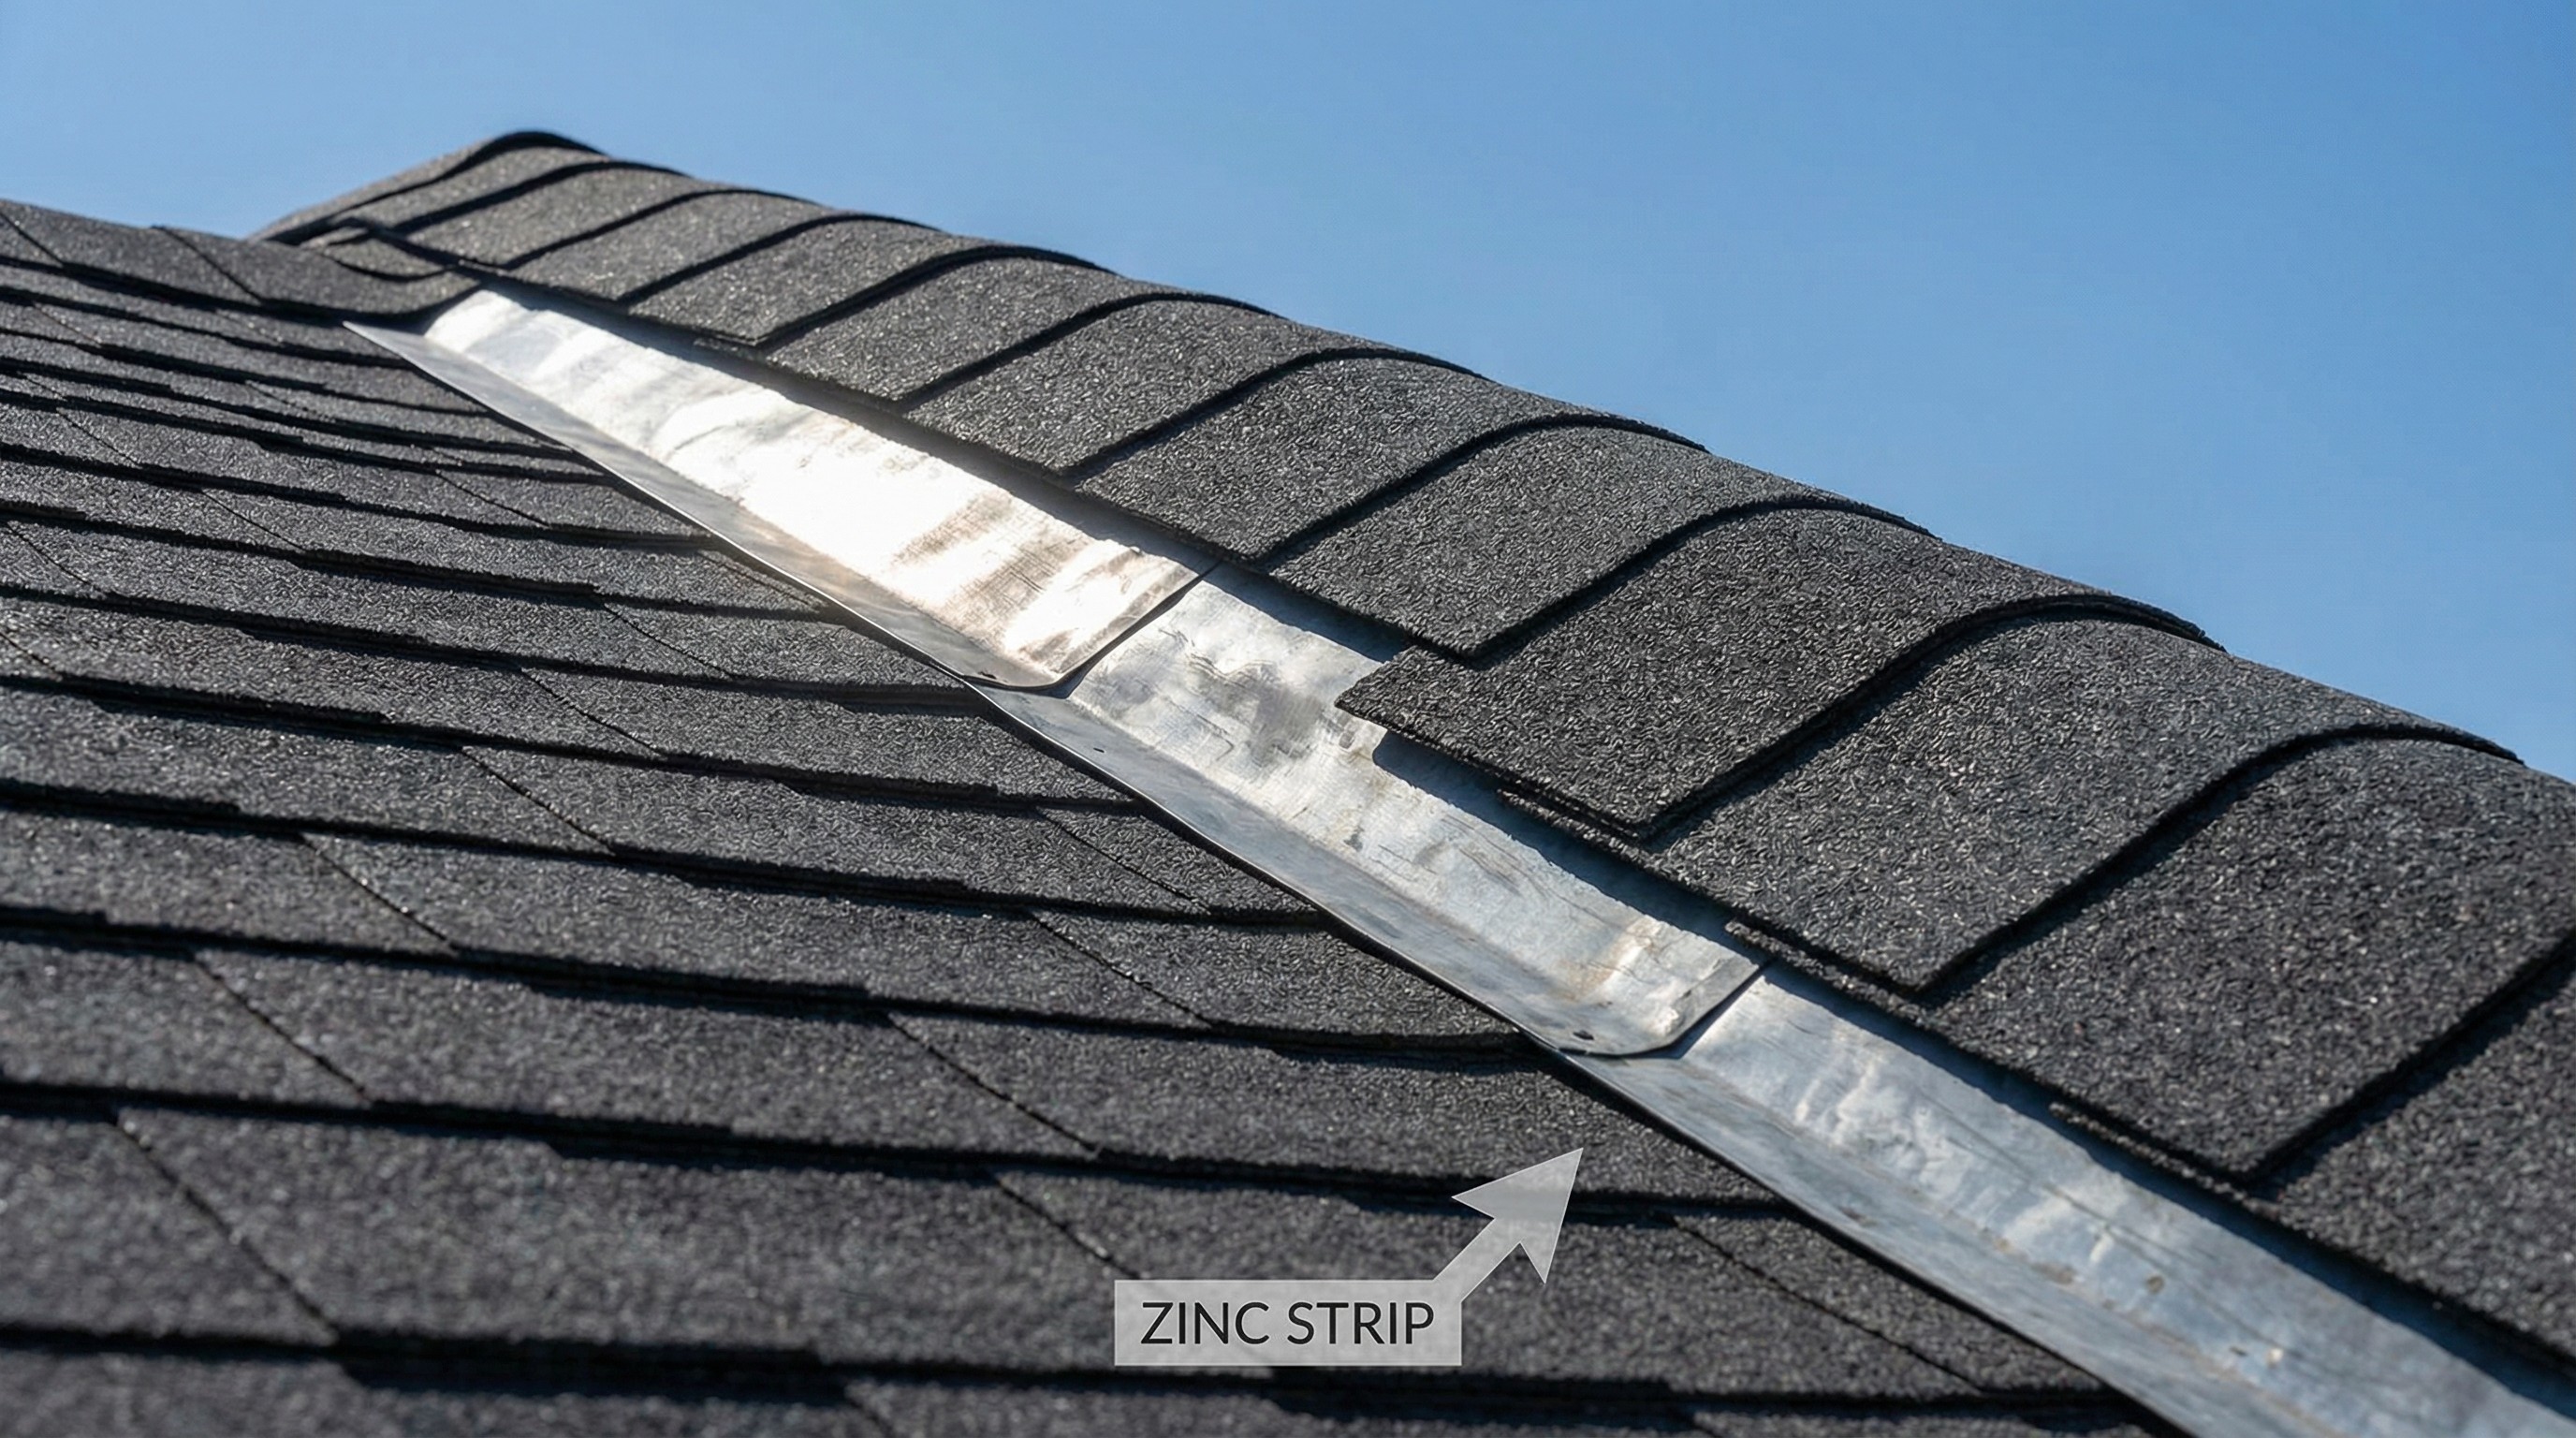
Zinc and copper strips are one of the most effective long-term prevention methods available.
Trim tree branches that shade the roof
Moss thrives in shade and moisture. Overhanging branches block sunlight and drop debris that holds dampness against your shingles. Cutting back branches allows more sun to reach the roof, which helps it dry faster after rain.
Keep gutters clean to improve drainage
Clogged gutters cause water to back up along the roof edge. That standing water keeps the lower shingles damp and creates ideal conditions for moss to grow. Regular gutter cleaning is simple prevention that makes a real difference.
Increase sunlight exposure on the roof
Beyond trimming trees, consider whether nearby structures or tall landscaping block sunlight from reaching parts of your roof. More sun means a drier roof, and a drier roof is far less hospitable to moss.
DIY moss removal vs hiring a roofing professional
For light moss on a low-slope roof, DIY removal works well if you are comfortable working at heights. You can handle the brushing, apply a moss killer, and rinse everything yourself over a weekend.
While DIY removal can be effective for light moss, a professional assessment helps identify underlying damage that moss may have caused-damage that could lead to costly repairs if left unaddressed.
However, some situations call for a professional:
Steep pitch or multi-story home: Safety considerations outweigh potential cost savings in these situations.
Heavy moss covering large areas: Professionals have better equipment and can work faster.
Signs of shingle lifting or leaks: A roofer can assess damage and recommend repairs, not just clean the surface.
You want a damage assessment included: Cleaning alone does not tell you whether the moss has already caused problems underneath.
A professional can spot issues you might miss and complete the job without causing additional damage.
How to get fair quotes for moss removal on your roof
Professional moss removal typically costs $300-800 for an average home, depending on roof size, moss severity, and your location. A 1,500 square foot roof with light moss might cost $300-500, while heavy moss on a 2,500 square foot roof could run $600-800.
When comparing quotes, look for a few specific things:
Line-item pricing: You want to see what you are paying for, not just a single number with no breakdown.
Damage assessment: A good quote includes inspection for shingle damage, not just cleaning.
Prevention treatment: Ask whether the quote includes zinc or copper treatment to slow regrowth.