Gutter guard installation costs between $3 and $30 per linear foot, depending on the type of guard you choose and whether you hire a professional or tackle the project yourself. For a typical home with 150-200 linear feet of gutters, expect to pay $1,500 to $5,000 for professional installation, or $200 to $1,000 if you buy materials and do the work on your own.
Installing gutter guards protects your home from water damage, reduces gutter cleaning to once every few years instead of twice annually, and can extend your gutter system's lifespan by preventing debris buildup that causes rust and sagging. Many homeowners coordinate gutter guard installation with roof replacement or repair work to save 10-15% through bundled contractor pricing.
This guide covers everything you need to know: what it costs, the five main types available, how to decide between DIY and professional installation, how to choose and vet installers, and how to coordinate the work with roofing projects for maximum savings.
What is Gutter Guard Installation?
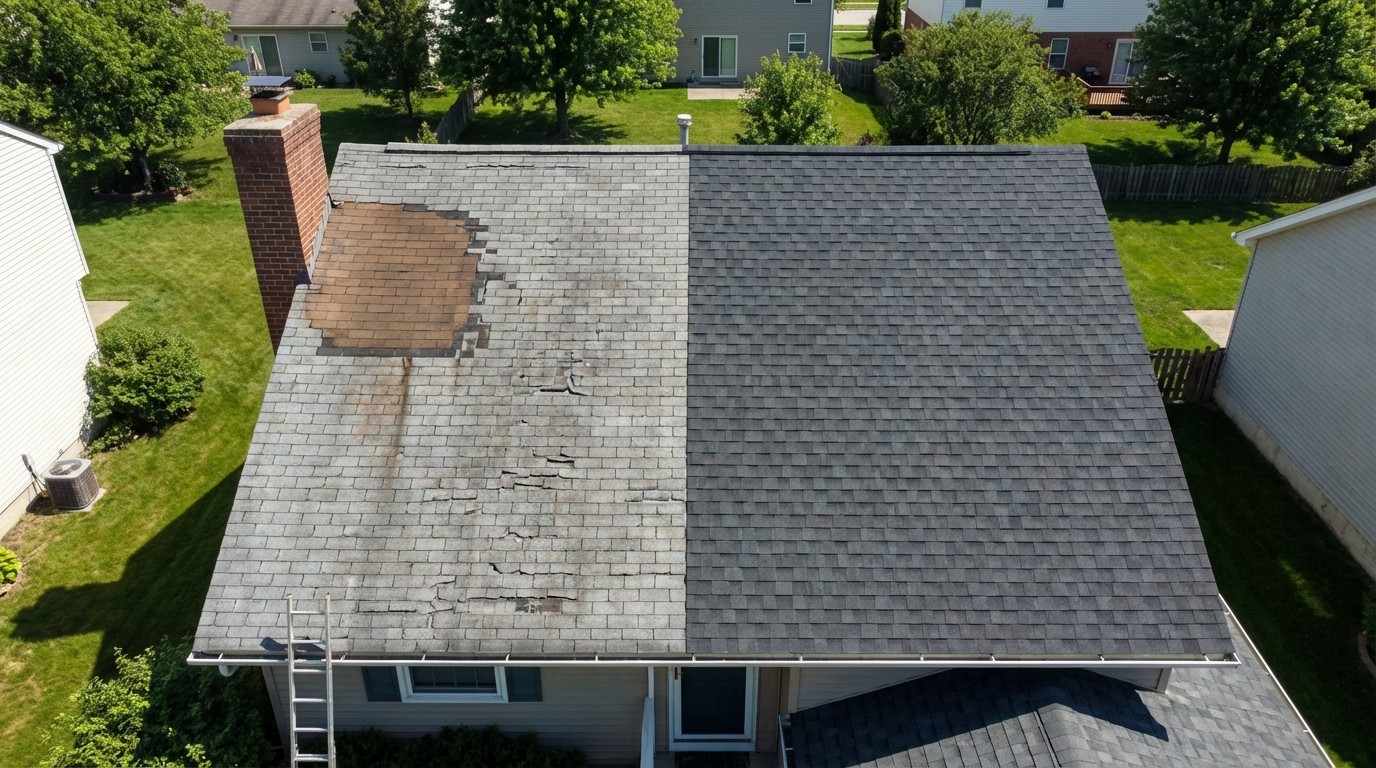
Gutter guard installation involves attaching a protective barrier system to your existing gutters to prevent leaves, pine needles, and other debris from clogging the channels while still allowing rainwater to flow freely into downspouts. The guards attach either to the gutter edge, under the first row of roof shingles, or inside the gutter channel itself.
When debris accumulates in unprotected gutters, water overflows and damages your foundation, landscaping, and siding. The weight of wet debris causes gutters to sag and pull away from fascia boards. Standing water breeds mosquitoes and accelerates rust formation.
Quality gutter guards reduce these risks by keeping most debris out. Maintenance drops from twice yearly to once every 2-3 years for most systems, saving time and reducing the risk of ladder falls.
Gutter Guard Installation Costs
Understanding installation costs helps you budget appropriately and compare quotes from different contractors. Prices vary significantly based on guard type, home size, and whether you hire a professional.
Average Cost by Material Type
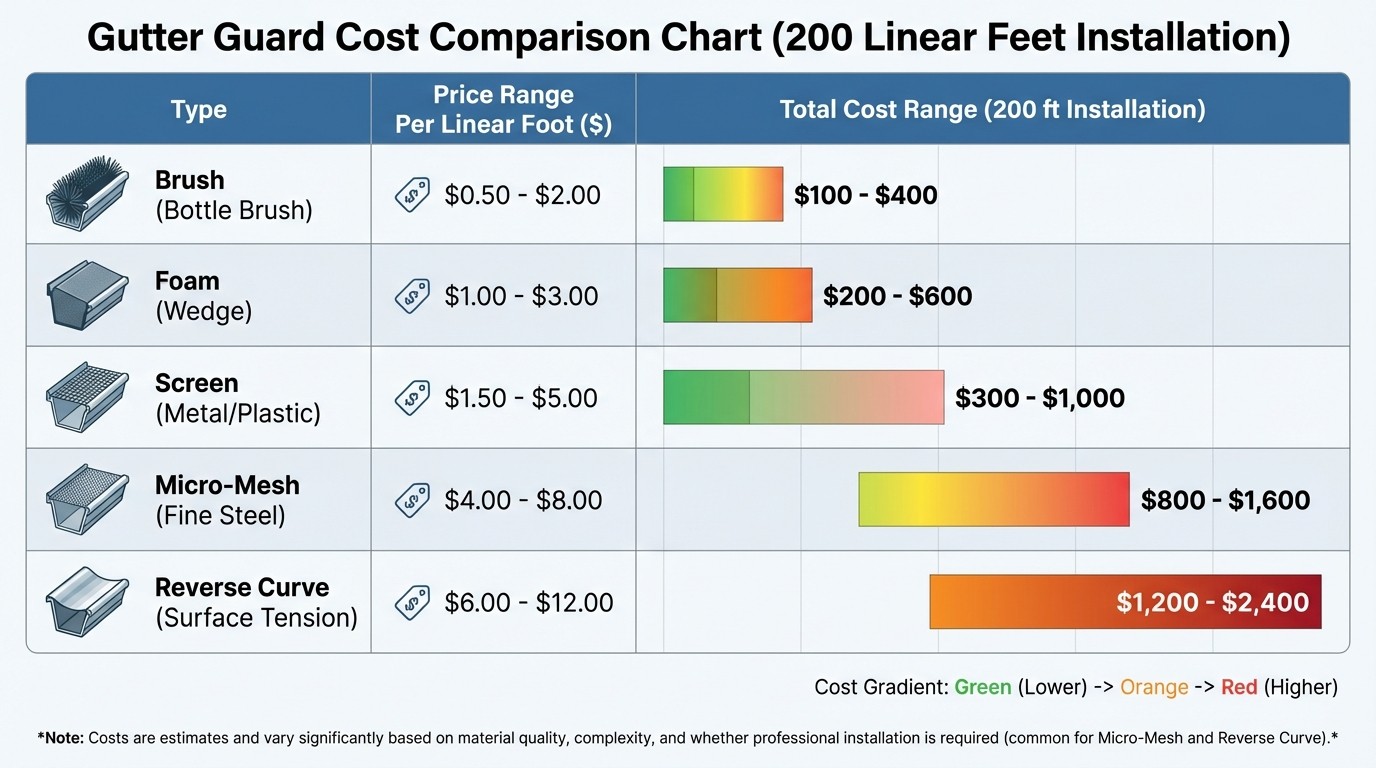
Different guard materials offer different levels of protection and durability, which directly affects their cost:
Guard Type | DIY Cost/ft | Pro Install Cost/ft | Total (200 linear ft) |
|---|---|---|---|
Micro-mesh | $2-$5 | $8-$30 | $1,600-$6,000 |
Screen guards | $0.50-$2 | $3-$8 | $600-$1,600 |
Reverse-curve | Pro only | $10-$25 | $2,000-$5,000 |
Foam inserts | $2-$4 | $2-$4 | $400-$800 |
Brush guards | $3-$5 | $5-$10 | $1,000-$2,000 |
According to a 2026 This Old House survey of 1,000 homeowners, the average professional installation cost was $1,565 to $3,476 for 200 linear feet.
The wide price range exists because installation complexity varies. A single-story ranch with straight gutters costs less than a two-story colonial with multiple valleys. Accessibility matters too. Homes on slopes or with difficult ladder placement see higher labor costs.
Cost by Home Size
Your home's square footage determines how many linear feet of gutter you need to protect. You can estimate your roof cost to understand total exterior protection investment.
1,000 sq ft home (100-120 linear ft): $300-$3,600 professional install, $200-$600 DIY materials
1,500 sq ft home (150-180 linear ft): $450-$5,400 professional install, $300-$900 DIY materials
2,000 sq ft home (180-200 linear ft): $540-$6,000 professional install, $360-$1,000 DIY materials
2,500 sq ft home (200-250 linear ft): $600-$7,500 professional install, $400-$1,250 DIY materials
These estimates assume standard single-story construction. Multi-story homes or complex rooflines can increase costs 25-50% due to safety equipment and extended labor time.
DIY vs Professional Installation Costs
DIY installation eliminates labor charges (60-70% of total professional cost). You'll pay only for materials ($200-$1,000) but need to invest 8-12 hours of time, rent a quality ladder ($50-$200), and potentially buy safety equipment ($50-$150).
Professional installation costs $1,500-$5,000 for the same home but includes labor, disposal, and often a 2-5 year workmanship warranty. Installation mistakes can void product warranties, which typically require professional installation. Safety is another factor. According to the Consumer Product Safety Commission, ladder falls send approximately 164,000 people to emergency rooms annually.
Calculate the value of your time. At $50/hour, 10 hours of DIY time represents $500 in opportunity cost. Add materials ($500-$1,000) and you're approaching professional installation pricing for screen guards.
Factors Affecting Installation Cost
Roof pitch: Steep roofs (8:12 pitch or greater) require additional safety equipment. Contractors charge 15-25% more for steep-slope work.
Gutter condition: Rust holes, loose sections, or sagging require repair before installation. Add $500-$2,000 for gutter repairs.
Home height: Two-story homes require extension ladders or scaffolding, adding $200-$500 to labor.
Geographic location: Urban areas with higher labor rates see prices 20-30% above rural markets.
Seasonal demand: Winter or summer installation can save 10-15% compared to peak spring and fall seasons.
Types of Gutter Guards Explained
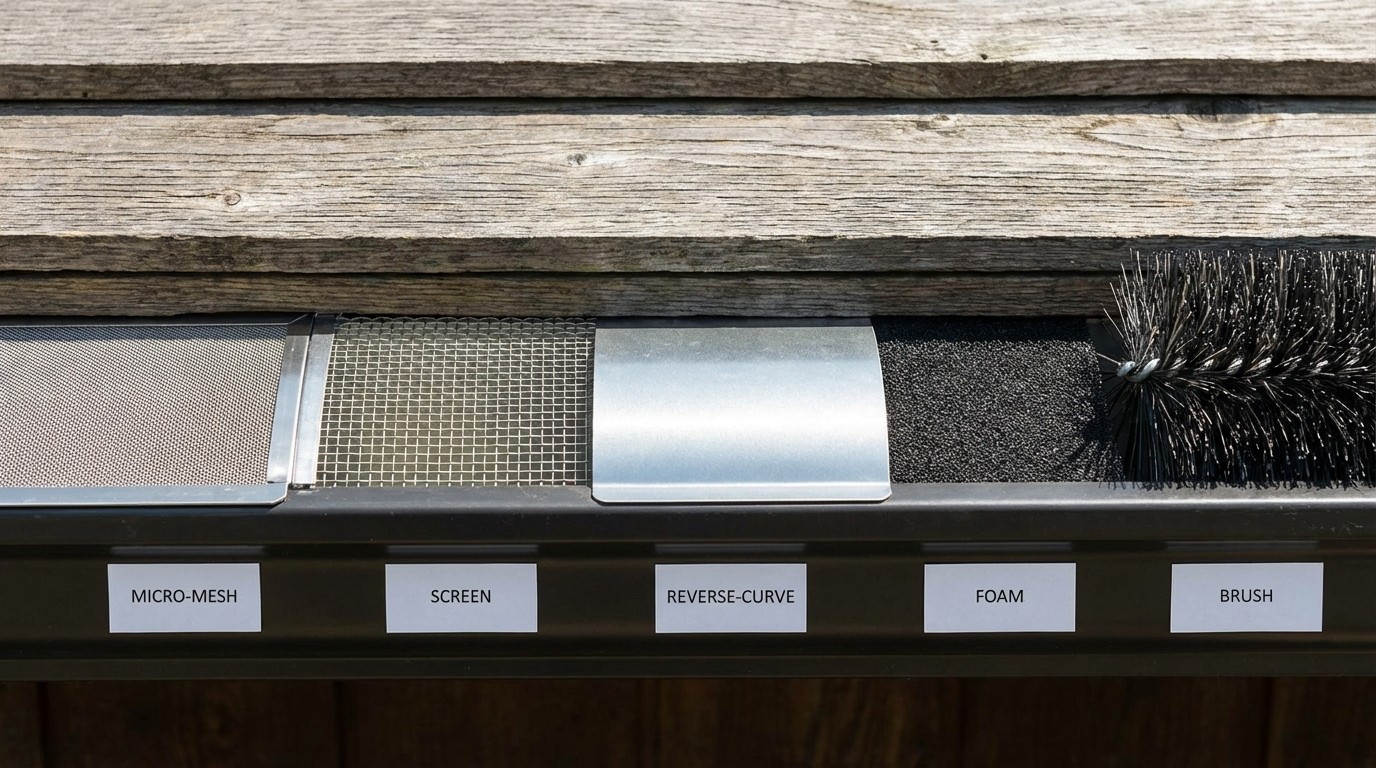
Five main types dominate the market, each using a different approach to keep debris out while allowing water flow.
Micro-Mesh Guards
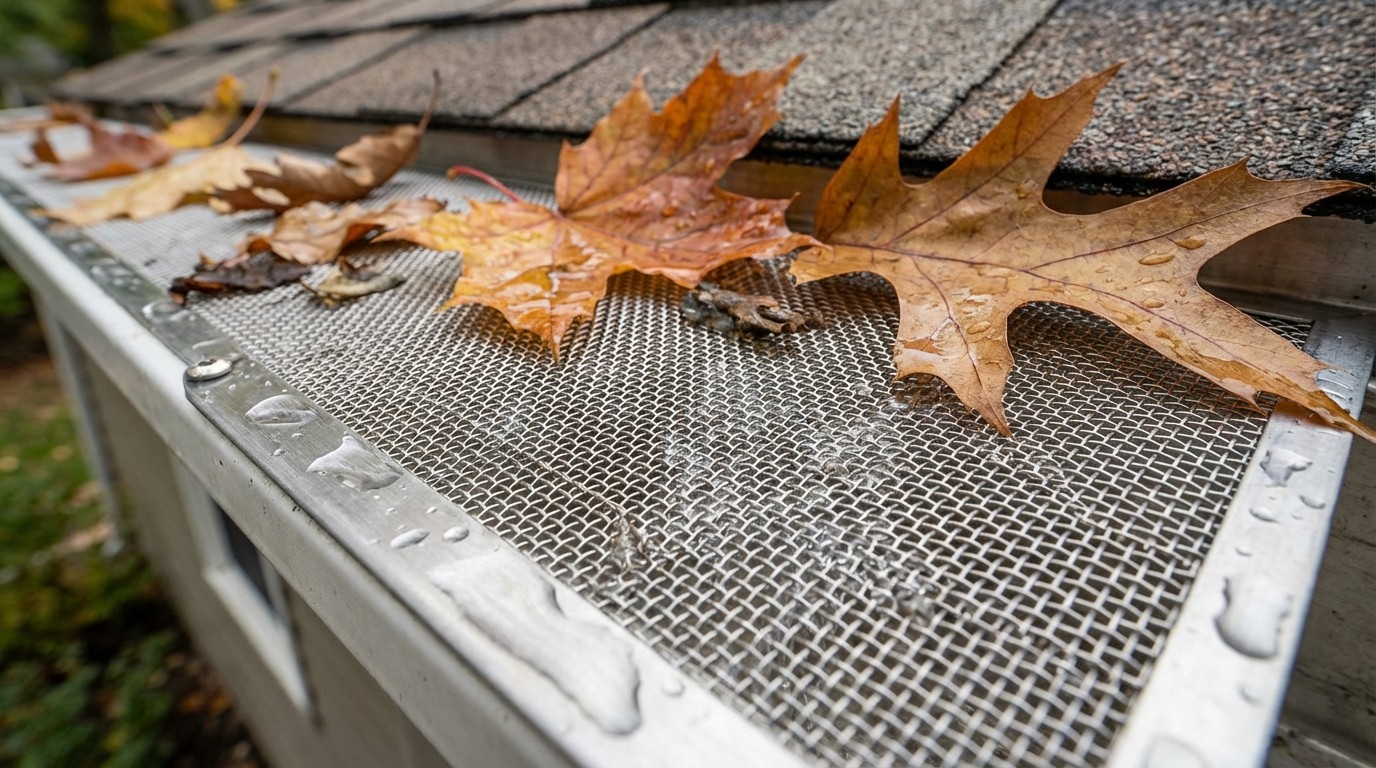
Micro-mesh guards use fine stainless steel or aluminum screen with holes smaller than coffee grounds. The mesh attaches to the gutter lip and extends under the first row of shingles, creating a smooth surface that sheds leaves and pine needles.
Pros: Most effective at blocking all debris types, handles heavy rainfall, lasts 20-30 years, comprehensive warranties.
Cons: Highest cost ($8-$30/ft installed), requires professional installation for warranty coverage, more visible from ground.
Best for: Heavy tree coverage, pine or oak trees dropping small debris, permanent solutions, heavy rainfall areas.
Popular brands include LeafFilter, Raptor Micro-Mesh, and HomeCraft. These often include lifetime transferable warranties covering materials and clogging.
Screen Guards
Screen guards are perforated metal or plastic panels that sit on gutters, allowing water through while blocking larger debris. They snap onto the gutter edge without requiring roof modification.
Pros: Affordable ($3-$8/ft installed), DIY-friendly (4-6 hours), widely available at hardware stores, easy to remove for cleaning.
Cons: Can clog with small debris like pine needles, shorter lifespan (5-10 years), plastic versions become brittle in cold climates.
Best for: Budget-conscious homeowners, areas with large leaf debris, minimal tree coverage, homeowners comfortable with occasional cleaning.
Screen guards work well as starter systems. If unsure about premium guards, screens provide immediate improvement at minimal cost.
Reverse-Curve Guards
Reverse-curve guards use surface tension to direct water into gutters while debris slides off. Water adheres to the curved surface and flows into a narrow opening while leaves can't make the turn.
Pros: Highly effective for large leaves, minimal maintenance, handles moderate to heavy rain, clean roofline appearance.
Cons: Most expensive ($10-$25/ft), professional installation only, can overshoot during extremely heavy downpours, difficult to remove.
Best for: Large deciduous trees, premium low-maintenance solutions, architectural designs where aesthetics matter.
Major brands include Leafguard and Gutter Helmet. Both require professional installation and offer 20-40 year warranties.
Foam Inserts
Foam inserts are porous polyurethane blocks that sit inside gutters, allowing water through while blocking debris. They press into place without fasteners.
Pros: Cheapest option ($2-$4/ft), easiest installation (30-60 minutes), no tools required, easily removable.
Cons: Shortest lifespan (3-5 years), debris decomposes into foam, seeds can sprout in accumulated soil, can harbor mold in humid climates.
Best for: Temporary protection, rental properties, very low-debris areas, testing guards before committing to permanent systems.
Plan for replacement every 2-3 years. Factor this recurring cost into total ownership expenses.
Brush Guards
Brush guards look like large bottle brushes that sit inside gutters. Bristles catch debris on top while water flows through the center.
Pros: Inexpensive ($3-$5/ft DIY, $5-$10 installed), easy to install and remove, allows gutter access, handles light to moderate debris.
Cons: Debris catches in bristles requiring periodic cleaning, moderate effectiveness, needs replacement every 5-10 years.
Best for: Simple supplemental protection, light debris areas, situations requiring gutter access, temporary solutions.
GutterBrush and Leaf Proof are sold in 3-foot sections that lay end-to-end in gutters.
How to Choose the Right Gutter Guards
Consider these factors to identify the best match for your home and budget.
Climate Considerations
Heavy rainfall areas (Pacific Northwest, Southeast) need micro-mesh or reverse-curve guards to handle high water volume. Screen guards work but may overwhelm during intense storms.
Cold climates with snow and ice challenge foam inserts, which freeze and crack. Metal micro-mesh and aluminum screens handle freeze-thaw cycles well. Avoid plastic screens in Northern states.
Humid climates accelerate foam degradation and create mold. Stick with metal or hard plastic guards in coastal areas.
Debris Type in Your Area
Pine needles require micro-mesh guards because they slip through screens and tangle in brushes. Large oak or maple leaves work fine with any guard type.
Seed pods and maple helicopters present moderate challenges. Screen guards with small perforations or micro-mesh systems handle these well. Foam and brush guards struggle with small debris.
Asphalt granules from shingle roofs clog screen guards but pass through micro-mesh. Reverse-curve guards handle granules well.
Budget and Longevity Tradeoffs
Calculate total cost of ownership by dividing installation cost by expected lifespan.
Foam guards cost $200-$400 but last 3-5 years ($50-$130/year). Micro-mesh costs $1,600-$6,000 but lasts 20-30 years ($53-$300/year). Lifetime costs are similar, but micro-mesh provides better protection.
Factor in avoided gutter cleaning costs. Professional cleaning costs $150-$300 per visit, twice yearly ($300-$600 annually). Quality guards pay for themselves in 5-10 years through avoided cleaning alone.
DIY vs Professional Installation: Which is Right for You?
The decision depends on your home's configuration, comfort working at heights, guard type, and warranty coverage preferences.
When DIY Makes Sense
DIY saves $1,000-$4,000 in labor costs for:
Single-story homes: Reach entire gutter system from standard 6-foot stepladder. Most DIY injuries occur on multi-story homes with extension ladders.
Screen guards or foam inserts: Snap onto gutter edge or press into place in minutes. No specialized tools needed.
Good gutter condition: No rust, loose hangers, or sagging. Installing guards over damaged gutters wastes money.
Ladder experience: Prior DIY experience and comfort on ladders. Honest skill assessment matters. Nervousness on ladders isn't worth the savings.
When to Hire a Professional
Professional installation makes sense for:
Multi-story homes: Significant fall risks. Professionals carry safety equipment (roof anchors, harnesses, ladder stabilizers) and workers' compensation insurance.
Micro-mesh or reverse-curve guards: Require specialized installation. Must be precisely positioned under shingles or aligned to specific angles. Mistakes void warranties.
Steep roof pitch (8:12 or greater): Dangerous without proper safety equipment. Professionals use roof jacks, scaffolding, or harnesses.
Gutters need repair: Professionals assess condition, make repairs, and install guards in one visit.
Warranty coverage desired: Most quality systems only honor warranties when professionally installed. Workmanship warranties (2-10 years) cover installation defects.
Safety Considerations
Ladder falls account for 164,000 emergency room visits annually. Falls occur when homeowners overreach, use ladders on uneven ground, or work alone.
Working at roof height on sloped surfaces compounds risks. You're reaching overhead to attach guards while balancing on a ladder against a rounded gutter edge.
For DIY work: Use ladder stabilizer, position on firm level ground, maintain three points of contact, work with a helper, never work alone.
Consider whether $1,500-$3,000 savings justifies the risk.
For homeowners over 50 or with mobility limitations, professional installation provides peace of mind.
How to Choose a Gutter Guard Installer
Selecting a qualified installer protects your investment and ensures guards perform as designed. Follow this systematic vetting process.
Essential Qualifications to Look For
Verify credentials before discussing your project:
Valid contractor license: Requirements vary by state. Check your state licensing board website to verify the license number and confirm it's current.
General liability insurance: Minimum $1 million coverage protects you if the contractor damages your property. Request a certificate of insurance (COI) and call the insurer to verify it's active.
Workers' compensation insurance: Covers injuries to contractor employees on your property. Without this, you could be liable for medical expenses.
Manufacturer certifications: Indicates training on specific guard systems. LeafFilter, Leafguard, and Gutter Helmet offer installer certification programs.
Years in business: Companies operating 3+ years have established track records. Be cautious with brand-new companies lacking references.
Questions to Ask Before Hiring
"Are you licensed and insured, and can you provide proof?" Legitimate contractors immediately provide license numbers and insurance certificates.
"What's included in your warranty?" Quality installations include product warranty (manufacturer, 10-30 years) and workmanship warranty (installer, 2-10 years).
"Can you provide three local references I can call?" Ask for recent projects (past year) in your area. Call and ask about punctuality, quality, cleanup, and whether they'd hire the contractor again. Apply similar vetting questions to ask a roofer when coordinating with roof work.
"Will you pull permits if required?" Some municipalities require permits, especially for roof modifications.
"Do you inspect and repair gutters before installing guards?" Professional installers assess gutter condition first. This reveals whether they prioritize quality.
"Can you coordinate with my roofer if I'm having roof work done?" Best contractors understand integration with roofing projects.
"What's your payment schedule?" Never pay 100% upfront. Standard schedules: 25-30% deposit, 40-50% at start, 20-25% upon completion.
"How long will installation take for my home?" Experienced installers estimate timeline based on linear footage and configuration. Vague answers suggest inexperience.
How to Compare Multiple Quotes
Get 3-5 quotes to establish fair market pricing. Ensure you're comparing identical guard types. Request line-item breakdowns showing materials, labor, disposal fees, and permits separately, just as you would when comparing roofing estimates.
Compare warranty terms beyond length. A 20-year warranty covering only material defects offers less protection than 15 years covering materials, labor, and clogging.
Evaluate installation timeline. Two-person crew should complete average home in 3-4 hours. If quoting 2 days, they're padding hours. If promising 1 hour, they're rushing.
Review payment terms. Be wary of contractors requiring 50%+ upfront, especially for "materials ordering." Legitimate contractors have vendor accounts.
Compare quotes from vetted installers with line-item pricing to ensure competitive rates from licensed, insured professionals.
Red Flags to Avoid
Same-day pressure: "Limited time offers" or claims prices increase tomorrow. Legitimate quotes remain valid 30-60 days.
100% payment upfront or cash-only: No established contractor requires full payment before starting.
No physical address: Only P.O. box or cell phone. Legitimate contractors have verifiable business locations.
Unlicensed or uninsured: Verify requirements through your state licensing board.
No written warranty: Verbal promises mean nothing when problems arise.
Suspiciously low bids: 50%+ below other quotes usually indicates inferior materials or price increases once work starts.
Recent reviews only: All reviews within 1-2 months or overly similar. Check multiple platforms for detailed reviews. Watch for similar roofing scams in the gutter industry.
Gutter Guard Installation Process
Understanding professional installation helps you know what to expect and ensures quality work.
Preparation Steps
Professional installers thoroughly clean gutters and downspouts first. Installing guards over dirty gutters leads to clogs underneath.
Professional Installation Timeline
Typical single-story home (150-200 linear ft): 2-4 hours total
Hour 1: Setup (ladders, materials, safety equipment, final measurements)
Hours 2-3: Installation (cutting guards to size, attachment, sealing seams, ensuring proper slope)
Hour 4: Quality control (water flow testing, checking connections, cleanup, final walkthrough)
Multi-story or complex rooflines extend timeline to 6-8 hours or full day.
Post-Installation Inspection
Walk property with installer before final payment. Check these quality indicators:
Water flows freely through guards without pooling. Seams are sealed tightly with no gaps. Guards sit flush against gutter or roof edge. Attachment points are secure with no loose sections. If attached under shingles, shingle edge lies flat.
Request written warranty documentation specifying coverage, length, and claim procedures. Get care instructions for your guard type.
Coordinating Gutter Guards with Roof Work
Many homeowners install guards during roof replacement or major repairs, creating cost savings opportunities.
Best Time to Install
Installing during roof replacement makes financial and practical sense. Roofers already have equipment at roof edge. Adding guards saves mobilization costs.
When contractors replace roofs, they remove the first shingle row at roof edge, creating ideal access for guards that attach under shingles. Installing later requires lifting shingles, risking damage to new materials.
Bundled projects typically save 10-15% compared to separate contractors. You avoid paying twice for equipment setup.
Fall installation before leaf season lets you test performance during peak debris. Spring installation after winter ensures guards attach to clean, damage-free gutters.
How Gutter Guards Affect Roof Warranty
Guards attaching under shingles can void roof warranties if improperly installed. Lifting shingles can crack them, break adhesive seals, or create wind lifting points.
Most roofing warranties include clauses about roof modifications. Guard installer damage could void warranty coverage.
Gutter-mounted guards attaching to gutter lip or sitting inside gutters don't affect roof warranty. Choose these if warranty protection concerns you.
Notify your roofing contractor if adding guards to new roofs. They can recommend compatible types and may install guards themselves or coordinate with specialists.
Common Gutter Guard Installation Mistakes
Awareness of common mistakes helps avoid problems compromising guard performance.
DIY Mistakes to Avoid
Installing over dirty gutters creates clogs you can't access. Always clean thoroughly first.
Wrong guard type for debris leads to failure. Foam can't handle pine needles. Screen guards with large perforations let seeds through.
Improper pitch causes water to run past guard opening. Guards must maintain gutter slope (1/4 inch per 10 feet toward downspouts).
Not sealing seams creates gaps for debris entry. Each joint needs overlap and sealant.
Inadequate attachment allows wind to lift guards. Follow manufacturer specs for fastener type, spacing, and depth.
Voiding warranties through improper installation. Read warranty terms before starting DIY work.
Loose or wavy sections that rattle weren't properly fastened. Guards should sit firmly with no movement.
Damage to shingles or fascia from careless installation. Lifted shingles or gouged fascia require repair at contractor's expense.
How to Ensure Proper Installation
Be present for final walkthrough. Request water flow test before final payment using garden hose to simulate rainfall.
Document installation with photos from multiple angles showing connections and coverage.
Get written warranty before crew leaves. Schedule 6-month follow-up to verify performance through seasonal changes.
Gutter Guard Maintenance and Long-Term Care
Guards reduce maintenance but don't eliminate it. Different types require different care.
Maintenance by Guard Type
Micro-mesh: Brush debris off 1-2x/year. Avoid pressure washing. Rinse with garden hose.
Screen guards: Remove trapped debris 2-3x/year. Some snap off for cleaning.
Reverse-curve: Annual inspection. Designed to be self-cleaning.
Foam inserts: Replace every 3-5 years. Check for mold and compression twice yearly.
Brush guards: Remove and clean 2-3x/year. Takes 15-30 minutes.
Inspection Schedule
Spring: Check for ice damage, loosened guards, winter debris. Fall: Pre-leaf season prep, ensure proper flow. After storms: Check for damage from branches, wind, hail. Annual professional inspection: Recommended even with guards.
When to Call for Service
Water overflowing despite guards indicates clogged guards, improper pitch, or blocked downspouts. Visibly clogged guards mean guard type doesn't match debris or maintenance was neglected. Sagging gutters suggest too much weight for existing hangers. Gaps appearing in guards reduce effectiveness.