

Roof flashing is thin metal sheeting installed at every joint, edge, and penetration on your roof to keep water from seeping into your home. It's the part of your roofing system that protects the vulnerable spots where shingles alone can't do the job.
Most roof leaks don't start in the middle of your shingles. They start where flashing has failed or was never installed correctly. This guide covers the different types of roof flashing, what materials work best, and how to spot problems before they turn into expensive repairs.
What is Roof Flashing
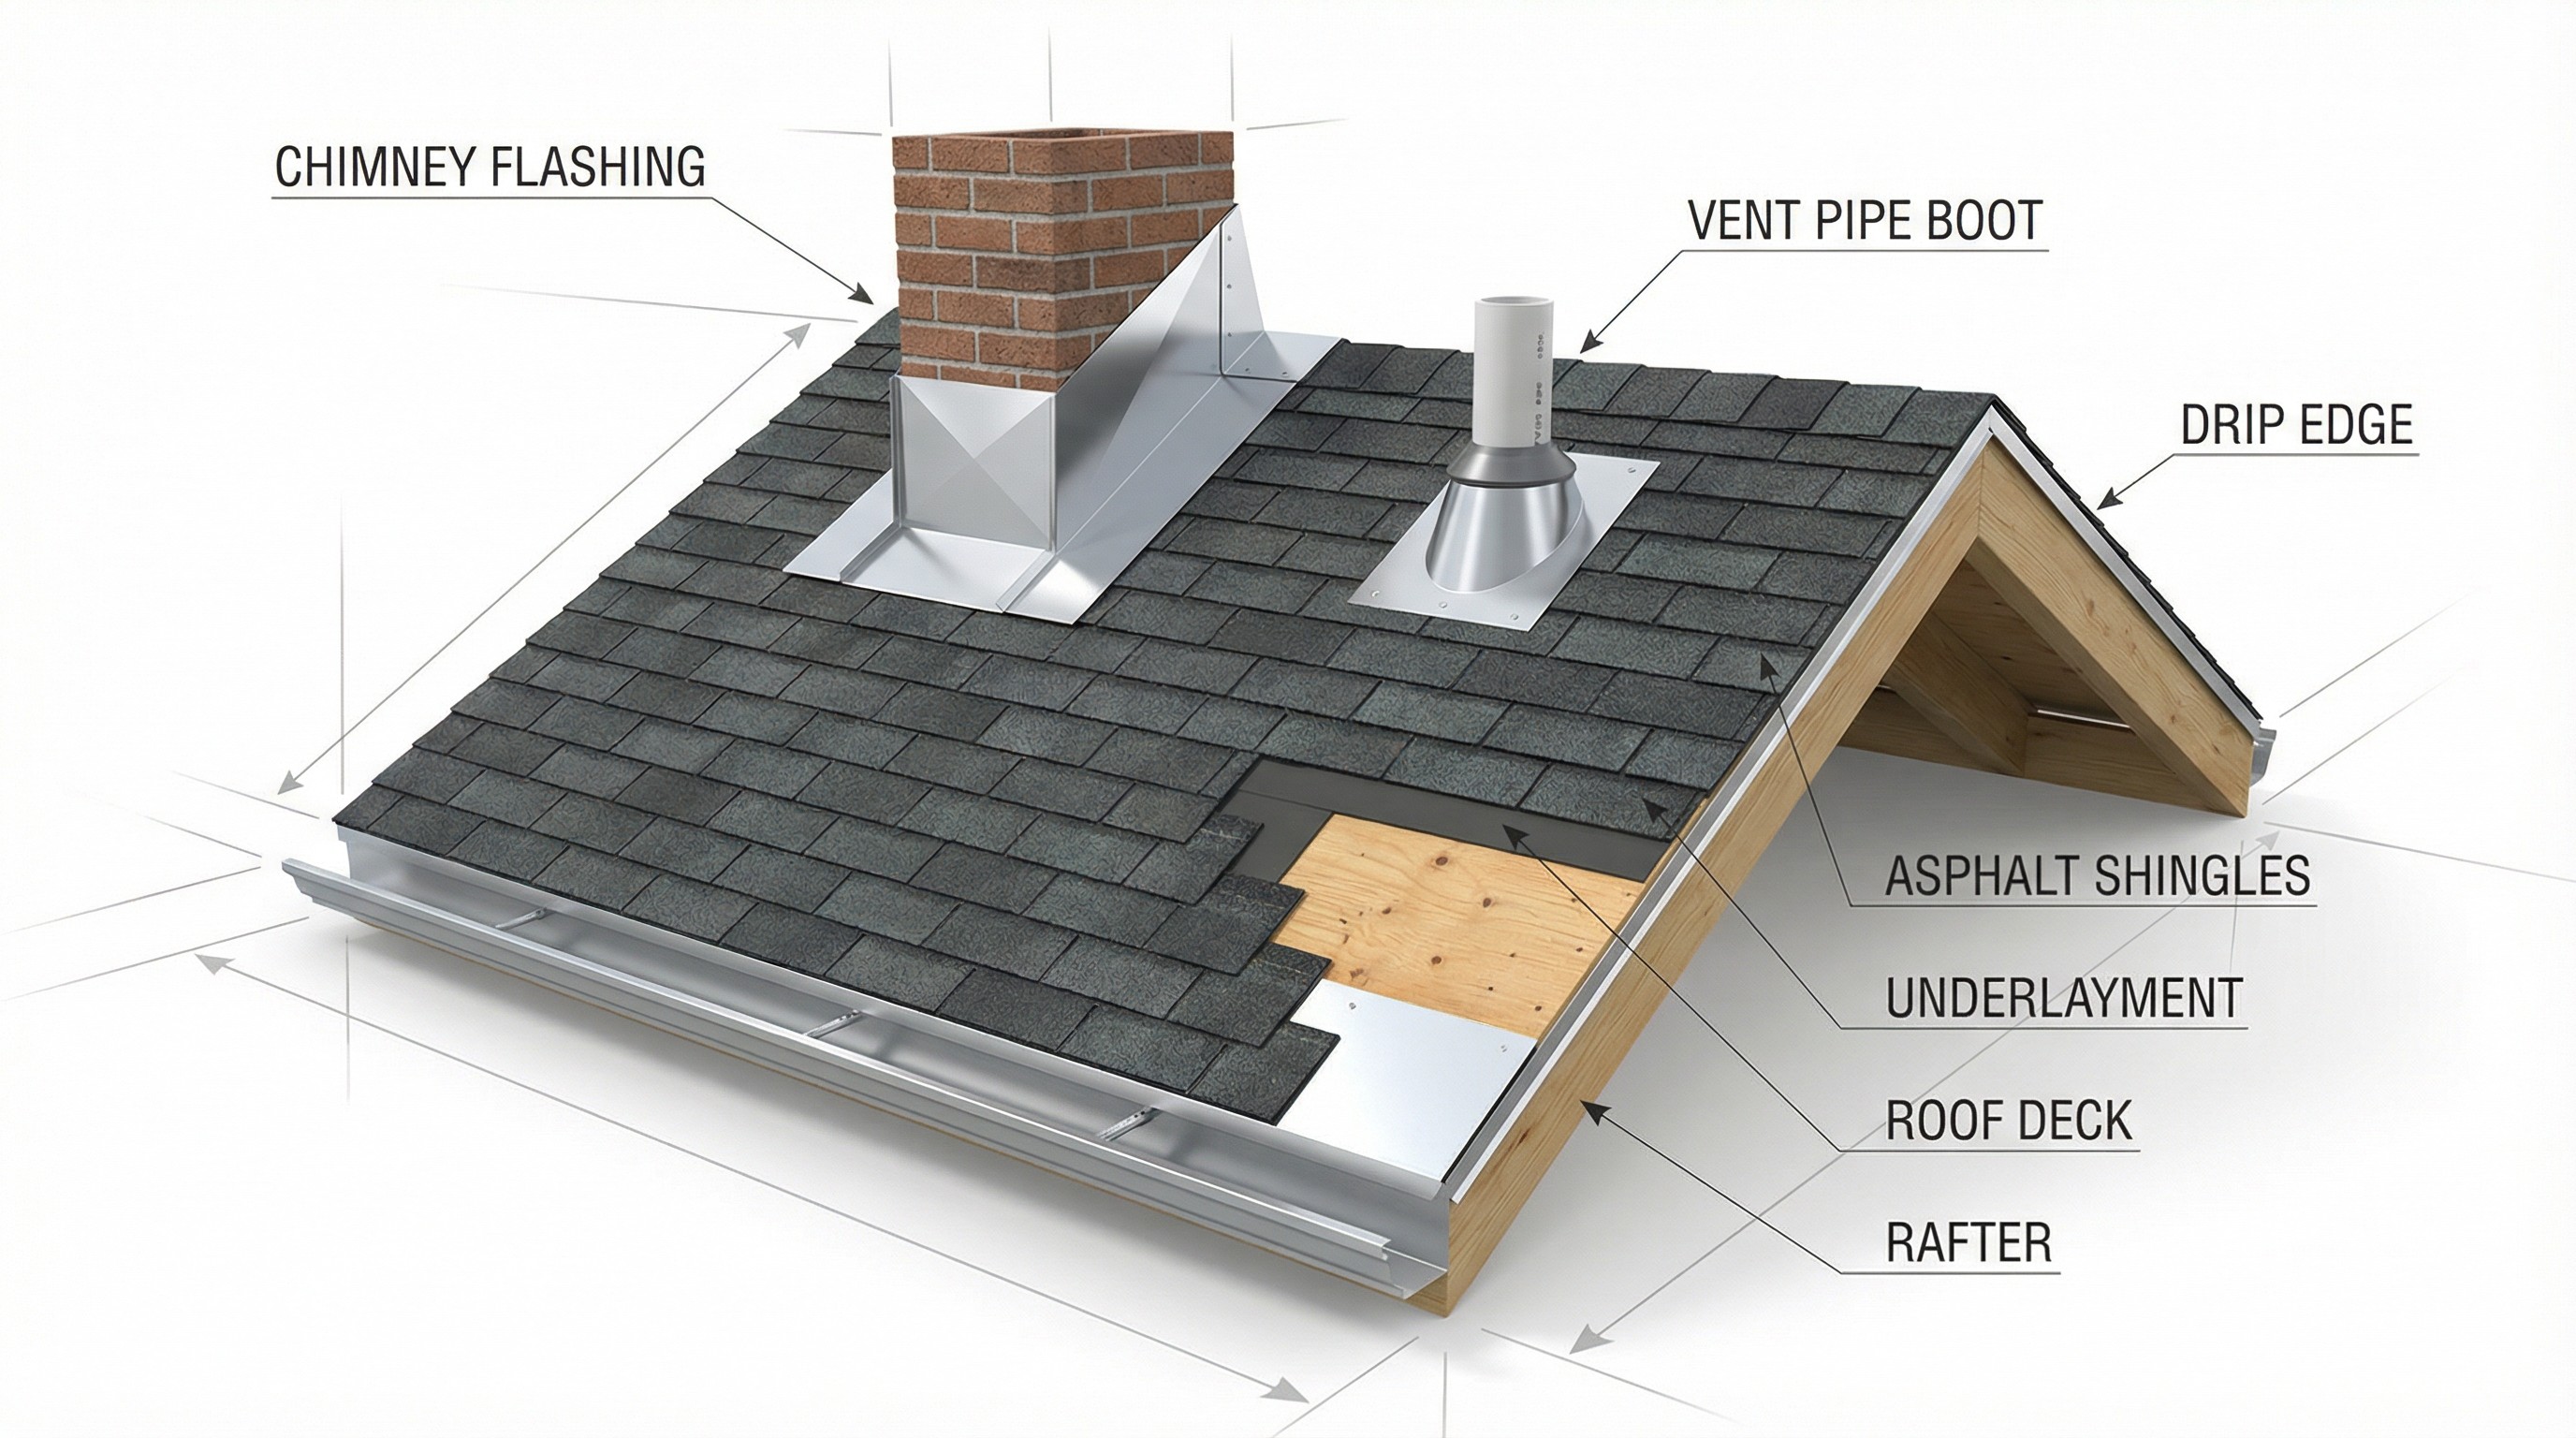
Roof flashing is thin metal sheeting that seals the joints and transitions on your roof where water is most likely to sneak in. You'll find flashing wherever your roof meets a wall, wraps around a chimney, or surrounds a vent pipe. Basically, anywhere two surfaces come together creates a gap, and flashing covers that gap to keep water out.
Your shingles do a great job protecting the flat, open areas of your roof. But at every edge, corner, and penetration, water has an opportunity to work its way underneath. Flashing is the piece that closes off those entry points.
Most homeowners never think about flashing until something goes wrong. Yet it's one of the most important parts of your entire roofing system.
Why Roof Flashing is Important
Most roof leaks don't start in the middle of your shingles, as many homeowners assume.
Properly installed flashing does three things for your home:
Prevents water damage: Seals the gaps where your roof meets walls, vents, chimneys, and skylights
Protects your home's structure: Keeps moisture away from the roof deck and wood framing underneath
Extends your roof's lifespan: Directs water away from vulnerable areas so surrounding materials last longer
Flashing failures often go unnoticed for months or even years, which makes early detection challenging.
Types of Roof Flashing for Your Home
Different parts of your roof face different water challenges. A chimney needs different protection than a roof edge, and a valley handles water differently than a sidewall. That's why roofers use specific flashing types for each location.
Here's what you'll typically find on a residential roof.
Step Flashing
Step flashing is L-shaped metal that goes where your roof meets a sidewall. Think of the area around a dormer or where an addition connects to your main house. Each piece of step flashing overlaps the one below it in a stair-step pattern, weaving between the shingle courses as they go up the roof.
This overlapping design works effectively because it allows water to flow down and away naturally. If one piece gets past a little water, the piece below catches it.
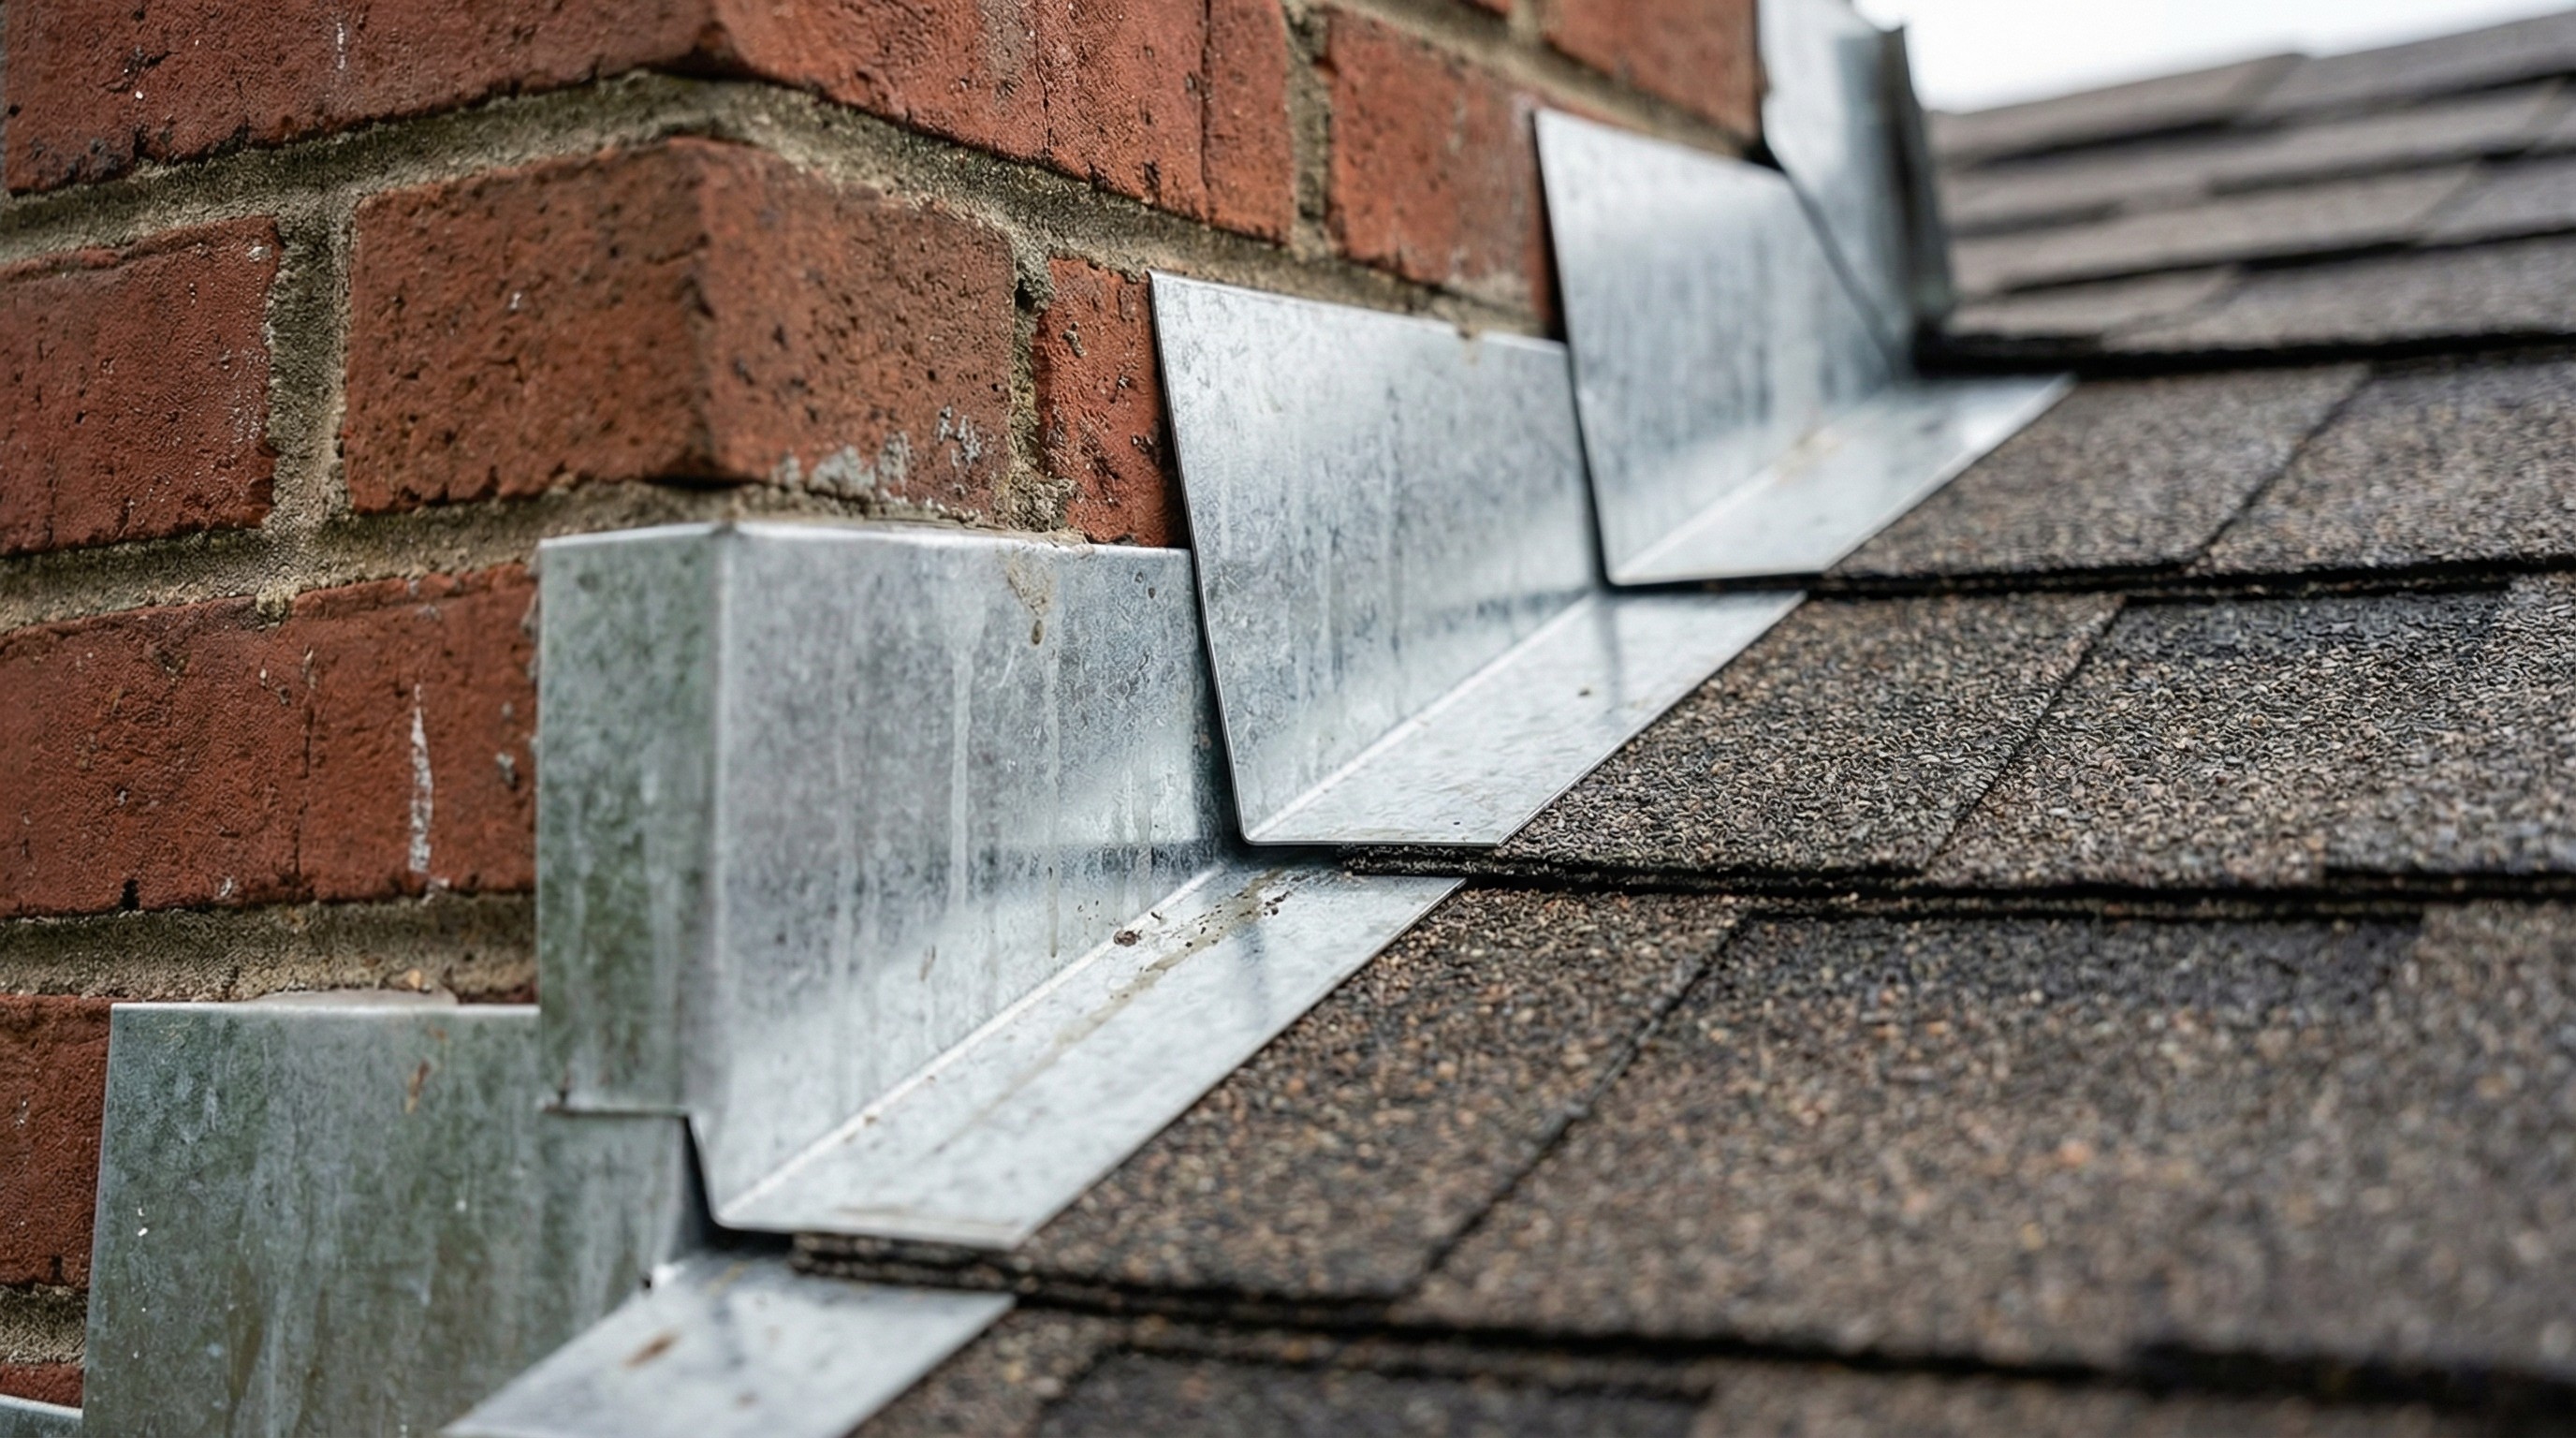
Counter Flashing
Counter flashing acts like a cap over step flashing or base flashing. On a brick chimney, for example, counter flashing gets embedded right into the mortar joints between the bricks. It covers the top edge of the flashing underneath so water can't get behind it.
You'll often see step flashing and counter flashing working together as a team. One seals against the roof surface, and the other protects the exposed top edge.
Drip Edge Flashing
Drip edge is a simple but important piece that runs along the edges of your roof. Its job is to direct water into your gutters instead of letting it dribble down your fascia board and behind your gutters.
Most building codes now require drip edge on new roofs. Without it, water tends to wick back under the shingles at the edge, which leads to rot along the perimeter of your roof over time.
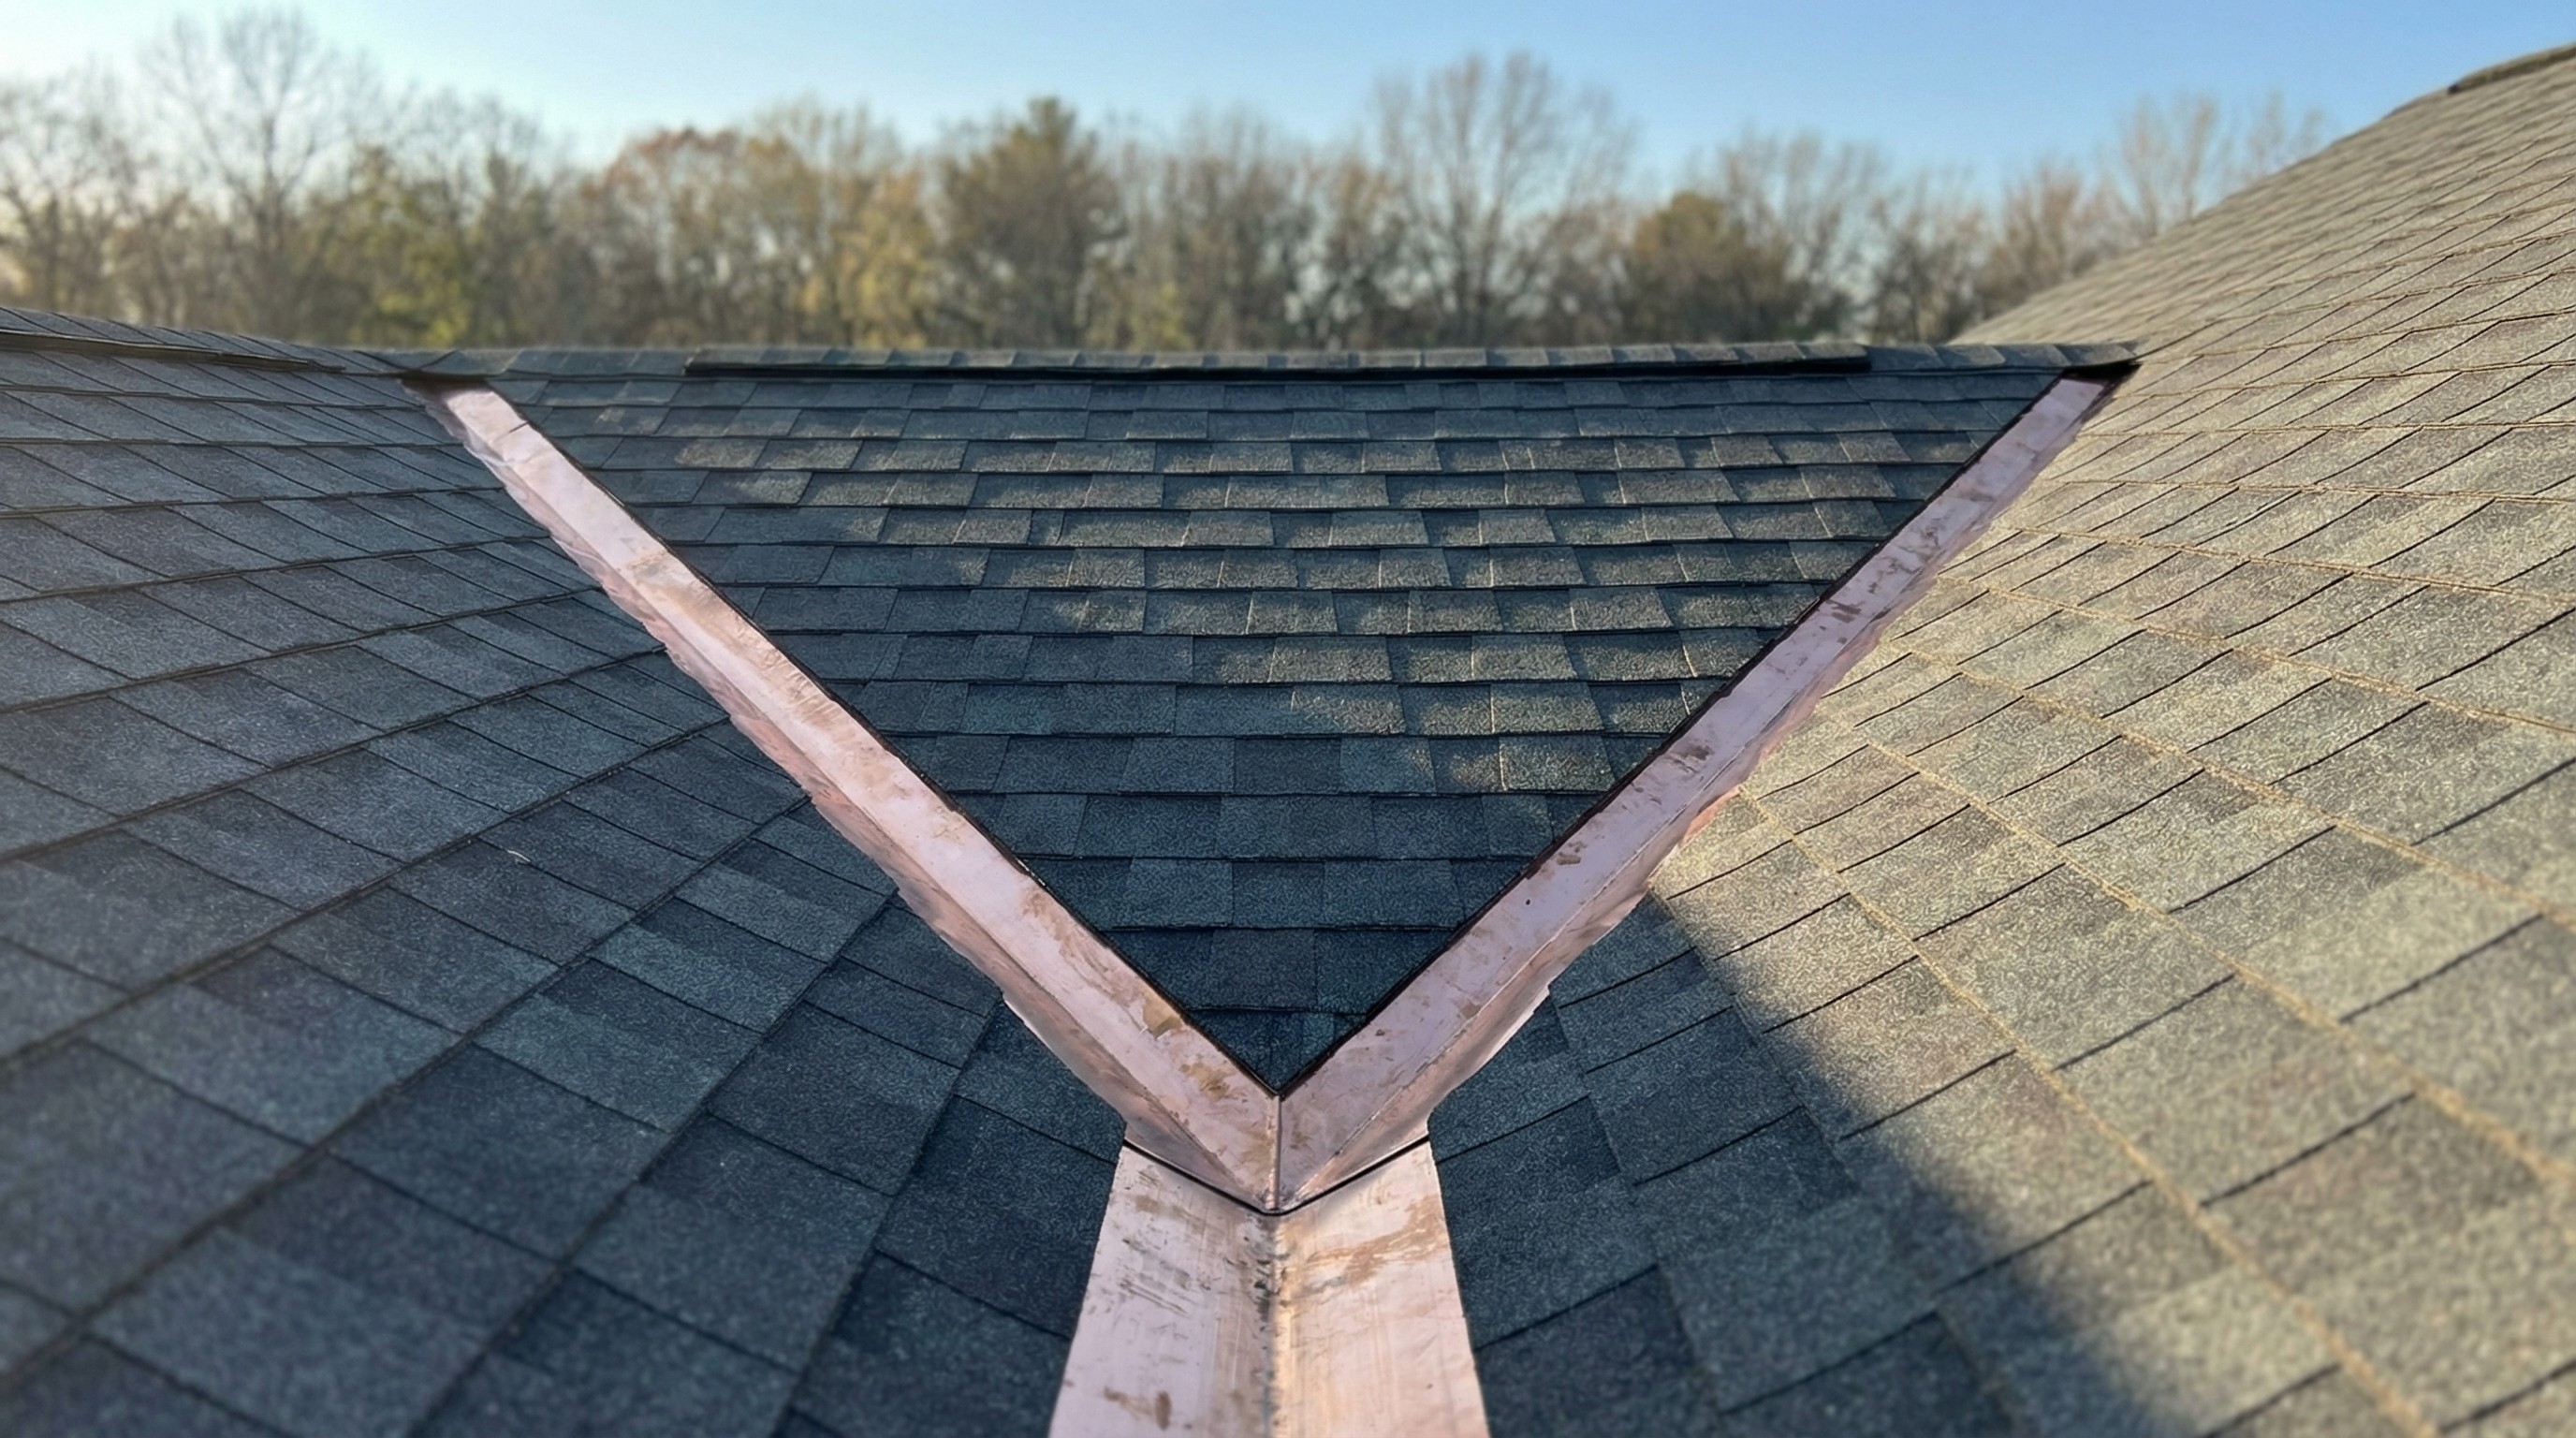
Valley Flashing
Valleys form where two roof slopes meet and create a channel. During a rainstorm, water from both slopes funnels into that channel, so valleys handle a lot of runoff.
Valley flashing can be installed two ways:
Open valleys: The metal flashing stays visible, with shingles cut back on either side
Closed valleys: Shingles from one or both sides cover the metal flashing underneath
Both approaches work when installed correctly. Open valleys tend to handle heavy water flow a bit better, while closed valleys give a cleaner look.
Chimney Flashing
Chimney flashing isn't just one piece of metal. It's actually a system of multiple flashings working together: base flashing at the bottom, step flashing along the sides, counter flashing embedded in the mortar, and sometimes a cricket on the uphill side.
A cricket is a small peaked structure that diverts water around the chimney instead of letting it pool against the back. Wider chimneys especially benefit from crickets.
Chimneys are one of the most common leak sources on any roof, largely because the flashing system is complex and has many potential failure points.
Vent Pipe Flashing
Plumbing vents poke through your roof to let sewer gases escape. Each one needs a cone-shaped flashing, often called a pipe boot, to seal around it.
Most pipe boots include a rubber collar that fits snugly around the pipe. That rubber collar is the weak link. Sun exposure and temperature swings cause the rubber to crack and deteriorate over time, often before the rest of your roof shows any wear.
Base Flashing
Base flashing sits at the bottom of vertical surfaces like chimneys and skylights. It works with counter flashing to create a two-piece waterproof seal.
The two-piece system accommodates the slight movement that occurs in roofs and walls due to temperature changes and settling.
Continuous Flashing
Sometimes called apron flashing, continuous flashing is a single long piece used where a roof meets a long vertical wall. It's essentially one uninterrupted run of metal.
For very long walls, continuous flashing typically includes expansion joints. Metal expands and contracts with temperature changes, and without those joints, the flashing can buckle or pull away from the surface.
Kickout Flashing
Kickout flashing is a small piece that sits at the bottom of a roof-to-wall intersection. Its job is to direct water into the gutter instead of letting it run down the wall.
This piece is often overlooked despite its importance. When kickout flashing is missing, water runs down the siding and soaks into the wall sheathing underneath. Over time, that causes rot and mold that you won't see until the damage is significant.
Skylight Flashing
Most skylights come with integrated flashing kits designed by the manufacturer. The kit is engineered to work with that specific skylight model.
Older skylights or unusual installations may require custom-fabricated metal flashings instead. Either way, skylights are penetrations that interrupt your roof surface, so the flashing around them matters a lot.
Headwall Flashing
Headwall flashing goes where a sloped roof meets a vertical wall at the top of the slope. It tucks under the siding above and extends over the shingles below, creating a watertight transition at that junction.
Flashing Type | Location | Primary Purpose |
|---|---|---|
Step Flashing | Sidewalls | Seals roof-to-wall joints |
Counter Flashing | Over base/step flashing | Covers exposed flashing edges |
Drip Edge | Roof edges | Directs water to gutters |
Valley Flashing | Roof valleys | Channels water runoff |
Chimney Flashing | Around chimneys | Multi-piece waterproof seal |
Vent Pipe Flashing | Around pipes | Seals plumbing penetrations |
Kickout Flashing | End of roof-wall joints | Directs water into gutters |
Metal Roof Flashing Materials
The metal you choose for flashing affects durability, cost, and compatibility with your roof. Different metals perform better in different situations.
Galvanized Steel Flashing
Galvanized steel is the most common choice for residential roofing. It's affordable, durable, and widely available. The galvanized coating protects against rust, though that protection does wear down over time, especially in coastal or humid climates.
Aluminum Flashing
Aluminum is lightweight and naturally rust-resistant. It's easier to cut and form than steel, which makes it popular for repairs. Aluminum handles salty coastal air better than galvanized steel, though it's not quite as rigid.
Copper Flashing
Copper is the premium option. It lasts for decades and develops a distinctive green patina as it ages. The cost is significantly higher than steel or aluminum, but copper works well for historic homes or projects where appearance and longevity matter most.
One important consideration: copper and aluminum are incompatible when used together. When they touch in the presence of moisture, a chemical reaction called galvanic corrosion occurs. If you have copper flashing, any adjacent flashing or fasteners also need to be copper or a compatible metal.
Material | Durability | Cost | Best For |
|---|---|---|---|
Galvanized Steel | High | Low | Most homes |
Aluminum | Medium | Low | Coastal areas |
Copper | Very High | High | Historic or premium homes |
How Much does Roof Flashing Cost
Flashing costs depend on the type, material, and whether the work is part of a full roof replacement or a standalone repair.
For a complete roof replacement, flashing is typically included in the overall price. Standalone flashing repairs, like fixing a leaky chimney or replacing a worn pipe boot, might run anywhere from $150 to $500 or more depending on the location and complexity.
Labor often costs more than the material itself. Flashing installation requires precision, and accessing certain areas of your roof takes time. When reviewing quotes, ask for line-item pricing so you can see exactly what you're paying for flashing versus shingles versus labor.
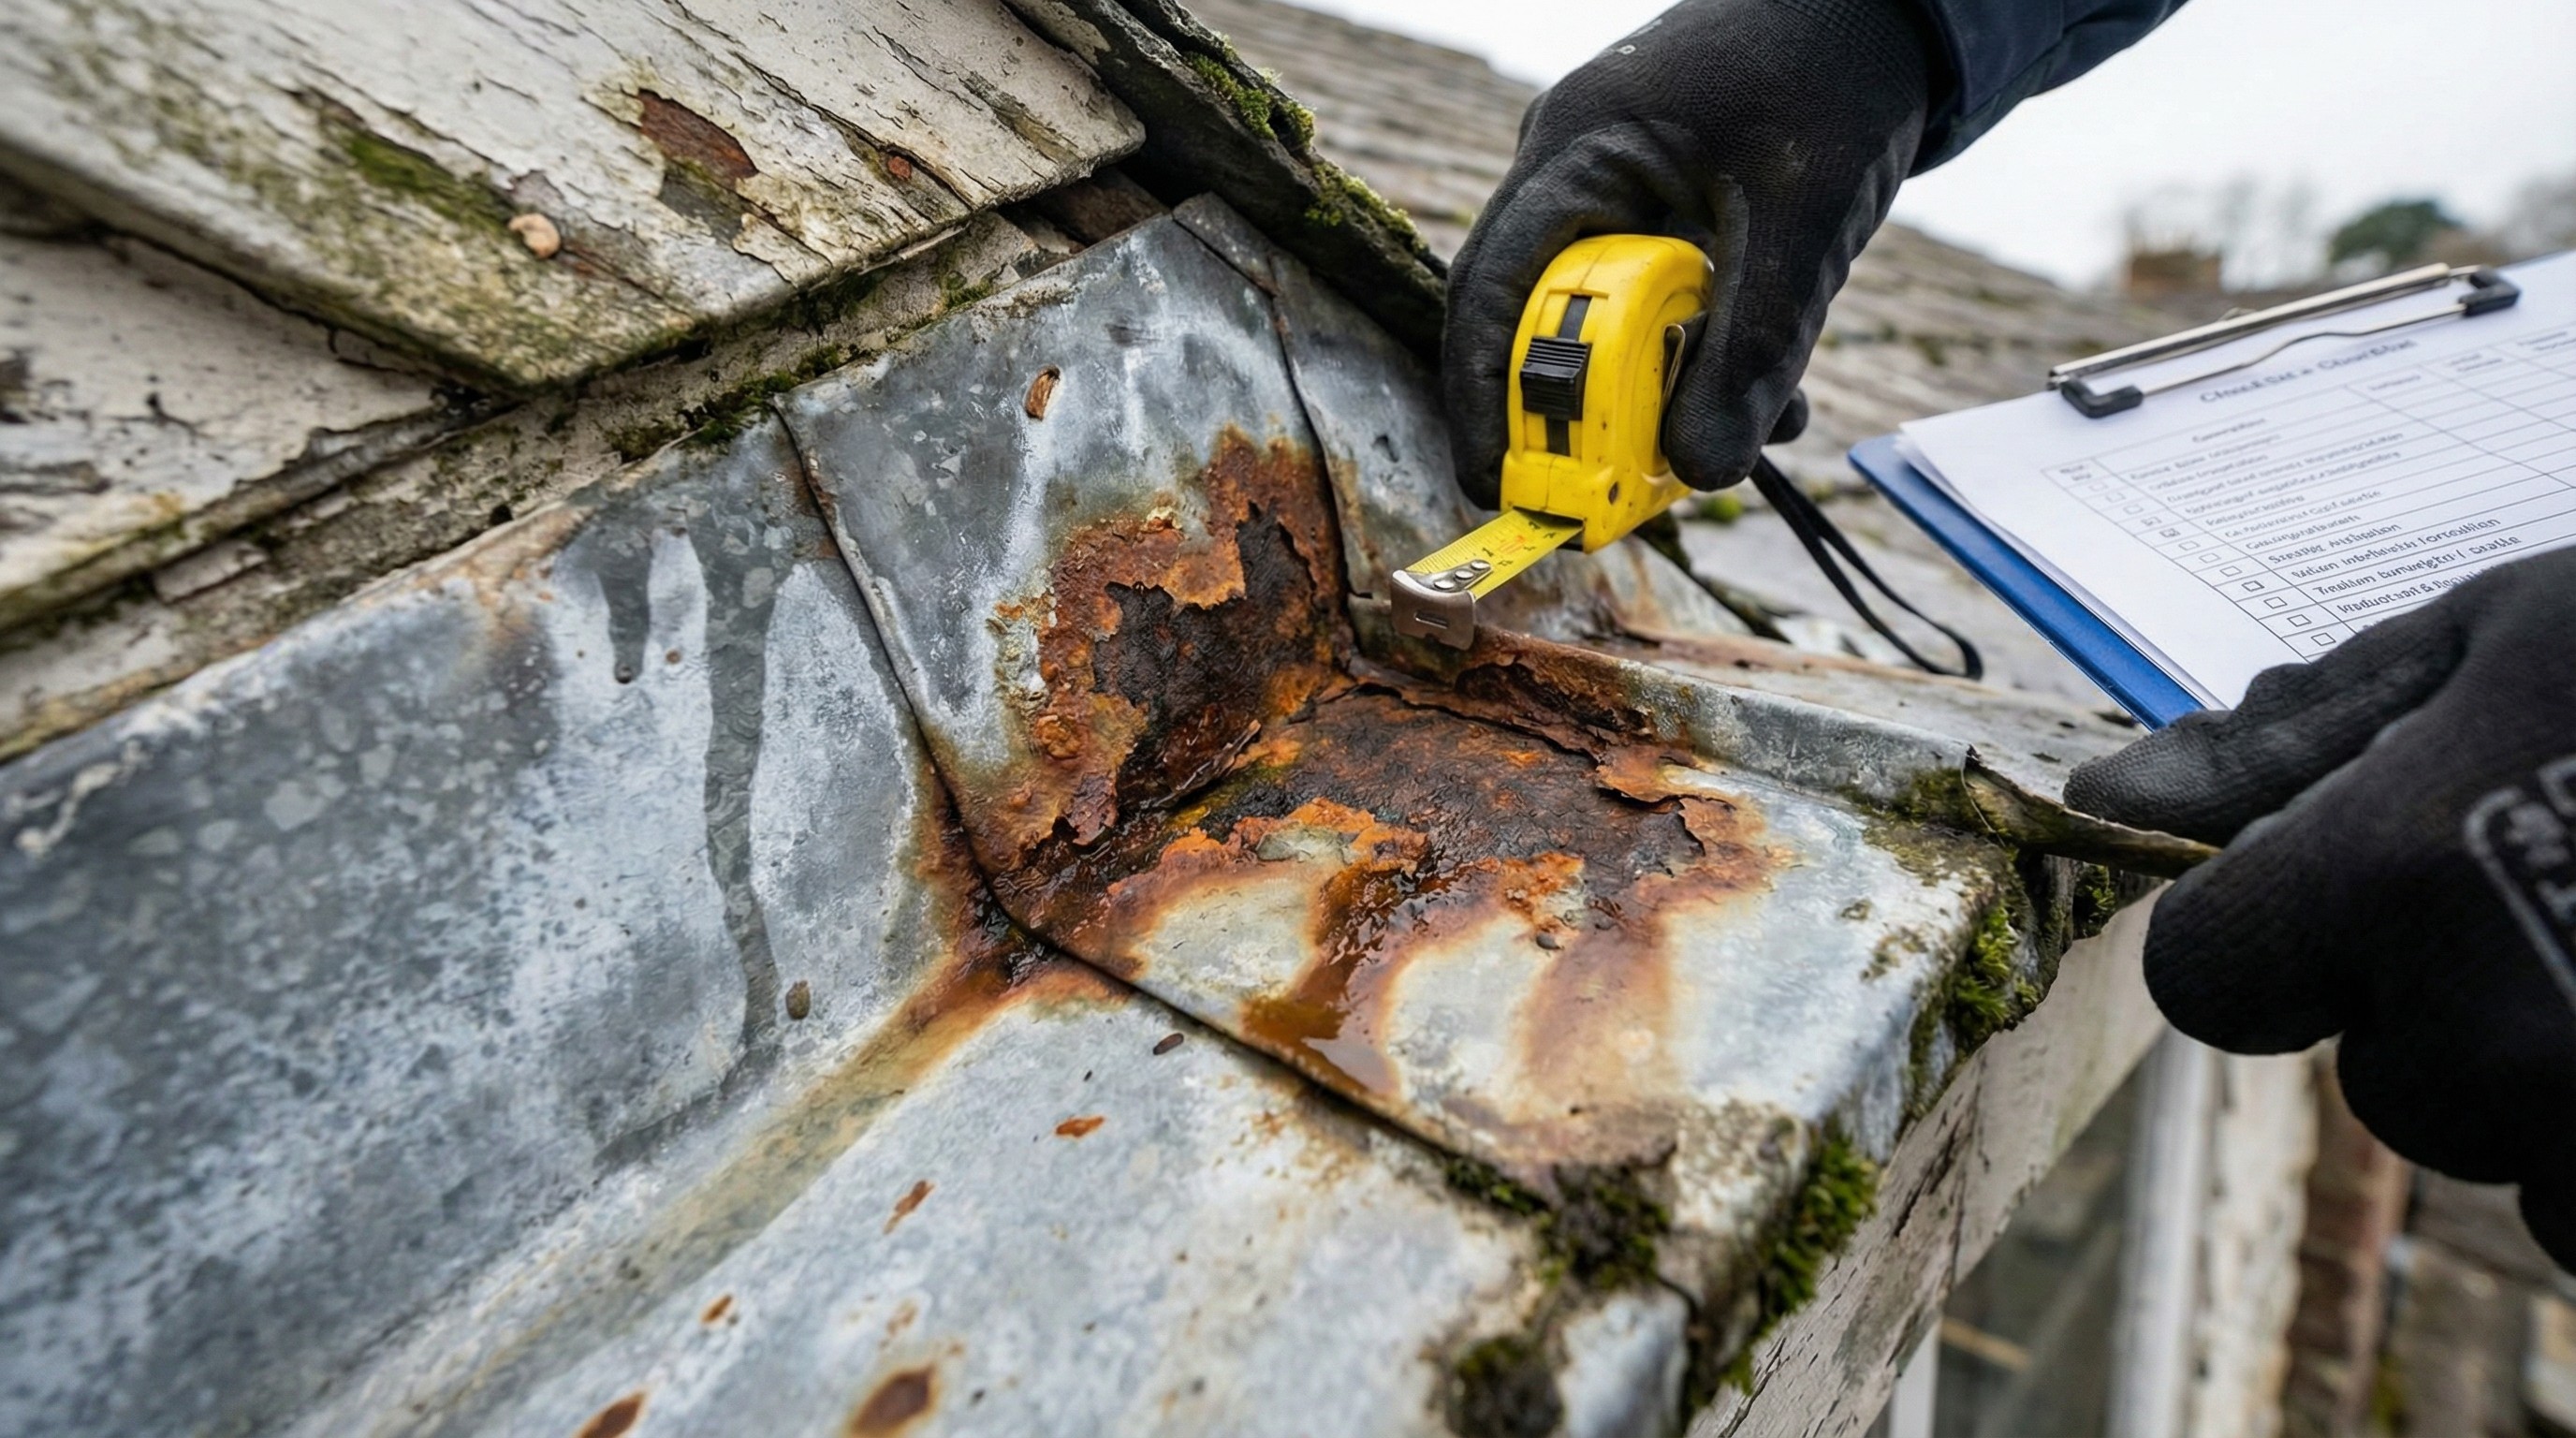
When to Replace Flashing on Your Roof
Flashing doesn't last forever. Identifying problems early helps you avoid more extensive repairs later.
Visible Rust or Corrosion on Flashing Metal
Any orange or brown discoloration on your flashing indicates rust. Rust weakens the metal and eventually creates holes. Once holes form, water gets through.
Lifted or Bent Metal Flashing
Wind, debris, or poor installation can cause flashing to pull away from the surface it's protecting. Even a small gap creates an entry point for water.
Water Stains Near Flashings on Roof
Stains on ceilings or walls near chimneys, vents, or skylights often point to flashing failure. The leak itself may be small, but water damage accumulates over time.
Cracked or Dried Sealant Around Flashing
Sealant is sometimes used to supplement flashing, but it's not a substitute for properly installed metal. When sealant cracks or dries out, it stops doing its job.
How to Evaluate Roofing Flashing in Your Quote
When comparing roofing quotes, pay attention to how flashing is described. A detailed quote typically includes:
Type of flashing specified: Lists what flashing will be installed at each location
Material included: Confirms whether flashing is aluminum, galvanized steel, or copper
New flashing or reused: Clarifies if existing flashing will be replaced or reused
Line-item pricing: Breaks out flashing costs separately from shingles and labor
Vague quotes that just say "flashing included" without details are worth questioning. You want to know what you're getting before work begins.


